Workshop 11 Notes
18 November 2008
![]()
Workshop 11 Notes
18 November 2008
Animation & Modeling with Fence Tools
TOPIC A: Animation
Note: For further animation reference materials you may want to consult the ARCH 545 website:
http://www.arch.virginia.edu/arch545/handouts.html
Part I. Animation WIth the Animation Producer Dialog Box
Animating Views and Sun
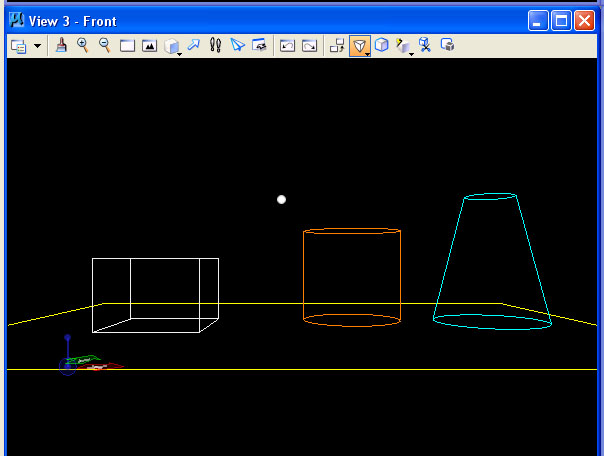
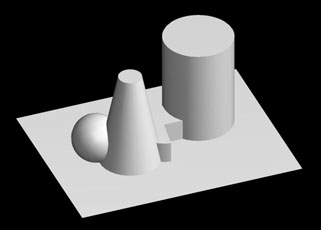
1. Construct a simple model with a surface
plane and three objects (slab, sphere and cone – from "Task List - Basic 3d" main palette)
in iso view.

2. Go to front elevation view.
3. Change to perspective (quick method from view tools icon).
(move mouse to lower left to get perspective)
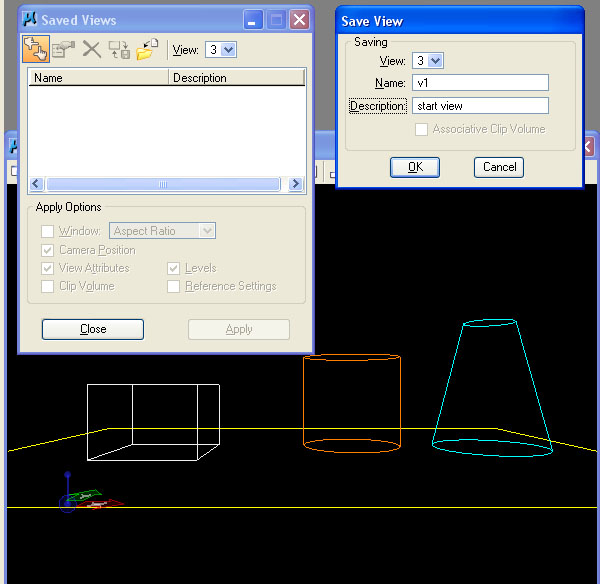
4. Begin to save views (Keep in mind that as you set up your views (keyframes)
you will be able to apply different motion descriptors: constant, accelerate,
decelerate.)
Go to: utilities/saved views
enter name (view 1: start view)
Next: rotate view slightly and zoom in slightly
Return to utilities/saved views enter name (view2: middle view)
Then: zoom view again, and save again enter name (view3: end view)
And so on for as many views you want incorporated into the animation.
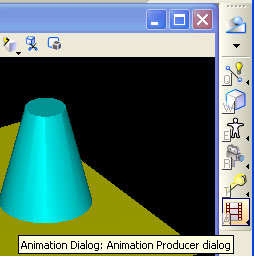
5. Once you have the saved views you desire you can begin to assemble the
views into your animation. Go to: Task List Animation. Select the animation
producer icon.
and then under tools/saved views

enter keyframes for :
settings/saved views view1 – frame 0, spline, constant
settings/saved views view2 – frame 10, spline, constant
settings/saved views view3 – frame 20, spline, constant
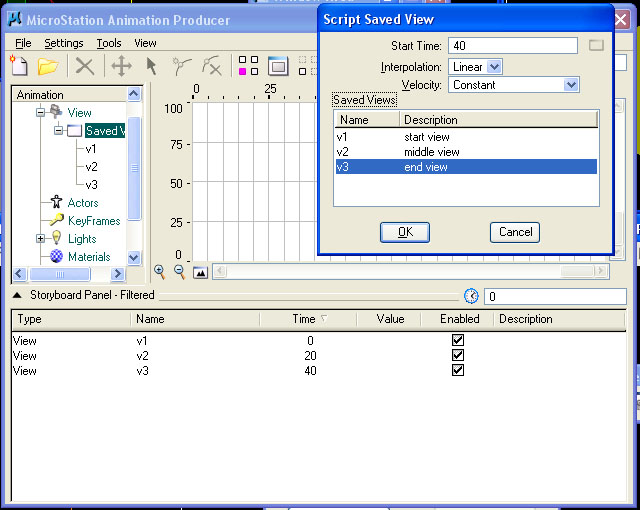
And so on for all your saved views “spline” refers to the interpolation
between your views in the model space and “constant” refers to
the velocity at which views are moved between. Both can be varied, notice the
options available.
Next, create a subdirectory on your hard drive (a folder) for stored images and the animation;
keep everything together.
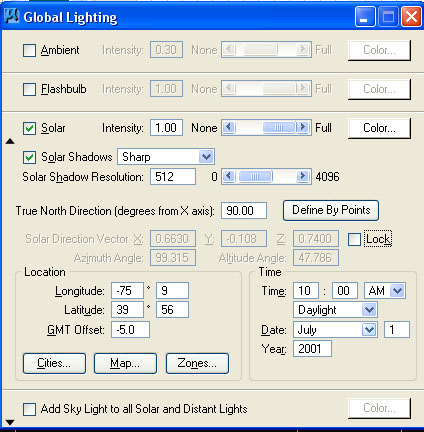
6. Go to Task List - Visualization and to global lighting to setup global lights (turn
sunslight on and make sure it isn't locked).
7. Return to animation producer dialog.
Record animation as single jpg
res. 320 x 200 (roughly for low resolution test)
raytrace – anitalias
name walk000.jpg
8. To preview your movie, goto Tools/ Preview
9. File save as options ( avi etc.)
Save to name1.avi
10. To play your movie: utilities/image/movie
11. In order to test solar conditions, in the animation producer dialog box/animation palen go to:
lights/global/solar/time, and right-click on the word "time" to select the "script" option.
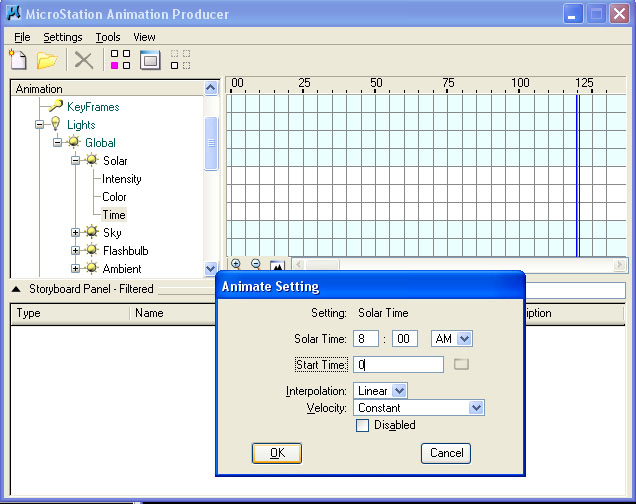
solar-time, frame 0, 8 a.m.
solar-time, frame 60, 6 p.m.
make velocity constant
12. Record animation as jpg
res. 320 x 200
raytrace – anitalias
save to name walk2.avi
13. Play move … utilities/image/movie
14. Add bspline to new layer
15. Utilities/render/flythrough (select spline/used fixed method)
Reset sunlight to mid-day for optimum lightingbox
Record directly to walk3.avi
Animating Objects
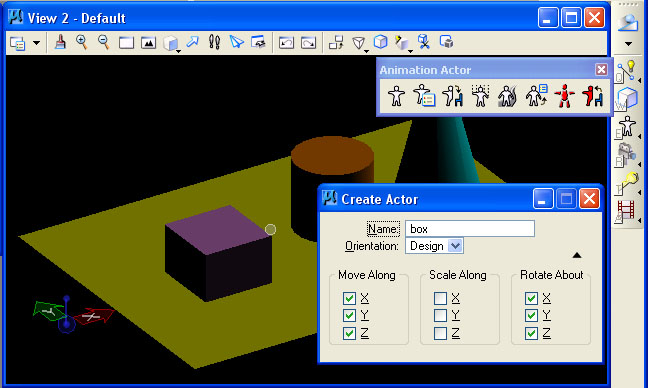
1. Go to:
Animation/actors/create actor of slab into “box” (or whatever object
you want to animate).Select the pick actors key, choose the degrees of freedom desired: select the
object with a tentative click on a known point to choose the origin of movement
and describe the movement.
2. Now keyframe the actor via Animation producer Tools/Named keyframes, one for the box on the "ground", and then, with moving the box up the z-axis using the actors mainipulation tool, a second for the box "inair"
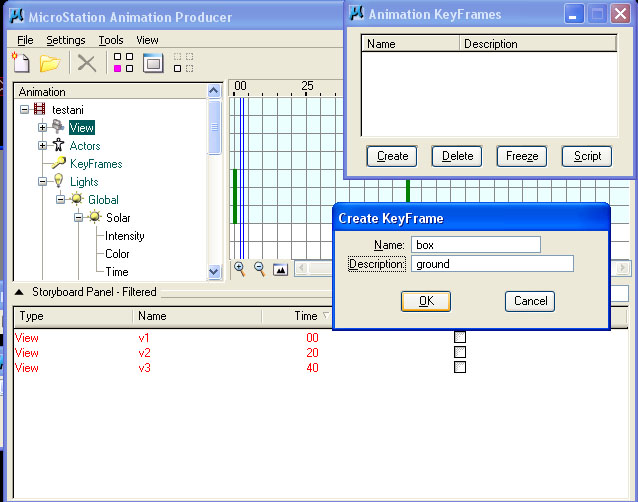
3. Select keyframes ground at frame 0, and "inair" at frame 30
disable view changes in script producer
4. record animation as jpg as before.
res. 320 x 200
raytrace – antialias
5. You can then make and select more actors (animate more objects if so desired. We
can aslso work with the cylinderusing algorithmic descriptors.
6. See Tools/parameters in animation producer dialog box, and create a variable, such as
cylinder_height with a value of 10.
The Animation Parameters dialog box is also used to edit and delete existing parameters. |
cylinder_height = 10
Script cylinder.
Z Position = cylinder_height * frame/maxFrame
record animation
res. 320 x 200
raytrace – antialias
render to jpg2
save to walk4.avi
change parameter to use both sin and absolute value functions:
Z distance – fabs(heightbox * sin(frame * 360/ maxFrame))
Additional variables
| Variable |
Description |
|---|---|
frame |
frame number |
pi |
the mathematical value, Pi, which is equal to the angle covered by one-half of a circle |
tSeconds |
elapsed time from beginning of sequence (frame 0) in seconds |
beginFrame |
beginning frame of the section currently being recorded |
endFrame |
end frame of the section currently being recorded |
minFrame |
first frame number at which action is defined (frame 0); also first frame of a preview |
maxFrame |
last frame number at which action is defined; also last frame of a preview |
beginSequence |
frame number of the start of the current script |
endSequence |
last frame number of the current script |
sequenceLength |
length of the current script in frames |
tSecondsSequence |
elapsed time (in seconds) from beginning of the current script |
Additional functions
These functions are identical to those in the standard C math library, except that all angular values are expected and returned in degrees rather than radians.
| Function |
Description |
|---|---|
radiansFromDegrees(d) |
radians from degrees |
degreesFromRadians(r) |
degrees from radians |
secondsFromFrame(f) |
seconds from frame number |
cos(angle) |
trigonometric cosine of angle |
acos(value) |
arc cosine of value |
sin(angle) |
sine of angle |
asin(value) |
arc sine of value |
atan(value) |
arc tangent of value |
atan2(valueY, valueX) |
arc tangent of valueY/valueX |
tan(angle) |
tangent of angle |
cosh(value) |
hyperbolic cosine of value |
sinh(value) |
hyperbolic sine of value |
tanh(value) |
hyperbolic tangent of value |
exp(value) |
exponential of x |
log(value) |
natural logarithm of value |
log10(value) |
base 10 logarithm of value |
pow(x,y) |
x to y power |
sqrt(value) |
square root of value |
fabs(value) |
absolute value of |
ceil(value) |
smallest integer not less than value |
floor(value) |
largest integer not greater than value |
fmod(x,y) |
floating point remainder of x/y |
rand() |
pseudo random number |
srand(x) |
set random seed |
The use of cylinder_height above is but one example of a customized animation parameter. We can paramterize objects in a way that is similar to how we used algebraic expressions within generative components.
For example, consider a custom parameter, named revolution, defined as follows:
360/maxFrame*frame
2*revolution — to rotate the actor 720°
revolution/2 — to rotate the actor 180°
Each newly defined custom parameter is stored in the active script along with the script entries themselves. You can then include this script in other scripts. Where you have commonly used parameters, you can place these in a separate DGN file and then import them as required.
6. A third method of scripting an actor: Graph it.
Make truncated cone into an actor
Key frame low and high positions.
Script low and high position using de-acceration towards later.
IOpen view/ velocity graph in animation producer window in the StoryBoard Panel
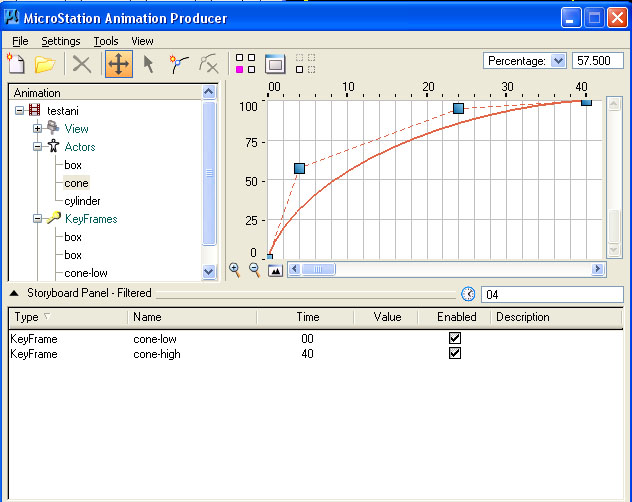
Select move points tool and select control point of velocity graph
And select “send to velocity graph”
Modify curve.
Create animation to jpg and then save through movie editor to walk5.avi.
7. Throughout, remember to to subdirectory
to keep all the rendered images of the animation together.
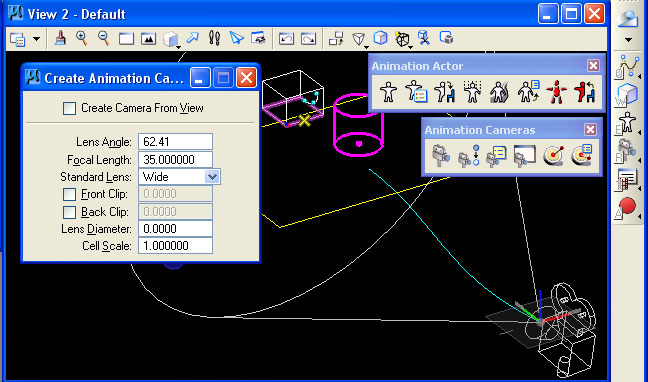
8. To move an actor or camera along a path. You first create a path, such as bspline.. You also create a camera. You then set the actor or camera in motion along the path.
9. The path can be a closed element (such as a block or circle), or an open element (such as a line, line string, curve, arc, or B-spline curve).
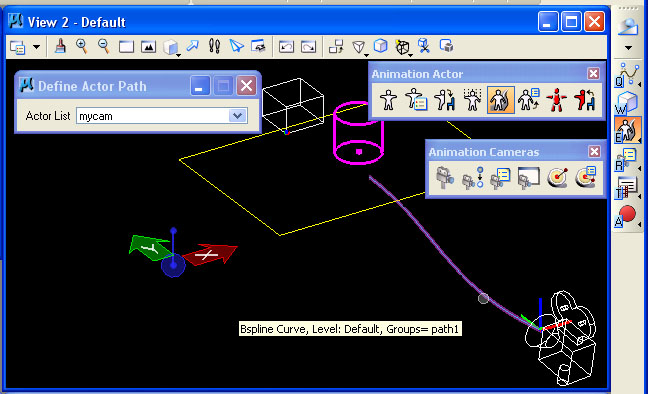
When working with this tool, you can identify the actor graphically, or you can double-click its name in the drop-down Actor List menu in the tool settings. Now, within the Animation Cameras palette, labelled "R", choose the first camera icon to create a camera pointed in the direction of the path.
The next step is to animate the camera along the path. Here, you select "Define Actor Tool" from the Animation Actor palette. When selecting the path element, if the actor is near one end of it (within 10% of the total path length) the direction of the actor is automatically calculated and the actor will animate over the entire length of the path. If, however, the closest point of the actor to the path is some distance along the path then an arrow displays to indicate the current direction. You can change the direction by moving the pointer to either side of the point on the path and entering a data point when the correct direction is displayed.
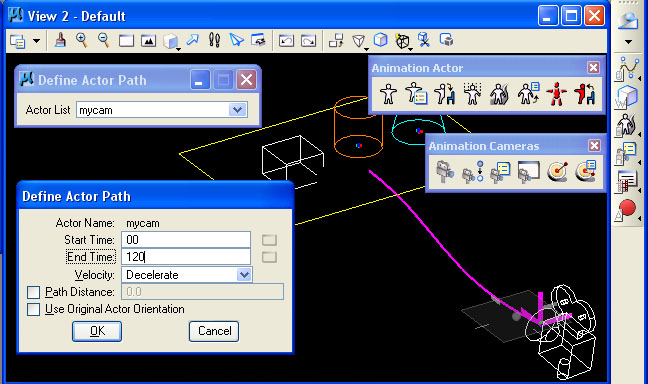
Immediately following the selection of the path and the camera, you are prompted to indicated the frame numbers, velocity and other properties of the cameras movement.
Part II: Creating Movie Files from Frames
Animations saved as AVI can be viewed though Quicktime which can be found
in Start/multimedia/quicktime.
Animations can also be compiled and saved directly through Quicktime Pro available
on public computers in the school
Part III: Animation Through Simpler One Off Options (not covered in workshop)
1. Solar Animation
1. Go to: Utilities/render/solarstudy
2. Select a start time and total time
3. Pick the number frames
4. Save (AVI 16 bit) in desired drive/directory
5. Use the above steps for viewing.
2. Fly By / Through
1. Go to a plan/top view and zoom out and create a separate level on which to place your path.
2. Use a bspline curve to set your path by drawing the curve towards your model from across the screen. Go to a side view to move the curve up in space.
3. Then:
Utilities/render/flythrough
4. Fix target position
Output view 3
Raytrace
30 frames
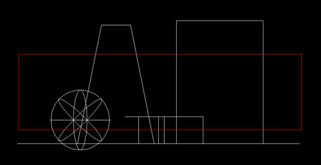
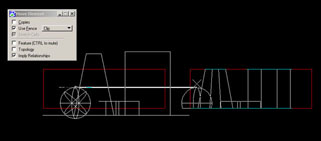
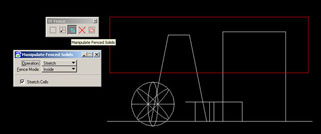
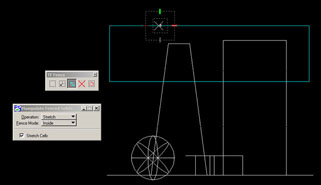
TOPIC B: Editing by Projection: Modeling With the Fence Tool
 |
 |
 |
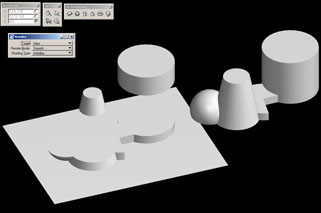 |
2. STRETCH FENCE
 |
 |