These notes introduce the use of function definitions inside of Python components within Grasshopper.
1. Python Libraries Continued
Rhino graphic libraries used in the examples are:
Rhino Common Libary - library functions for Rhino Python, most of which are also available to the Python scripting component within Grasshopper. This library is referred to as "Rhino" in the examples we will cover in the workshop notes.
Rhino Script Syntax Library - library functions
for Rhino Python, most of which are also availble to the Python
scripting component within Grasshopper. This library is referred to
as "rhinoscriptsyntax" in the examples we will cover in the workshop notes.
Note for now that the Rhino Common Library has geometry elements with a data structure that is the same as the entities created directly in with direct Rhino comands. However the Rhino Script Syntax Libary has geometry has elements that contain an alternative data structure that is optimized for scripting in inside Python. These "rhinoscriptsyntax" elements are converted to direct Rhino entities if output from Python to Rhino. This distinction between the two libraries will be clarified in the example here.
In genearl number of function libraries have been created for Grasshopper to generate geometry and handle other requirements. The current listing of functions and related examples can be found in the web site: http://wiki.mcneel.com/developer/python
2. Stair Run
This example is based upon a function that draws a stair according to a vector direction and specification for the number of steps, as well as riser, tread and width dimensions for each step.
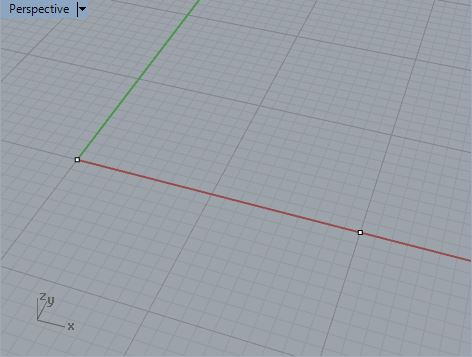
1. Begin by placing two points along the X-Axis at 0,0,0 and 0,2,0.
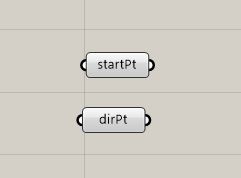
2. Enter Grasshopper and create two point parameters to correspond to the points in Rhino using the methods of workshop notes 9. Relabel the points "startPt" and "dirPt" respectively.
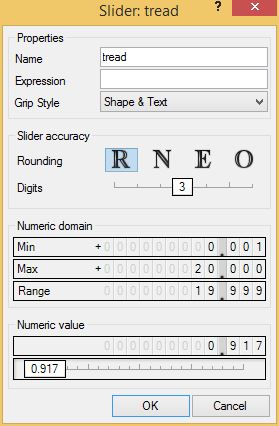
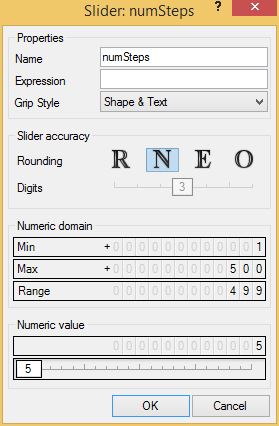
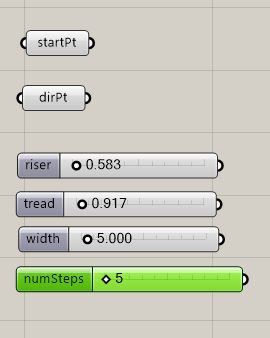
3. Next using the Number Slider component, create the following variables:
| Slider Name | Type Number | Range | Current Value |
| riser | float | 0.001 to 20.0 | 0.583 (or 7 / 12) |
| tread | float | 0.001 to 20.0 | 0.917 (or 11/12) |
| width | float | 0.001 to 100 | 5.0 |
| numSteps | int | 1 to 100 | 5 |
 |  |  |  |
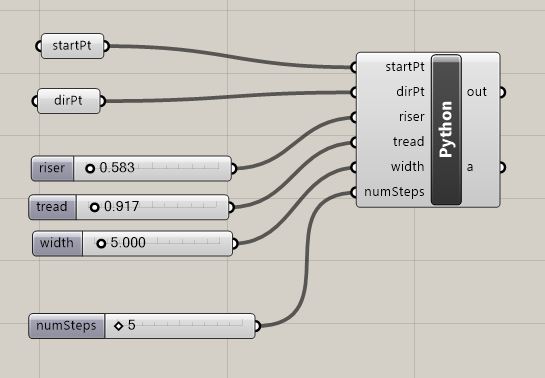
4. Now within the "Math' tab of Grasshopper, place a Python script in the in canvas window and create six inputs as as follows setting the "type" to correspond to the six parameters above consisting of two 3D points, three floating point variables, and one integer vaiable.
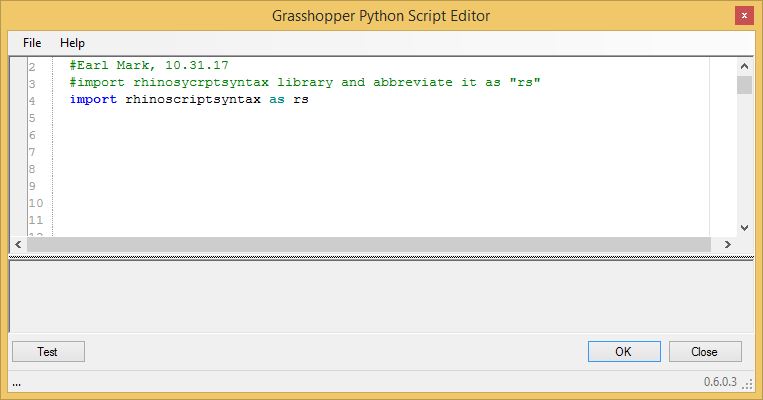
4. For initiating the script the next task will be to import the "rhinoscriptsyntax" library to have access for Rhino entity creation function. Also, here comment lines are preceded with the automatically colored # symbol and are used to annotate the purpose of the script and to provide any documentation that seems appropriate to the script maker for sharing it with other programmers or simply as personal notes for recalling the intentions of key lines later on.( In this example, the notes are slightly more verbose than probably typical.)
5. We will develop the script incrementally with by writing several internal functions beginning with the key word "def" for define function and test them as we go along. First, we can begin by writing a script that draws a single box and that is based upon the rhinoscryptsyntax "AddBox" function. The
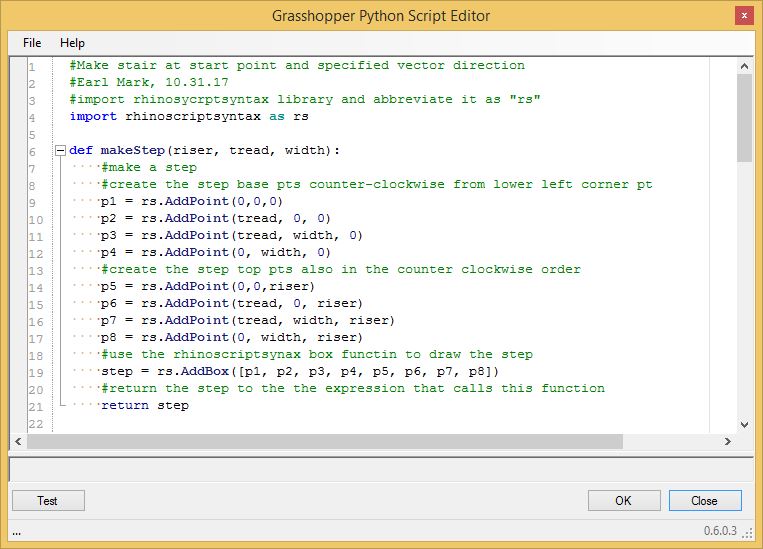
6. Note that the box is assigned to the variable "step" in line 19 above, and that "step" is in turn returned (output) from the function in line 21.
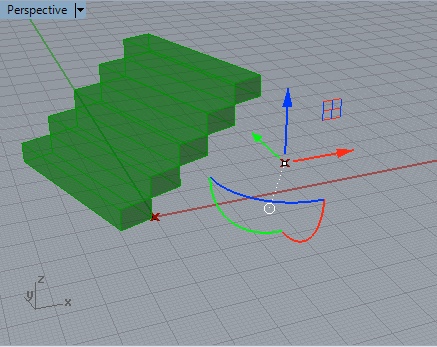
7. To test, the function, we add two more lines to the script. The comment line #main indicates where the script in a sense begins. That is, line 24 "a = makeStep(riser, tread, width") callls the makeStep function and assigns the returned "step" to the default output vaiable "a". This output in turns generates a temporary representation of the Step within the Rhino perspective window.
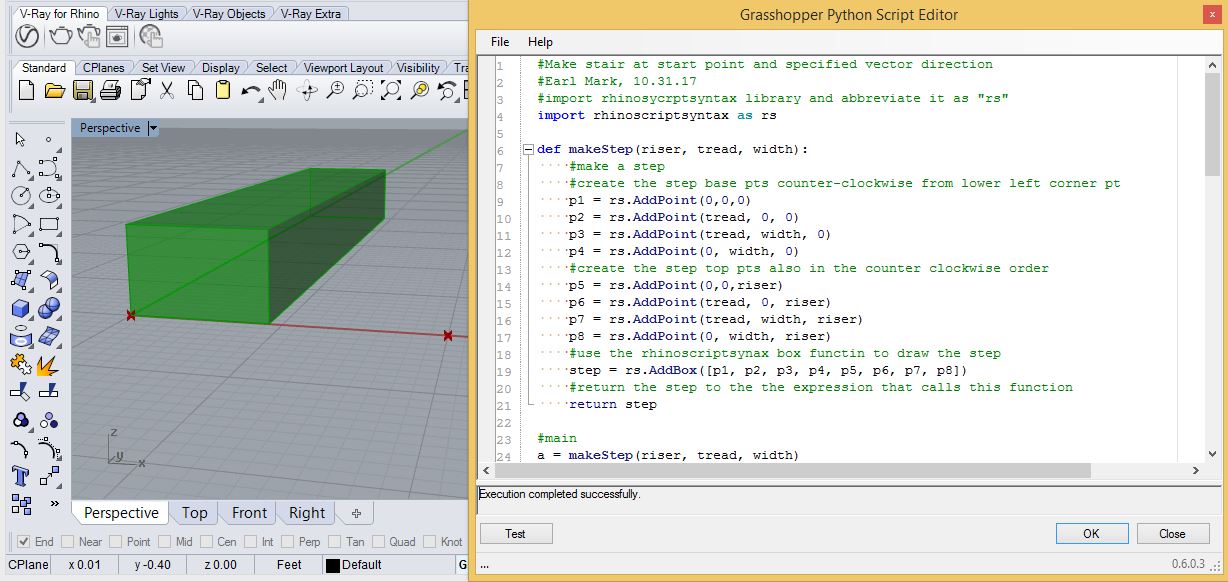
The output variable "a'' by default is included on the right-hand side when first adding the Python script component into the canvas window (see step 4 above).

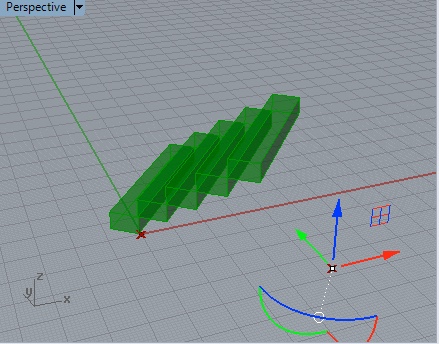
8. Having established a single step component, the next phase of writingthe script continues with creating a second function to draw a run of steps at the origin of the XY plane. Below the function "makeRun" has four arguments and includes a "while" loop.
Some key parts of the function are as follows.
Line 25 establishes a counter variable "numStep" to track what step we've created. Line 26 establishes a list variable named "steps" with the fist element in the list named "step" already included inside square brackets.
Lines 28 through 31 initiate a vector moving diagonally up the steps according to the riser and tread dimensions of the first step.
Lines 33 though 37 establish the basis for the while loop which stops when the number of steps we've illustrated (the value of "numStep") exceeds the value of "numSteps - 1". In particular, line 34 copies the existing last step created and assigns it to the variable "nextStep" while translating it up the stair the diagonal distance of just one step upward. The new step is appended to the list of "steps". However, the "nextStep" becomes the "curStep" so that it in turn is used in tern as the basis for the generating the next "nextStep" up the stair.
Note that line 42 assigned the output of the "makeRun" function to the output variable "a".

9.
This last part of the script involves a bit more complex
vector use and depends upon the cross-product function.
Alternatively it coulld be achieved by outputting the stairs from part
8 back into Rhino and using regular Rhino tools to move and rotate the
stairs into their final position. Alternatively
it could also be achieved by outputting the
stairs into more standard Grasshopper components that would handle
translation and rotation. Here, however, is a more complete way to
address the final relocation and rotation of the stairs through vector
algebra inside of Python. This part is therefore somewhat
optional and for those of you more comfortable with the math.
Note that we need to use cross-products to determine whether the rotation angle for the steps is counter-clockwise (positive) in the XY Plane relative to the X-Axis, or counter-clockwise (negative) in the XY Plane relative to the X-Aixs.
 |
 |
| Postive Rotatation - Counter-Clockwise relative to the X-Axis | Negative Rotatation - Clockwise relative to the X-Axis |
To complete the script, we need to add a function "rotateSteps" that 1) tanslates the stair in the XY plane so that it begins at the location determined by "startPt. and so that2) rotates the steps around "startPt" in the XY plane according to the direction determined by the angle of the vector from "startPt" to "dirPt" to the x-Axis.
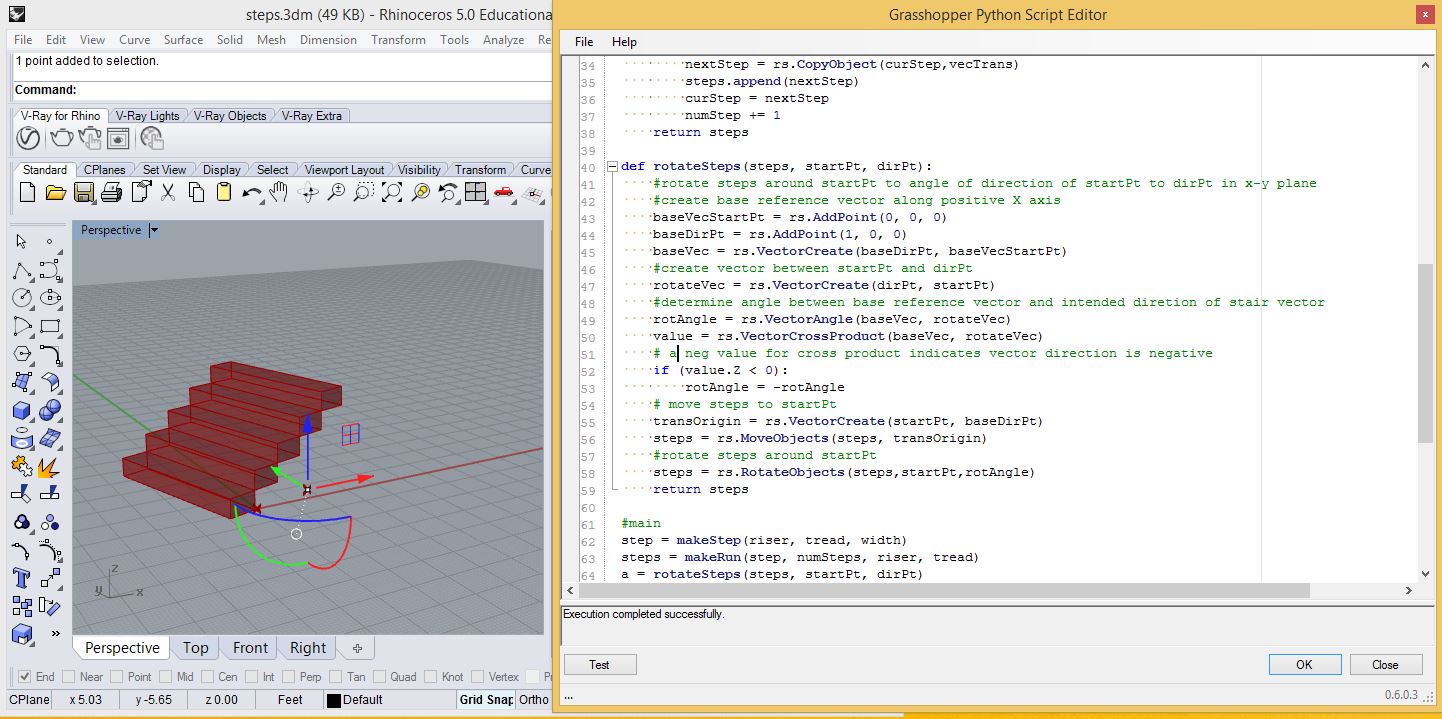
Within this function, we determine a vector "baseVec" that runs parallel to the X-axis in lines 43 through 45. We then determine a vector "rotateVec" based upon the angle between "startPt" and "ptDir" in line 47.
Next. we establish the value for the angle "rotAngle" in line 49 between the two vectors by using the function "rs.VectorAngle(baseVec, rotateVec)" and assigning it to the variable "rotAngle".
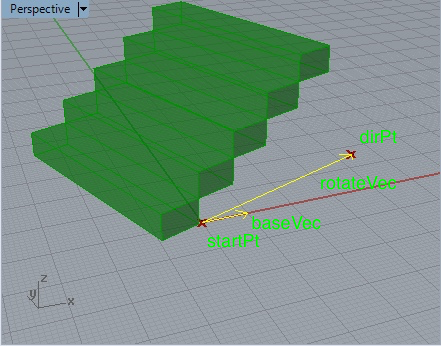
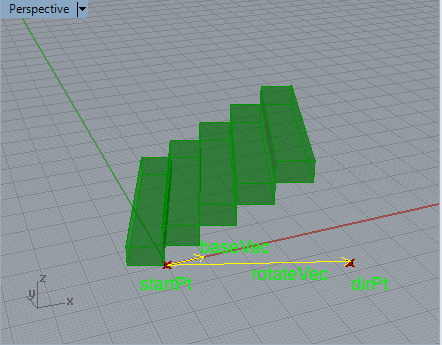
However, the function "rs. rotAngle" angle in line 49 above simply returns smallest positive angle between the vectors "baseVec" and rotateVec", but doesn't indicate if the angle moves in the counter-clockwise (positive) in the XY Plane relative to the X-Axis, or in the counter-clockwise (negative) in the XY Plane relative to the X-Axis. For example in the image below:
baseVec is the vector running along the positive X-Axis from 0,0,0, to 1,0,0 (the shorter vector)
rotateVec is the vetor running from startPt to dirPt. (the longer vector)
 |
 |
| Postive Rotation - Counter-Clockwise relative to the X-Axis | Negative Rotation - Clockwise relative to the X-Axis |
For example, lets say that the angular difference in the left-hand image above in the counter-clockwise direction on the X_Y plane (postive direction) is 33 degrees, then the function would return the value of 33 since the counter-clockwise direction would be the minimal angular difference between baseVec and rotateVec. However, similarly, lets say that the angular difference in the image bove in the clockwise direction on the X_Y plane (negative direction) is -33 degrees, then the function would return the value of 33 since again the counter-clockwise direction would be the minimal angular difference between baseVec and rotateVec.
Thus, to determine if this value is positive or negative, we use a vector algebra math calculation known as the "cross-product" of a vector running along the X-Axis with the vector running from originPt to dirPt..
 |
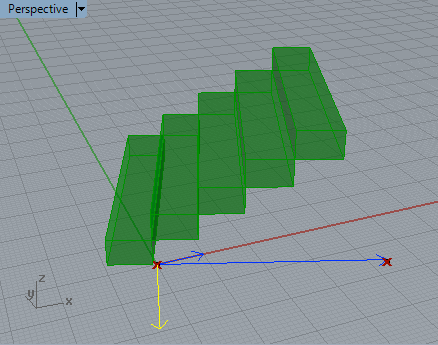 |
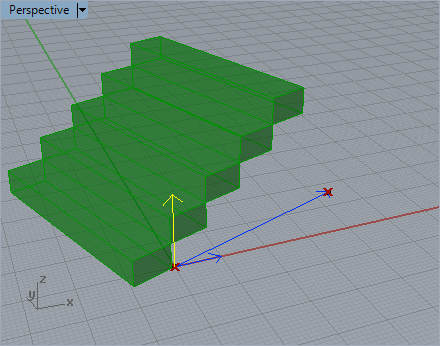
| Postive Cross-Product highlighted in yellow. | Negative Cross-Product highlighted in yellow. |
More specifically, if the cross-product of the "baseVec" over the "rotateVect" result is positive, then we know that the value is in the postive rotation direction. Or if the cross-product of the "baseVec" over the "rotateVect" is the negative, then we know that the value is in the negative rotation direction. A more complete mathematical explanaton of cross-products is beyond the scope of these workshop notes. However, the "cross product" is visuallly analagous to the so-called "right-hand rule (link to Wiki page)".
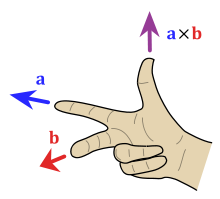
If the "baseVec" is the index finger on a person's right hand and the "rotateVector" is the middle finger on a person's right hand, then the thumb finger will point in the direction of the cross-product. In the case of the stairs rotated counter-clockwise on the X-Y plane, the thump points up in the direction of positive "Z" and therefore the rotation is positive or in other words it is counter-clockwise in the X-Y plane. And, if the thumb points down in the direction of negative "Z", then the rotation is negative or in other words it is clockwise in the X-Y plane. See the "right-hand rule" link for an illustrated explanation of the right-hand rule.
Thus in line 53 and 53 we test to see if value of the cross-product is negative, and if so, we change the sign of the rotation angle to a negative angle.
At the end of the function, in lines 54 and 55 we create a vector named "transOrig" to move the stairs from its temporary location at 0,0,0 in the X-Y plane to the location of startPt. And in line 58 we rotate the stairs around the startPt.
Finally, note that in line 62 that the stairs generated by the function "makeRun" are assigned to the variable "steps". In turn, in line 63 we pass the "steps" onto the function "rotateSteps" and assign the output (i.e., the rotated steps) to the output variable "a'".