COMPUTER
AIDED
ARCHITECTURAL DESIGN
Workshop 18 Notes,
Week of December 1, 2024
NOTE: This set of workshop notes provides a streamlined V-Ray sunlight study through Grasshopper that handles rendering more directly in Rhino without having to reference all geometry inside of Grasshopper. It includes methods to animate sunlight movement as well as moving objects That is, you can animate any objects that you selectively reference inside the Grasshopper environment.
We begin with a V-Ray Grasshopper-based animation file featuring a moving car converted from a sketchup file to a proxy file through Rhino. Next, we incorporate sun movement using Rhino Grasshopper's built-in components to simulate sunlight based on latitude, longitude, and time. The sunlight animation procedure can be applied to any Rhino file configured for V-Ray without requiring geometry to be imported into the Grasshopper environment. Alternatively, the workflow can be adapted to include some geometry in Grasshopper, offering advantages such as object animation. In this example, we add the example of converting a Sketchup file to a proxy file. However, that portion of the this tutorial can be simplied by using a non-proxy object such as already illustrated Workshop Notes 11. Thee notes therefore require more steps to manage the results. Workshop 20 Notes describe the simpler approach and is recommended over this more complex process.
The complete animation video is provided at the end of these notes. This guide focuses on sunlight animation tools that enable rendering for specific time frames, latitudes, and longitudes. Rather than detailing every technical aspect of this example, the intent is to provide a pre-configured Grasshopper file with minimal explanation to facilitate quick setup and animation creation. The notes are divided into three sections:
Part I: Preview of the example Grasshopper file.
Part II: Overview of the Grasshopper canvas layout.
Part III: The rendered animation.
The complete Grasshopper script and a demonstration Rhino file are available in the CLASSES folder for ARCH 2710 under the "examples" sub-folder named "sunStudyCarMoving".
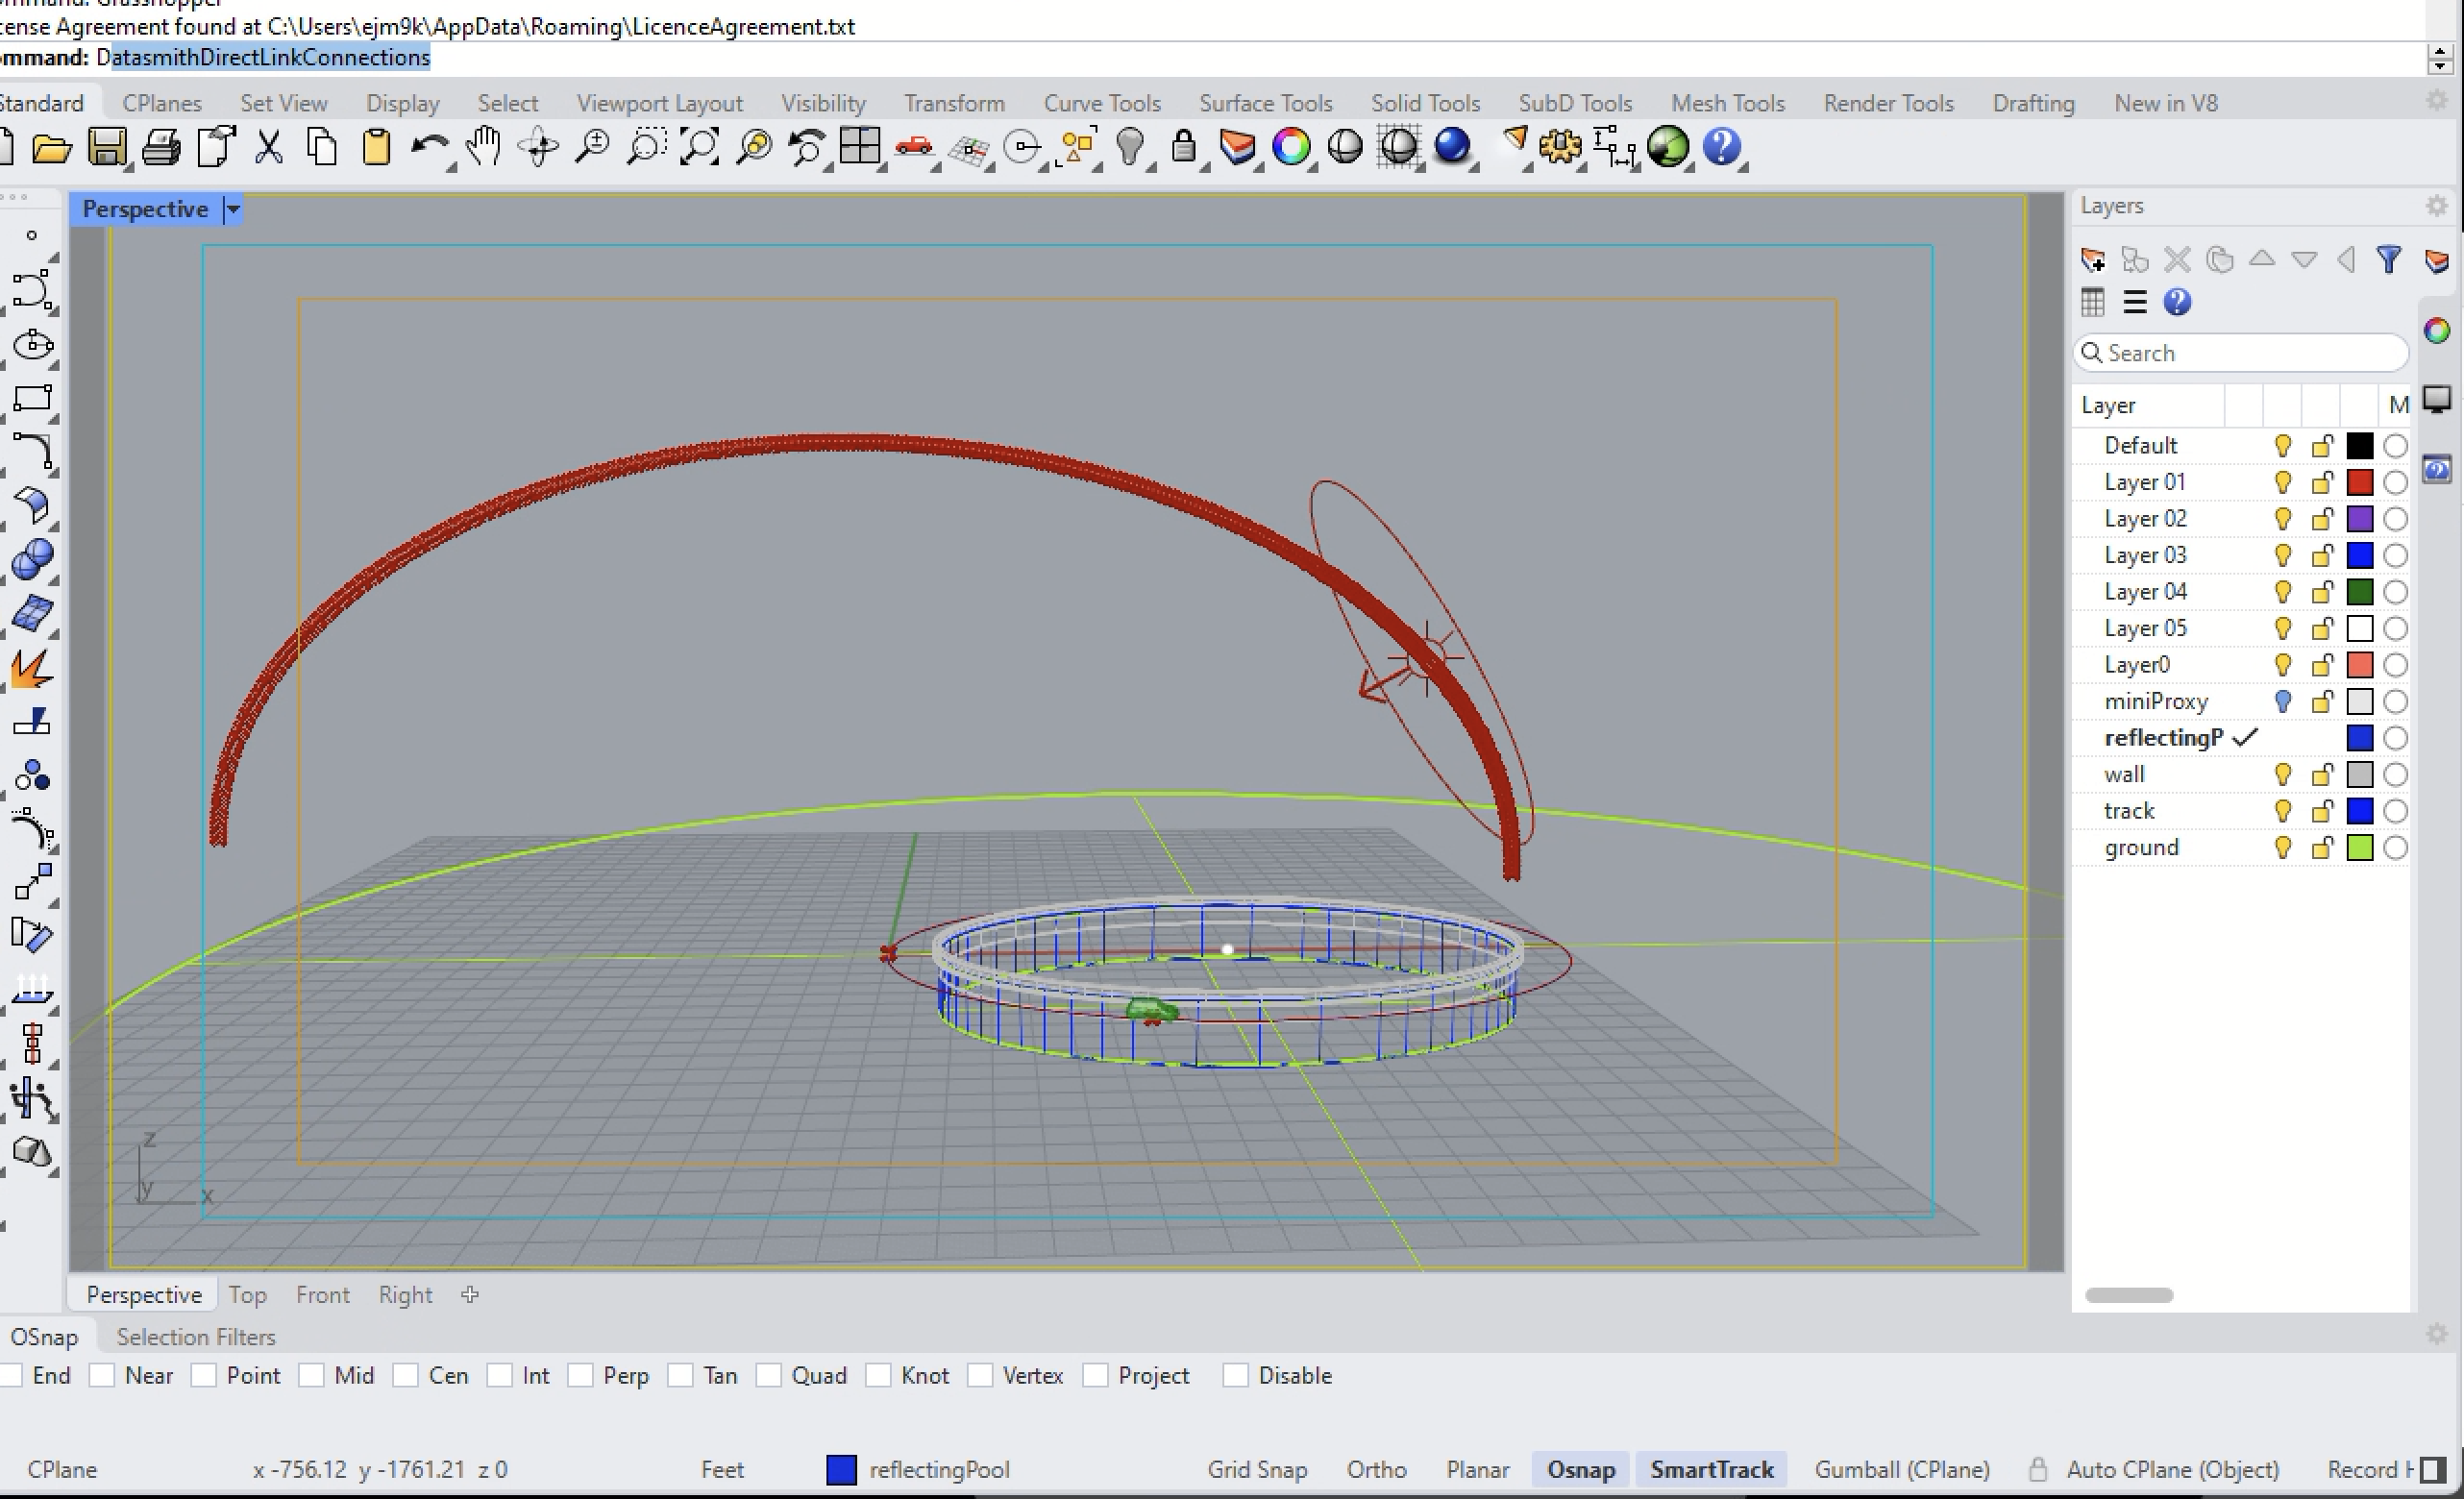
1. Open the Rhino file sunStudyCarMoving.3dm and then open the perspective view. The tightly spaced sun positions form the ring over the model. The current sun position is highlighted with a larger sun symbol in the ring. The ground plane is a circular surface. At the center of the model is a reflecting pool. A car highlighted highted in green travels around the pool
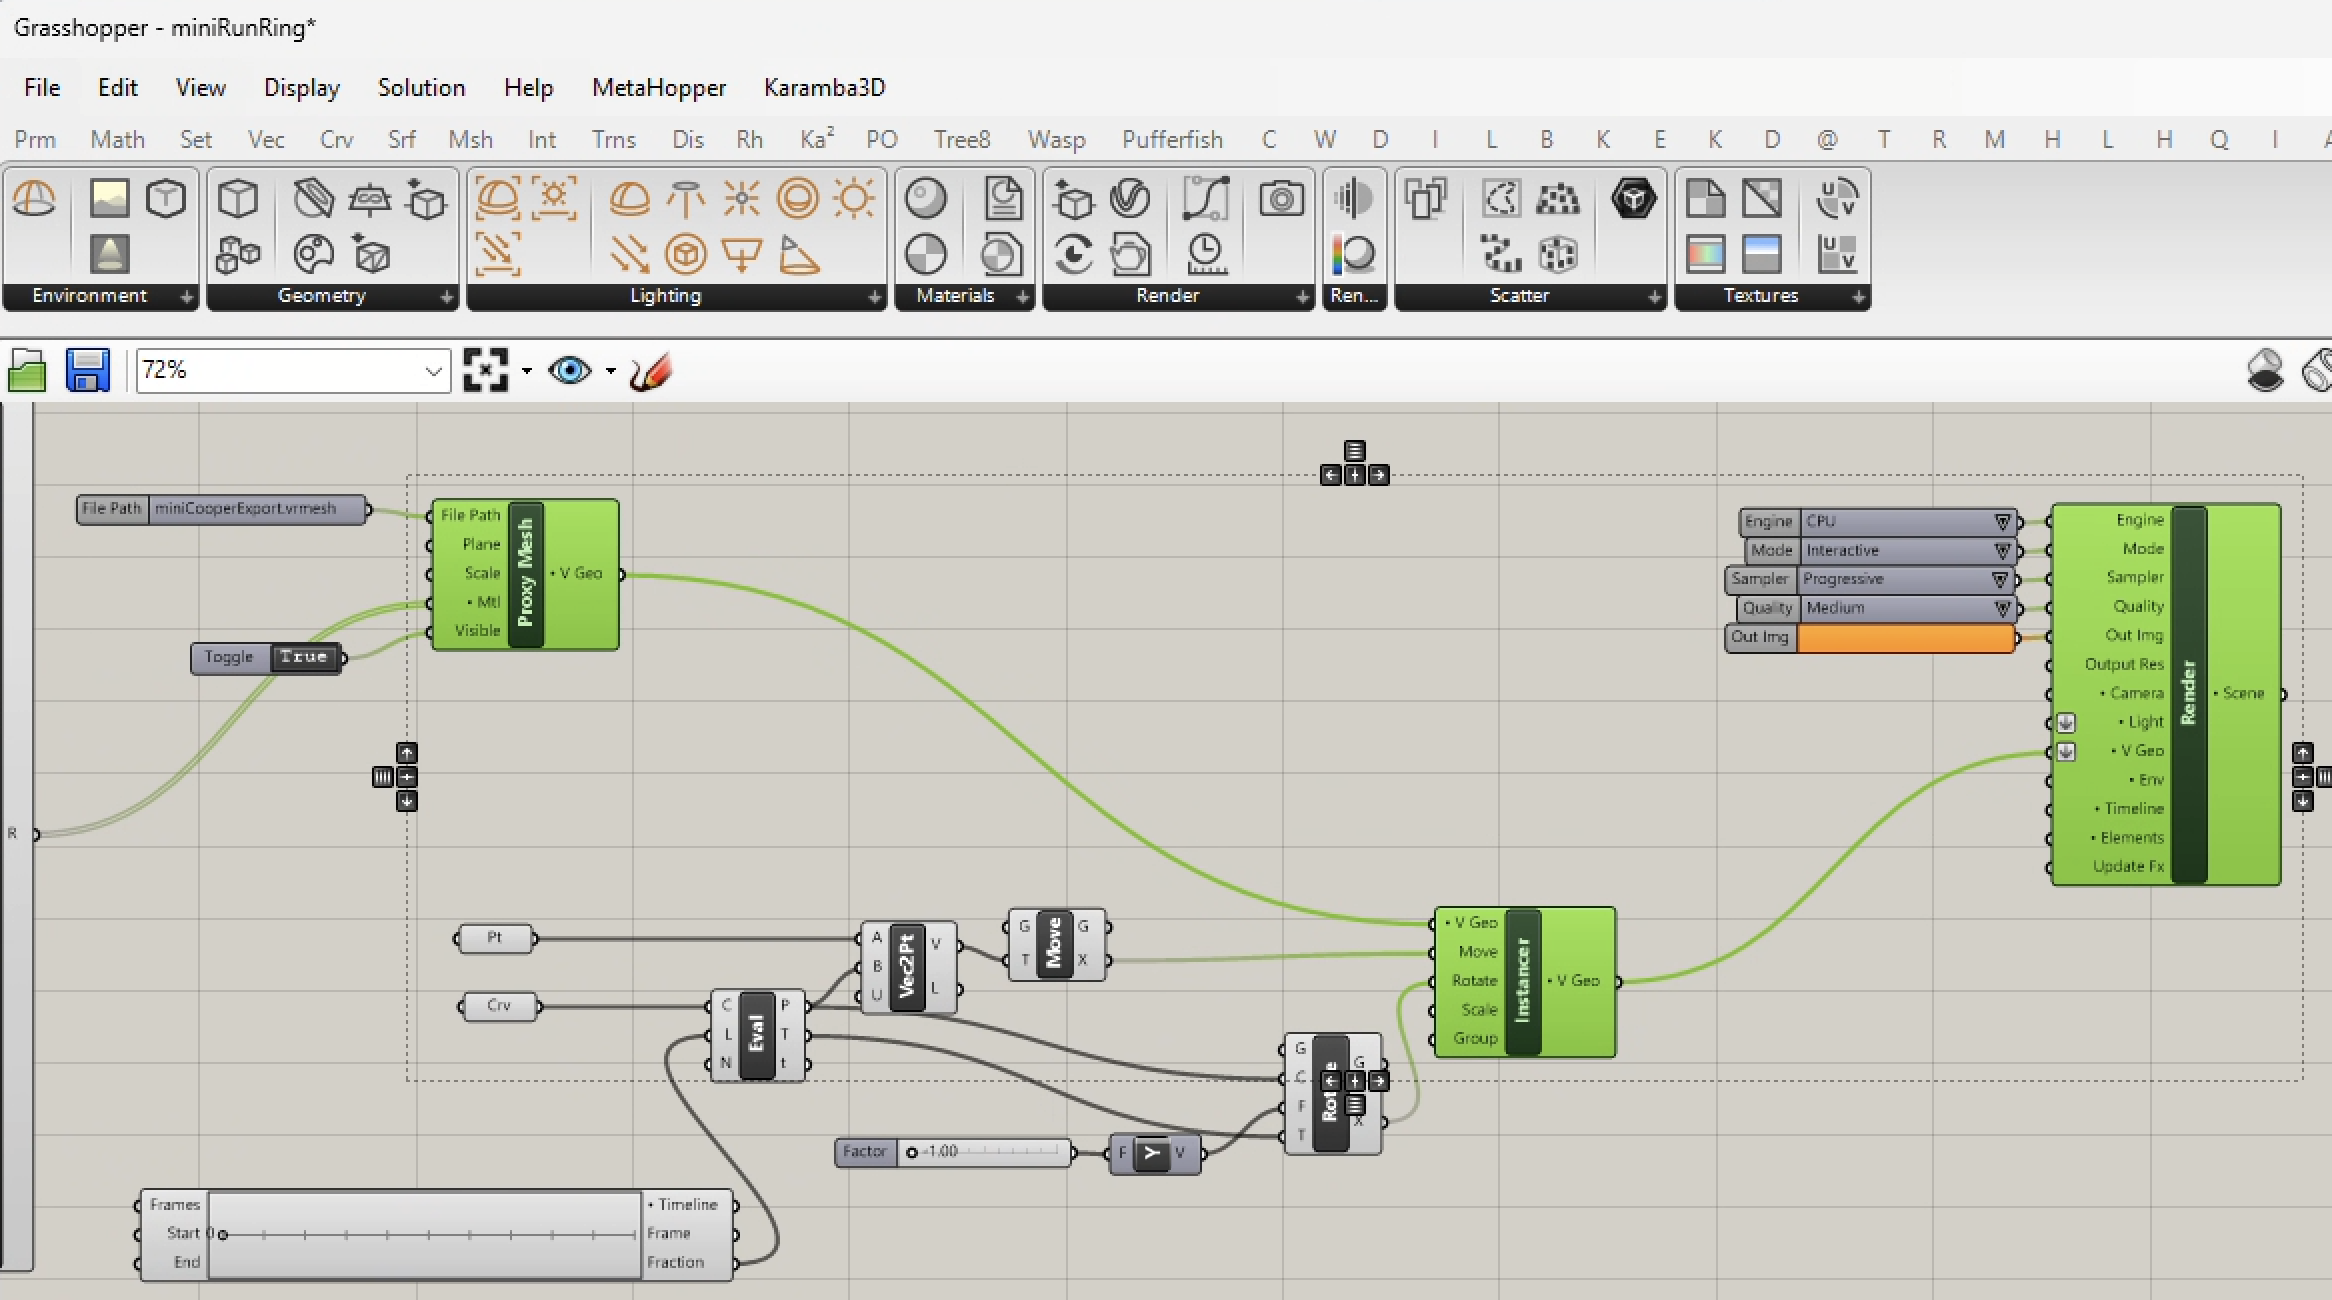
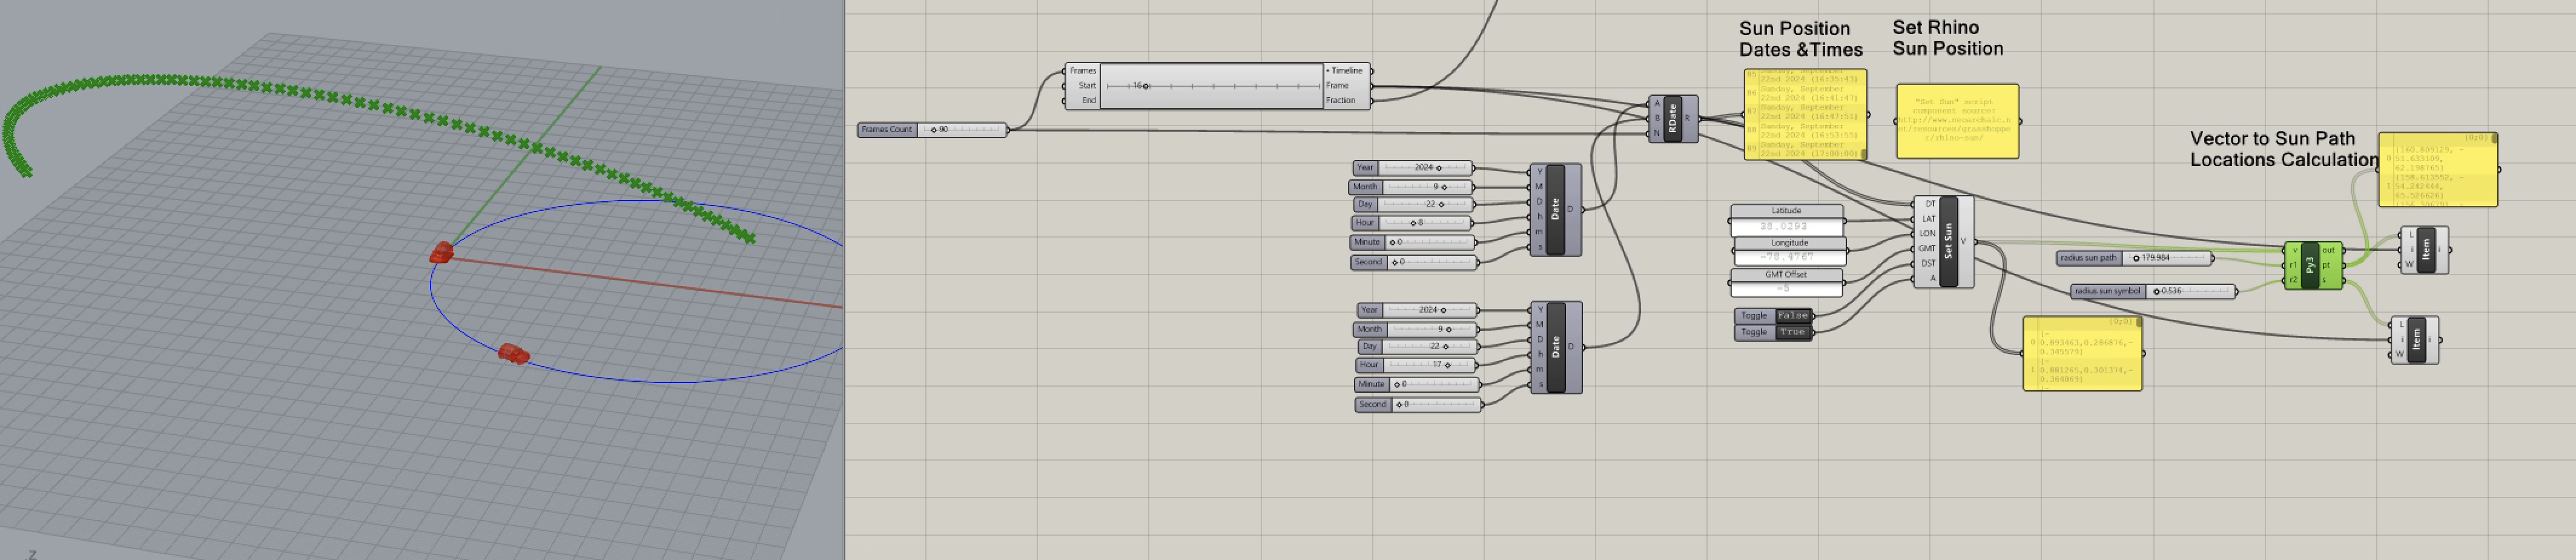
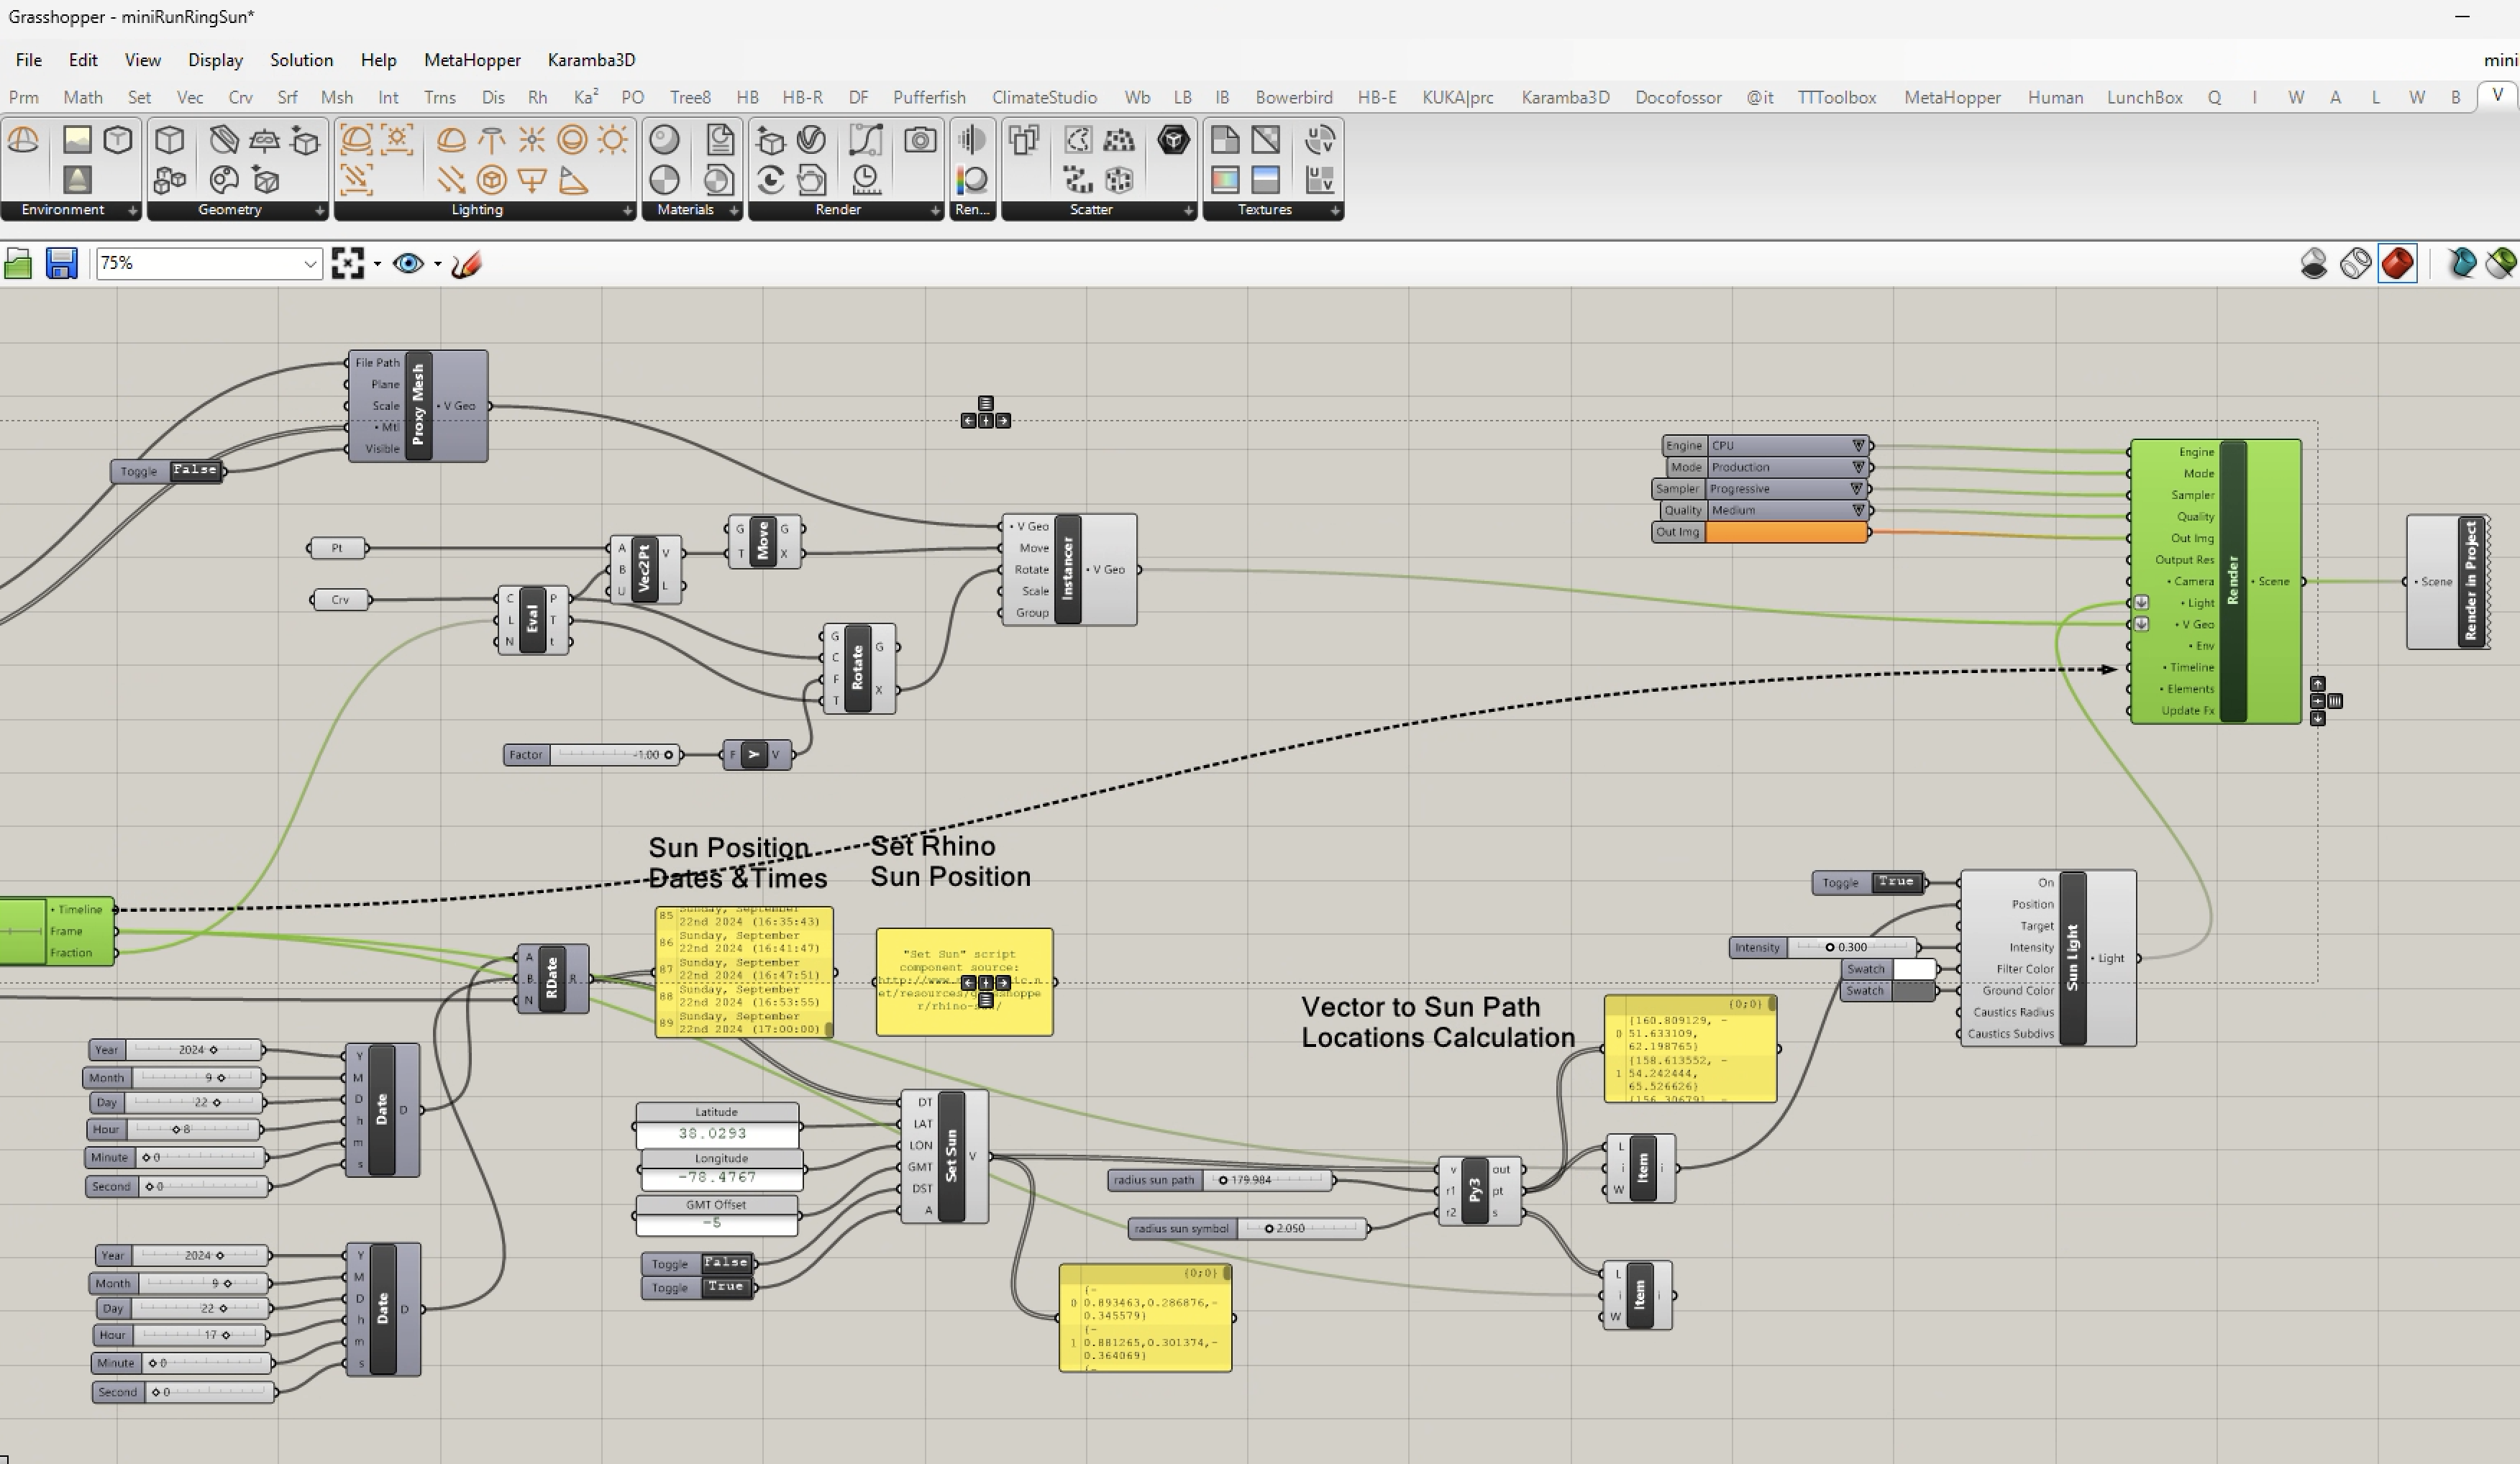
2. Next, open up the grasshopper script "miniRunRingSun.gh" for an overview of the completed script. Left-mouse-button click on the script for a full resolution view (warning: It is greatly magnified).

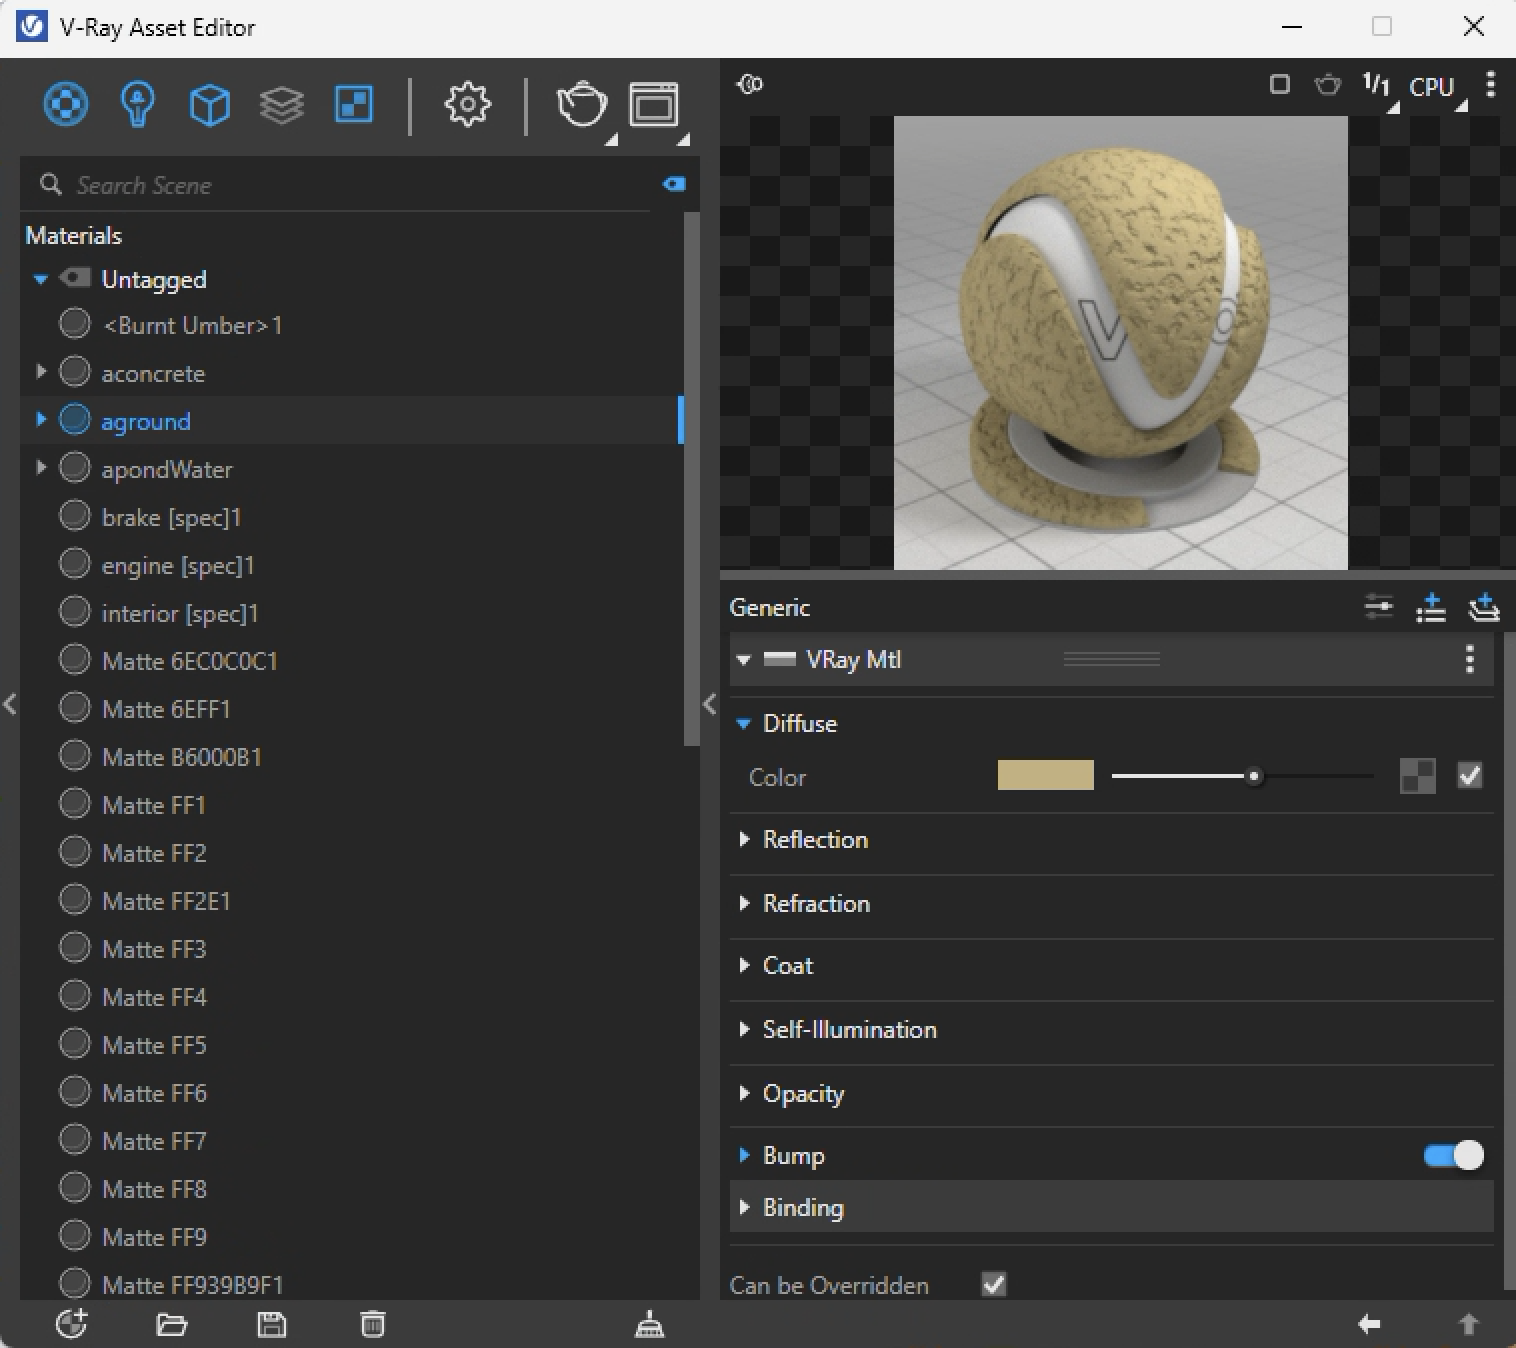
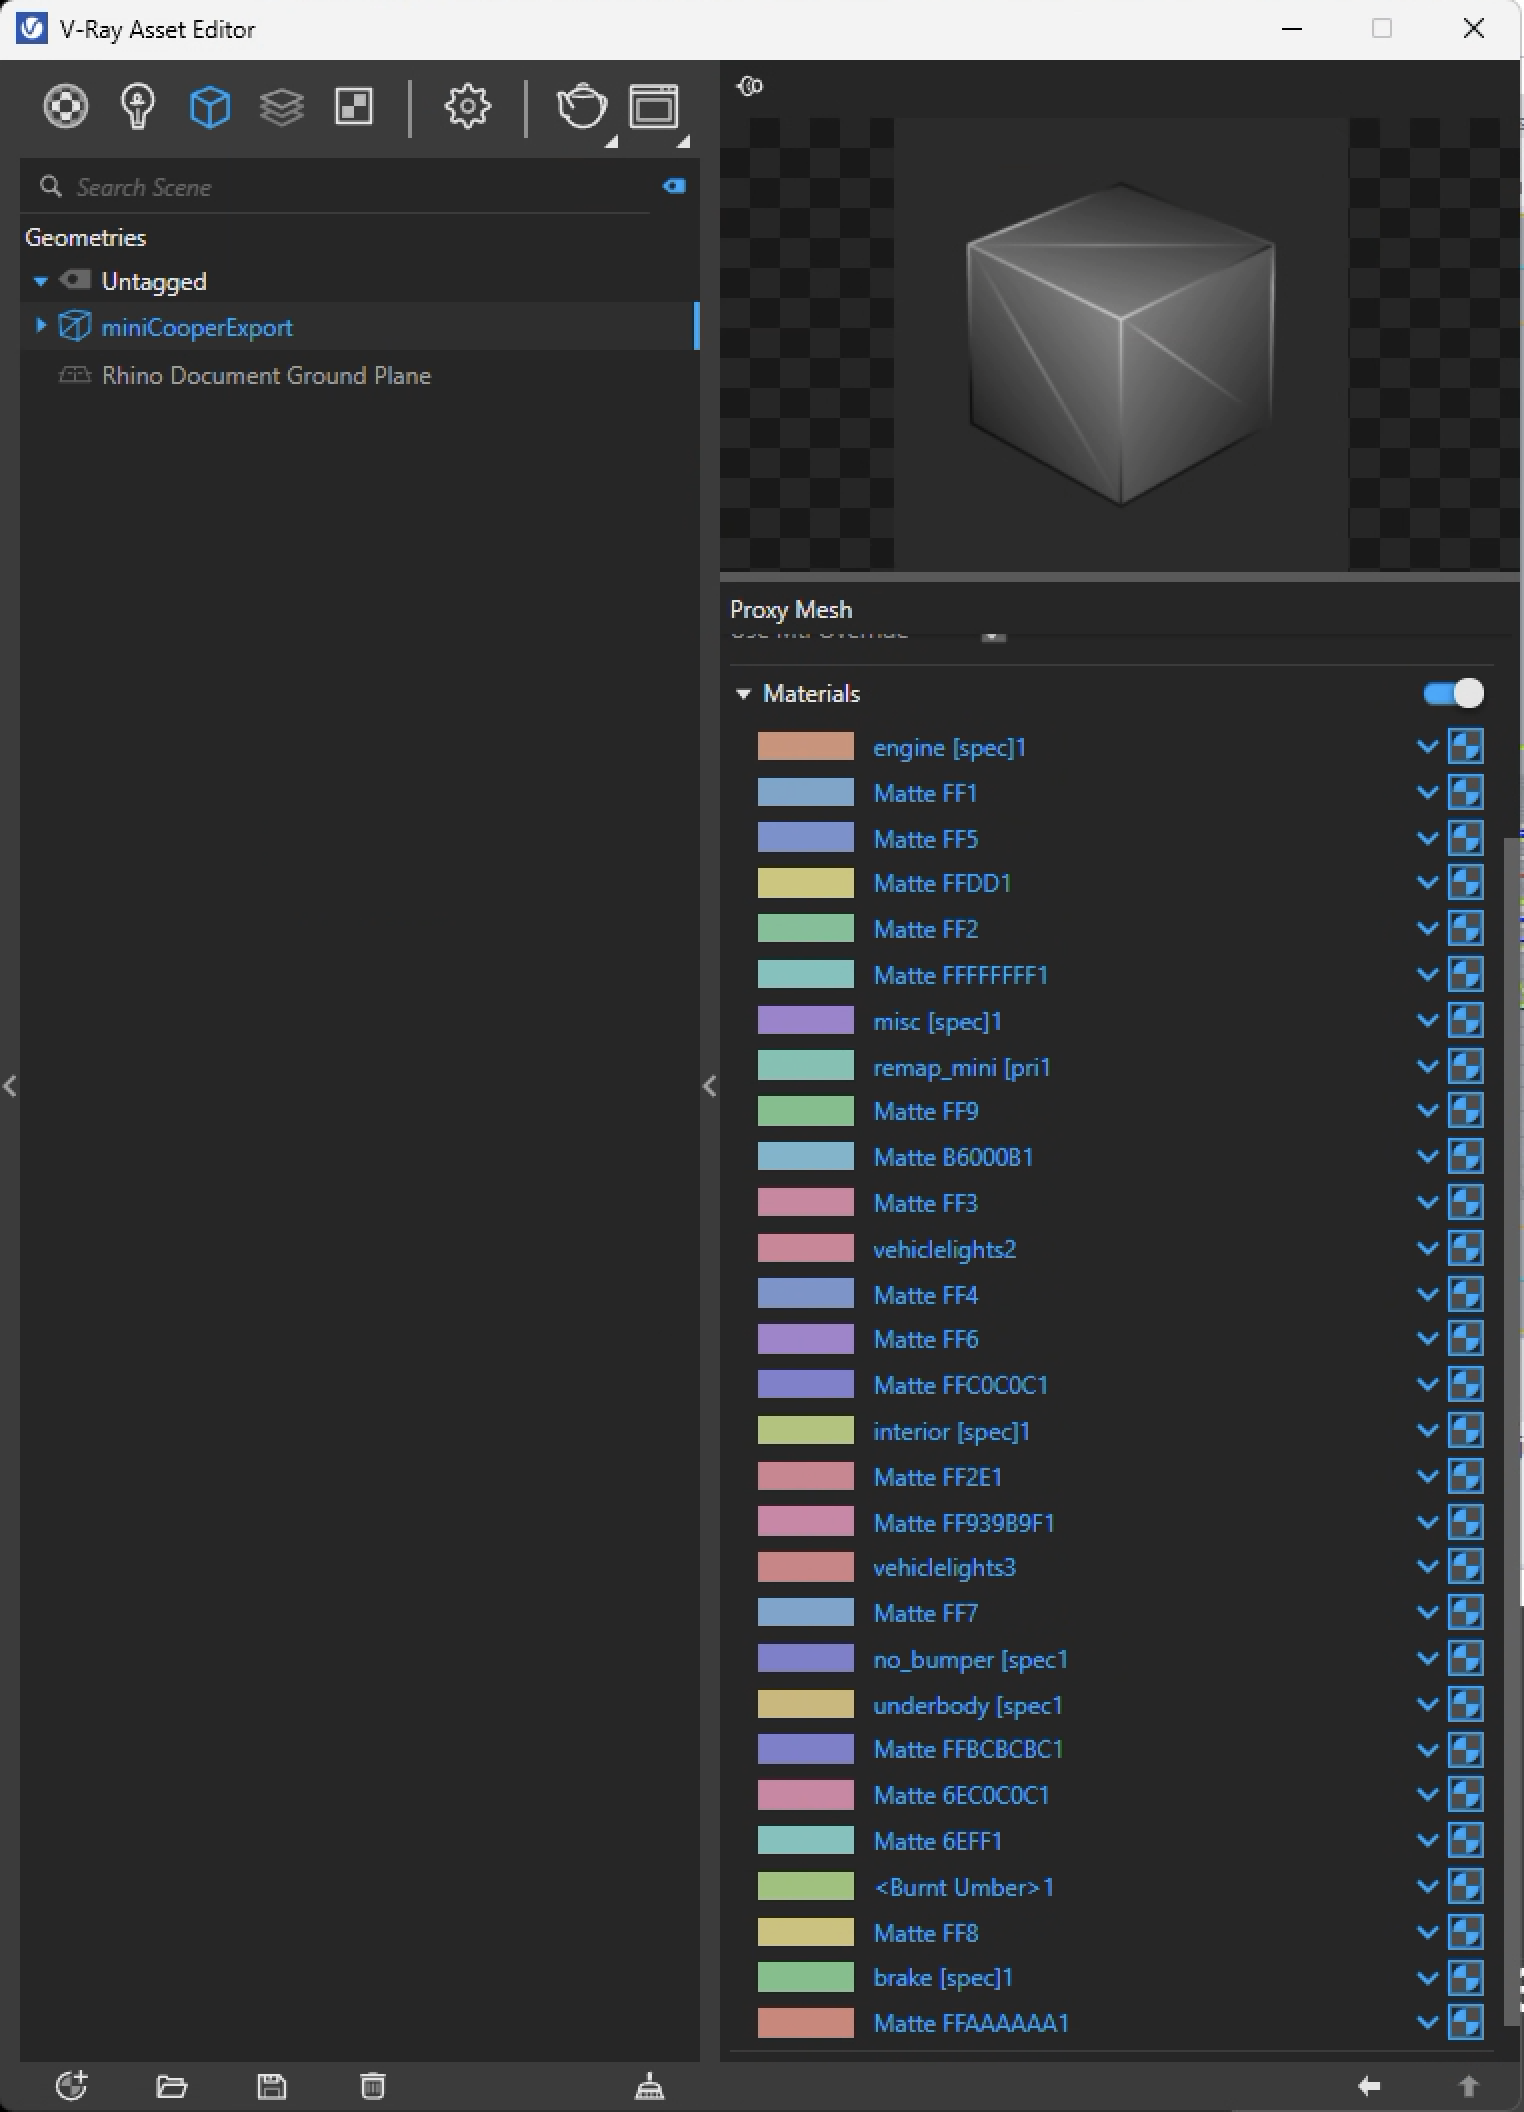
3. Next, open the V-Ray Asset Editor window and note the V-Ray materials that have been pre-assigned to the objects in the Rhino file. This includes a beige bump mappterground material. Note too that many materials are specific to the car, a Mini Cooper vehicle that was imported from Sketchup 3D Warehouse.
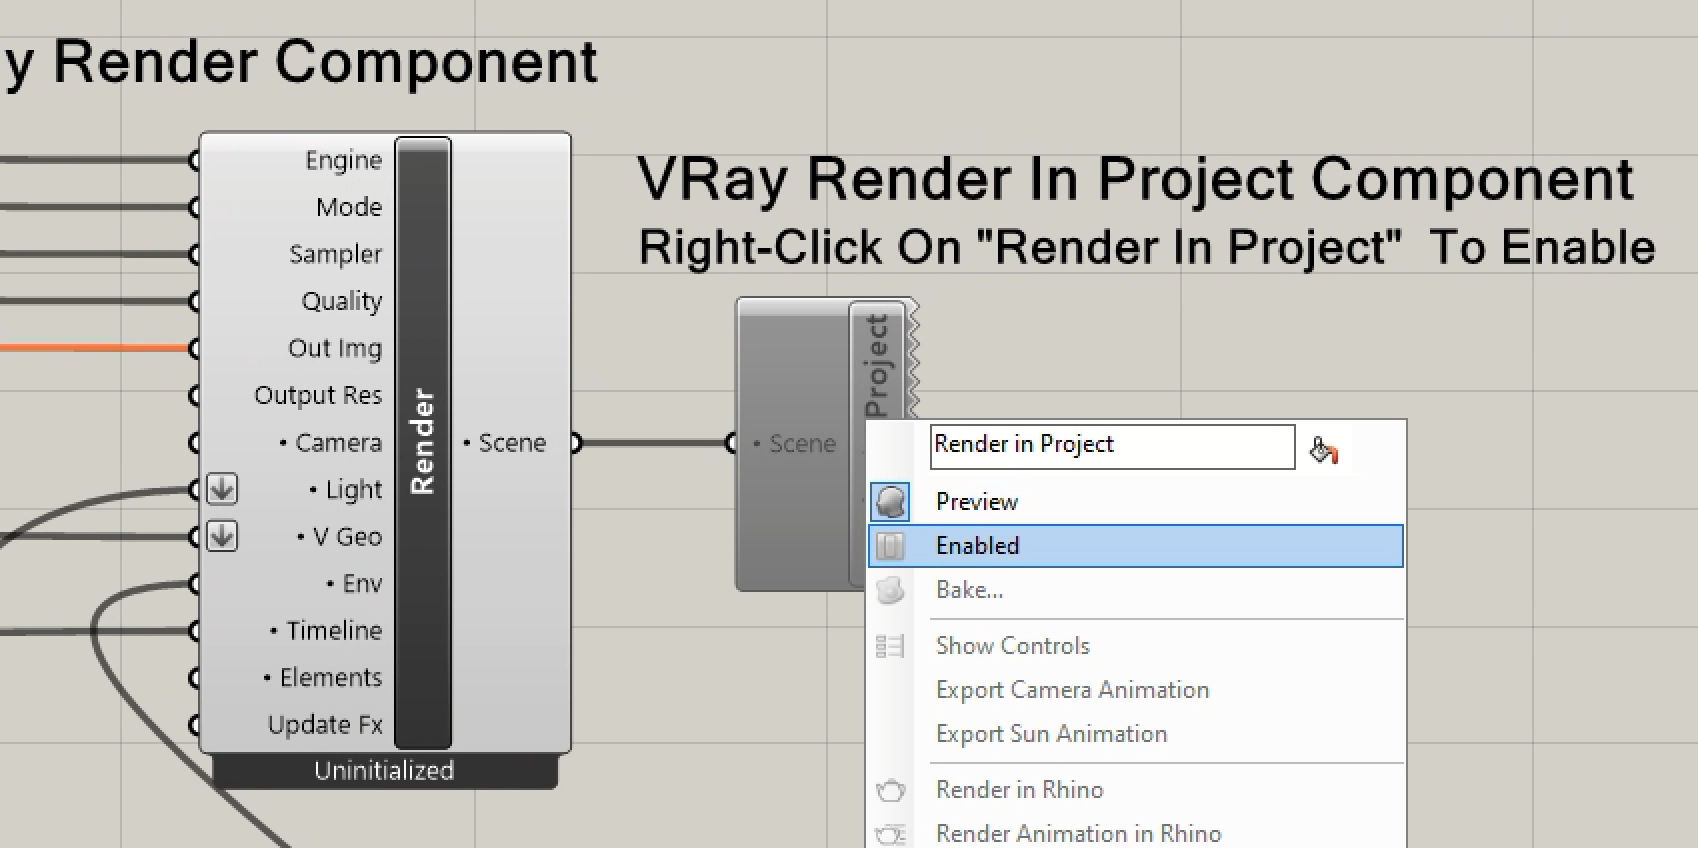
The script is nearly ready to launch. Make sure that the Rhino ''Current Renderer" menu option is set to "V-Ray for Rhino". In the V-Ray Asset editor, setup the resolution, quality and rendered frames save location as in previous tutorials. Right-mouse-click on the "Render in Project" component in the Grasshopper script to enable it. Right-mouse-click on the "Export Sun Animation" in the same component to export the sun data into Rhino. Finally, right-mouse-click on the "Render in Rhino" option in the same component to check a single rendering. Adjust the exposure level if needed, and once again, right-mousebutton-click on the "Render in Project" compoent and select the "Render Animation in Rhino" option to facilitate the rendering of the animation. However,, these instructrions are better understood by reviewing the details in part II below.
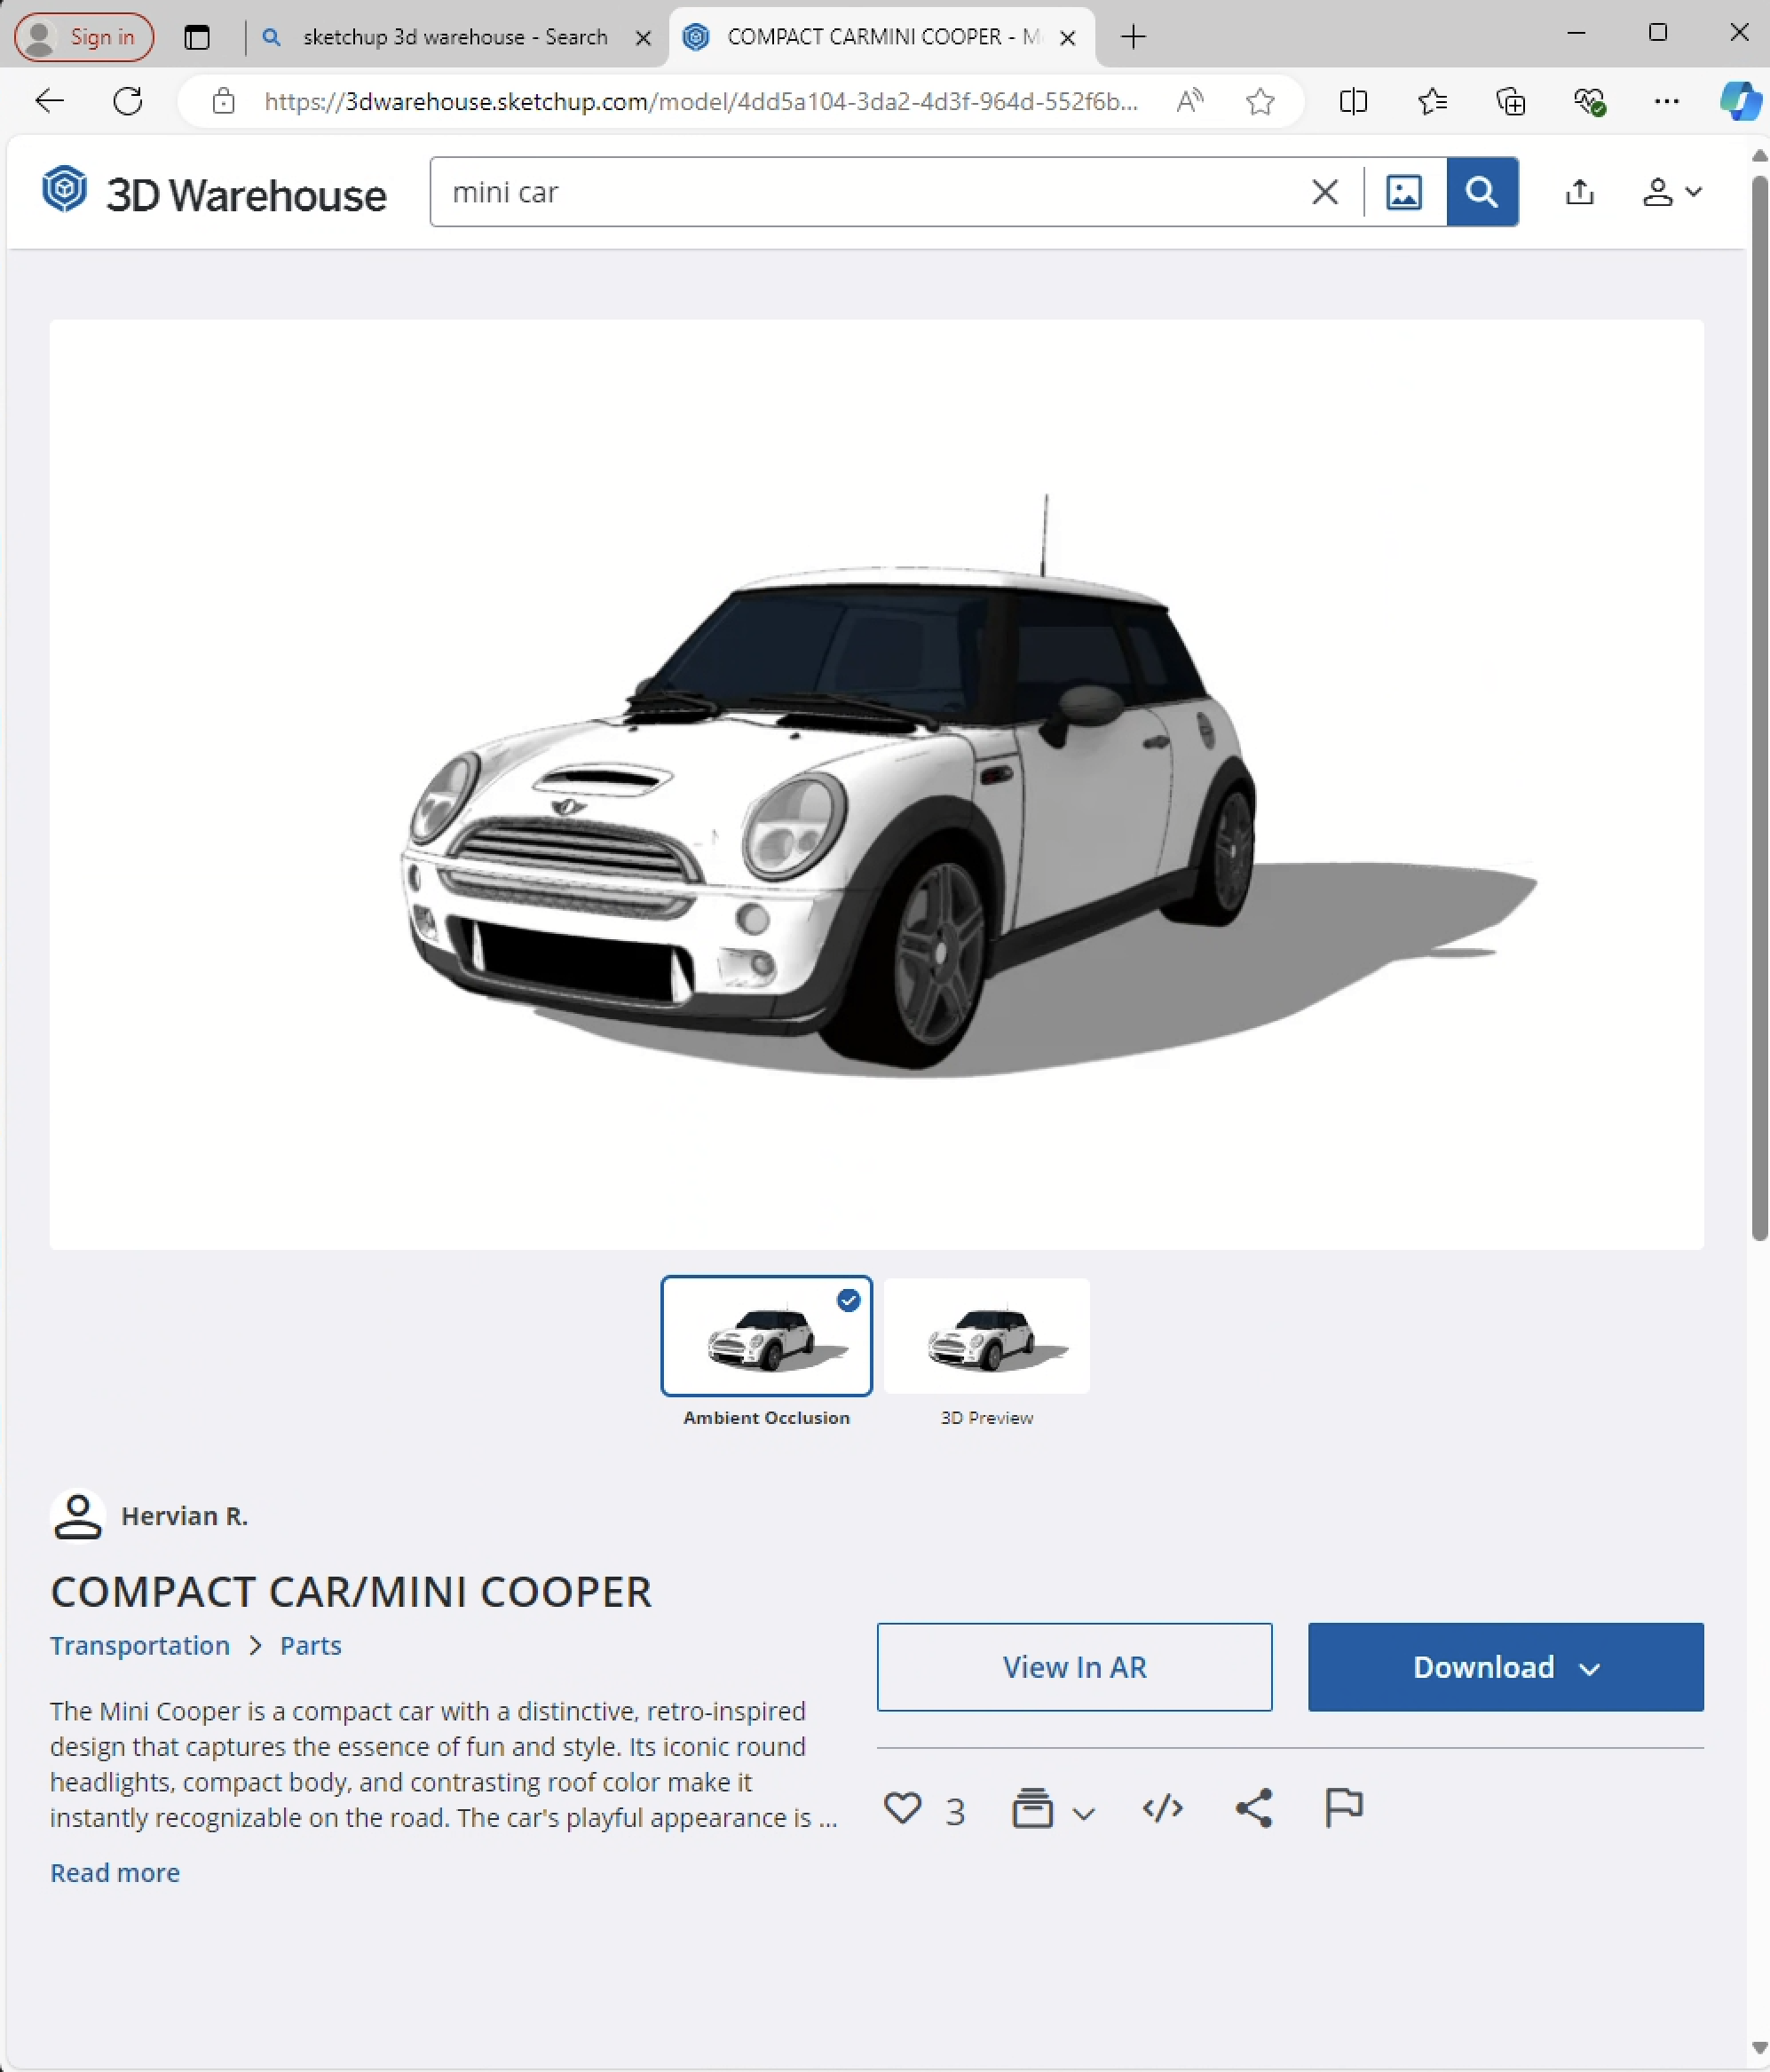
A. Import a Pre-existing model of a car from Sketchup 3D Warehouse (https://3dwarehouse.sketchup.com).
In this part we develop the Canvas script to the extent that you can initiate most components yourself. There are a few components that will need to be copied from the script above as they were custom programmed using techniques that go beyond the scope of the tutorial.
1. Open a new Rhino file and to the degree desired replicate the creation and development of the elements described below.
2. The process begins here by downloading a car from Sketchup 3D Warehouse. You will need to register for a free account in order to down load any files. Or, you may have another source for a vehicle or other type moving object. This model by Hervian R was selected. Note that it comes with over 27 materials as shown in V-Ray Asset Editor window above. Use the "Download" button below to download this or another vehicle file as a Sketchup "skp" file. The search text "Mini Cooper" was used to find it.
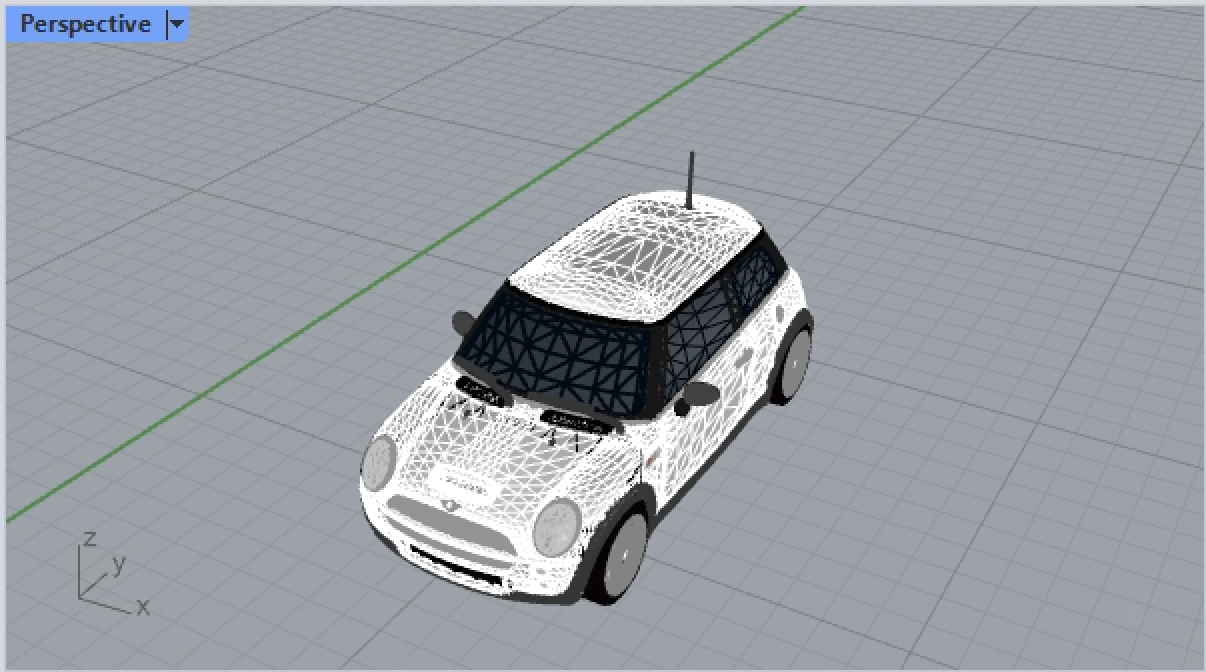
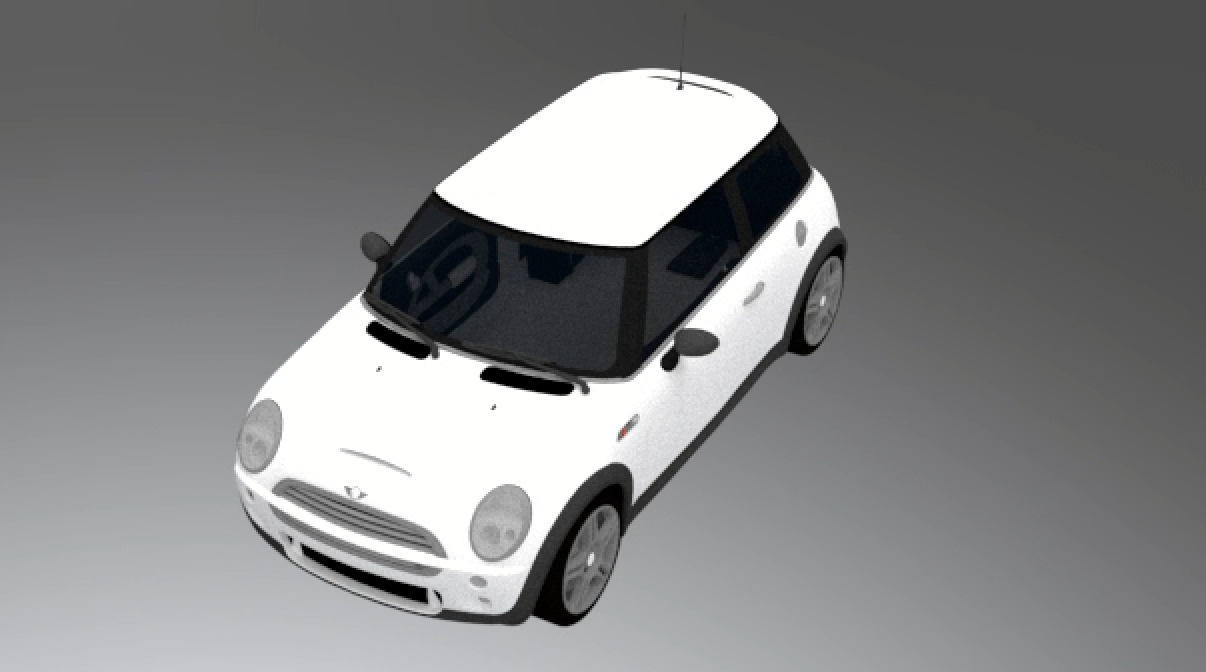
3. Within Rhino, use the "File Menu / Import" option to import the skp file into Rhino. The file will appear on the ground plane as shown in the following image.
4. Render the model in V-Ray and note that the materials are already pre-assigned through a method we've not covered this fall. However, we will cover a different method appropriate to our process for working with this model converted to a Proxy file.
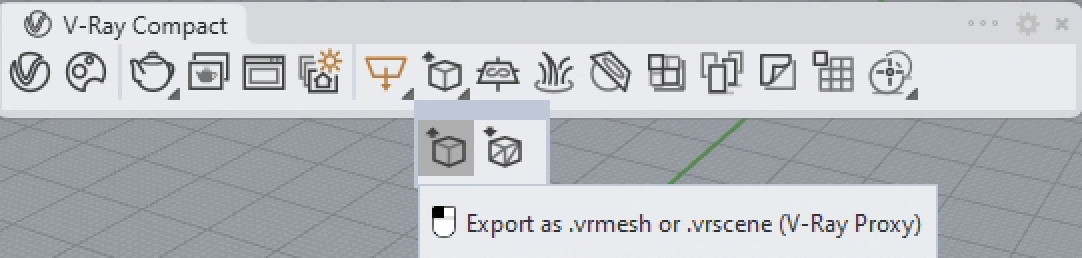
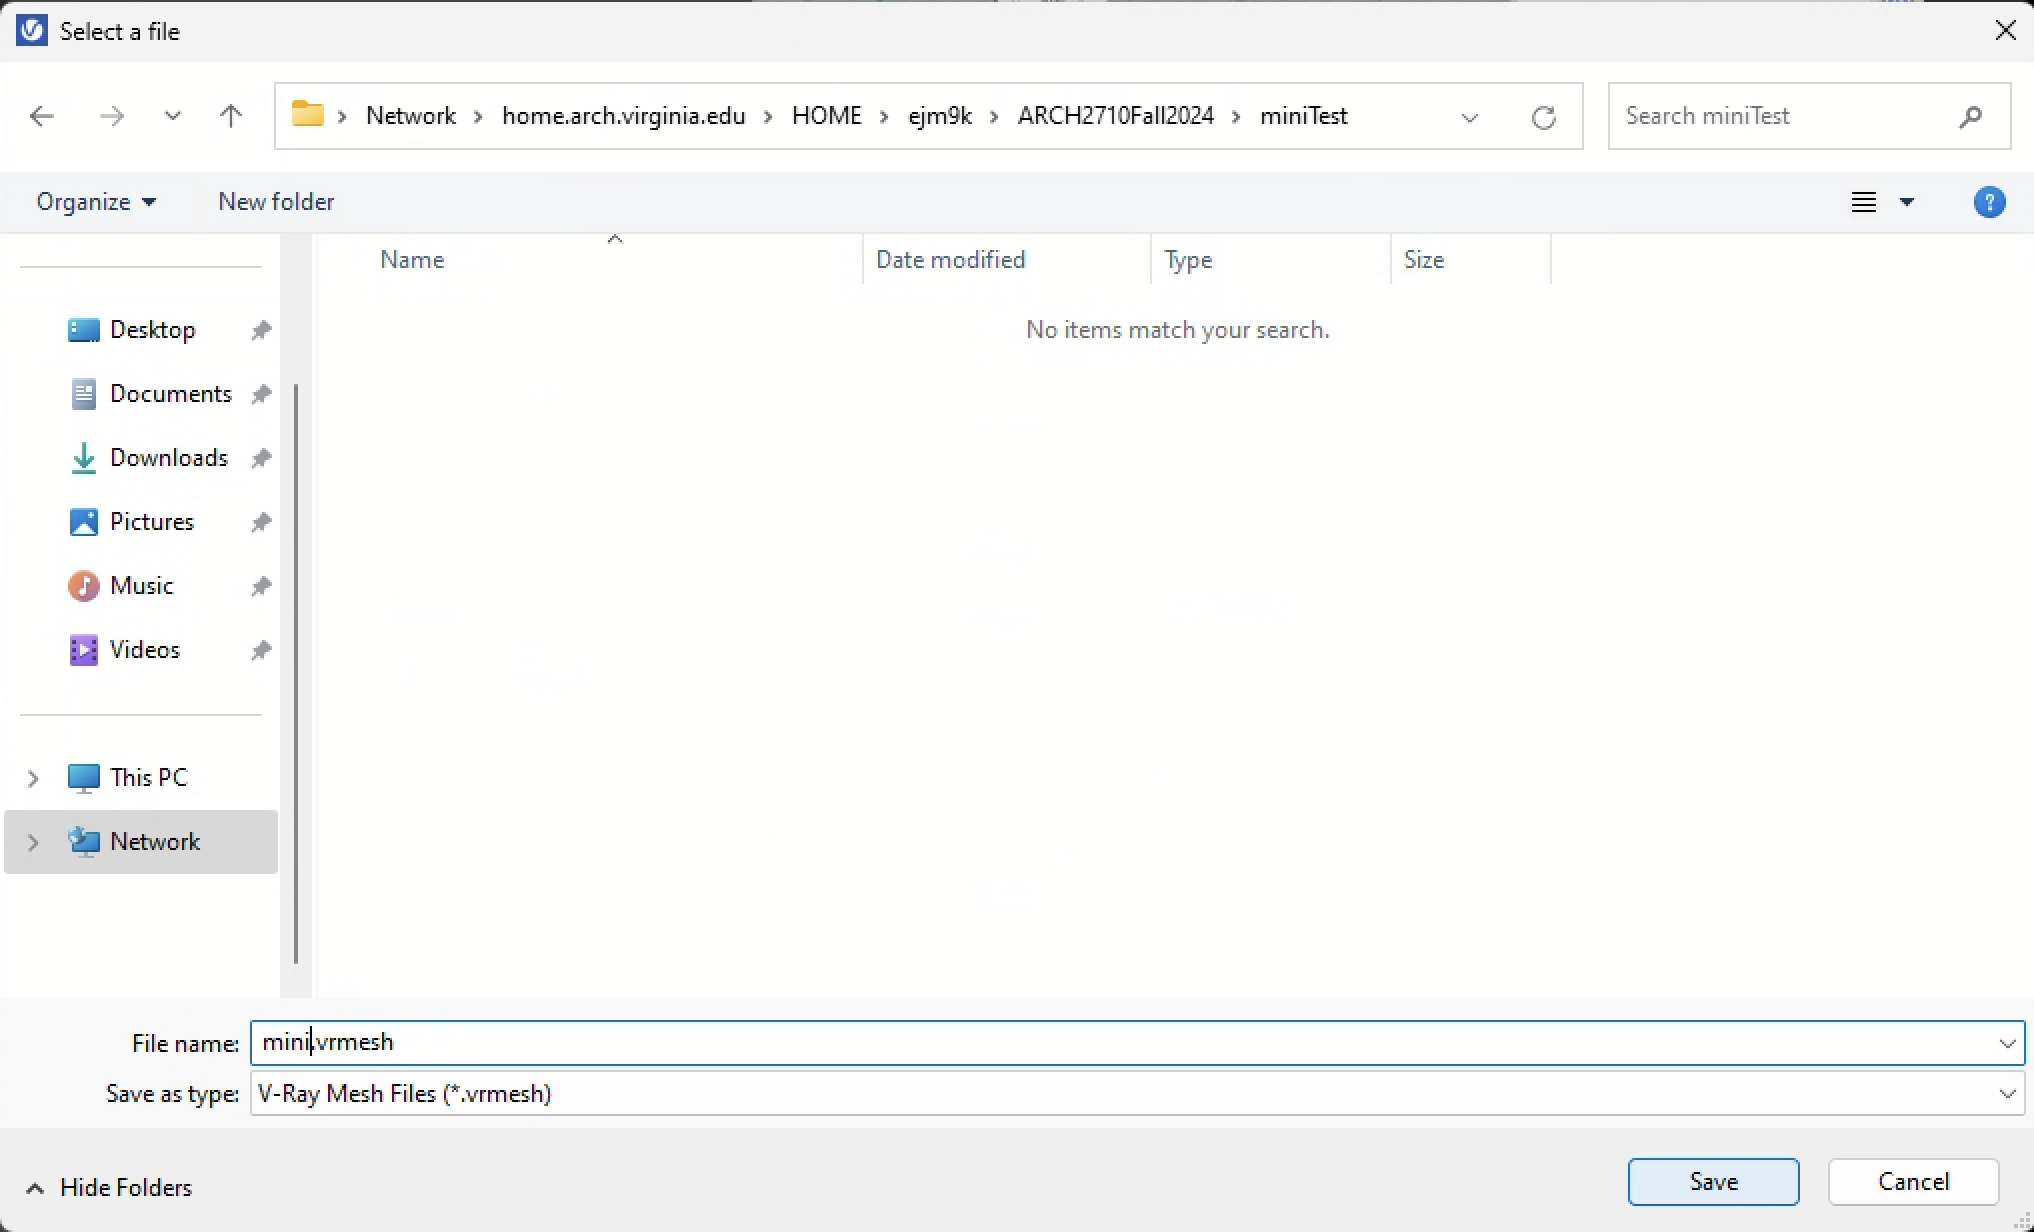
5. From the VRay menu in Rhino, use the "Export Proxy File" tool to export the car to an external file.
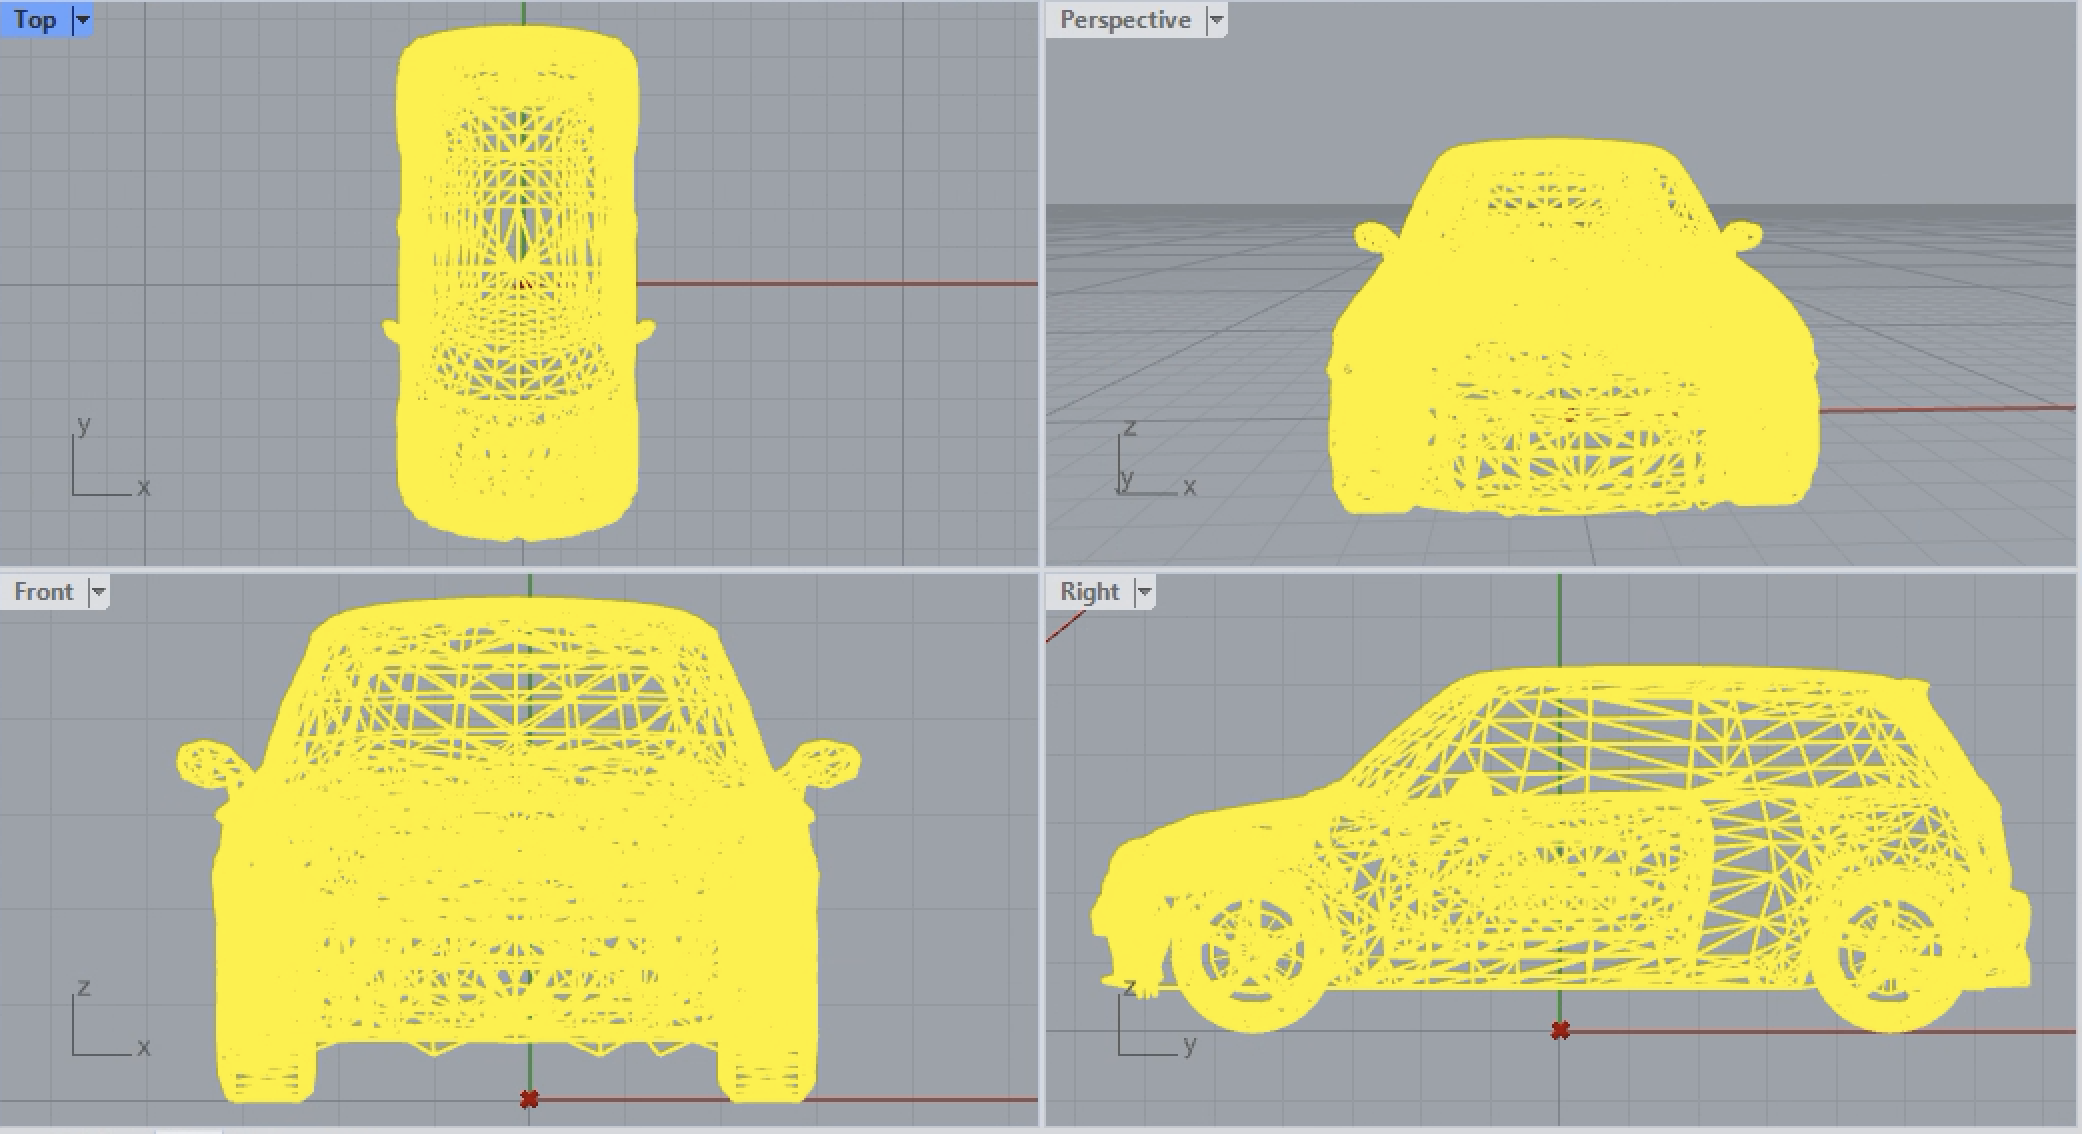
6. Move the car to that it is on the orgin of the model space and aligned with the negative y-axis direction.
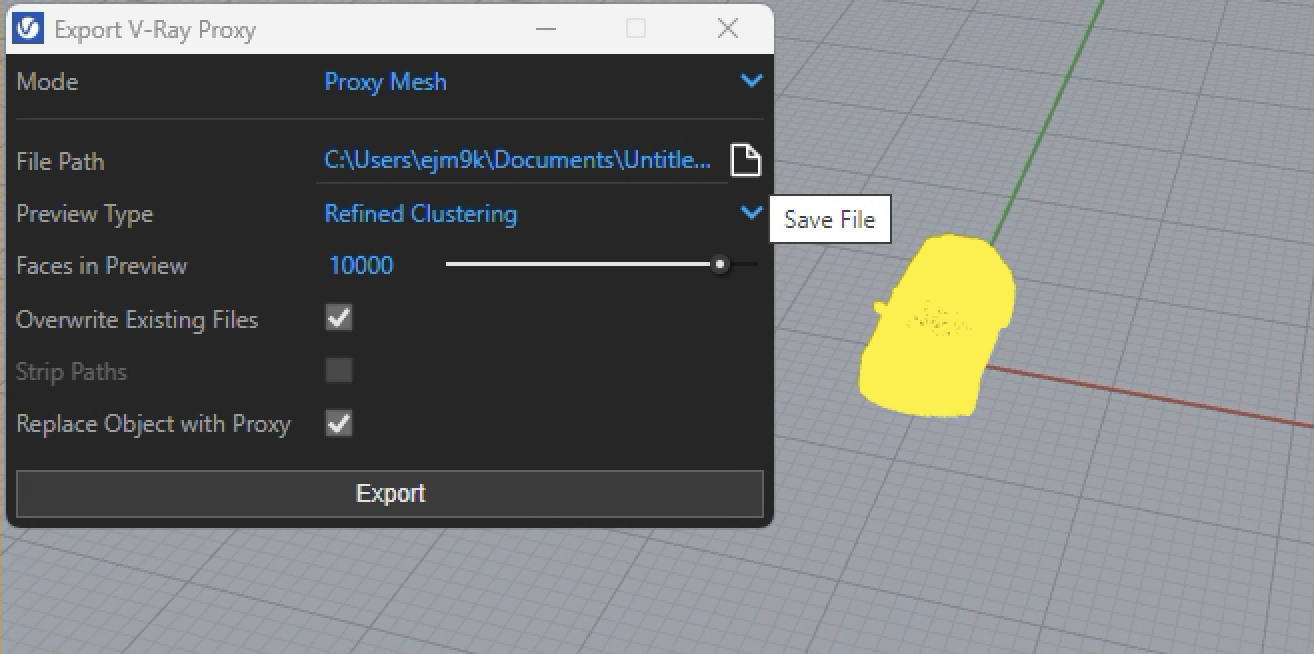
6. Choose the appropriate folder in the "Export V-Ray Proxy" dialog box that follows. Also, make sure to on the option to "Replace Object with Proxy" as shown in the window below. This last option has enormous advantages with respect to assigning materials.
7. View the Proxy file materials in the Geometry section the V-Ray Asset Editor and note that they have now been automatically assigned to objects in the Proxy file.
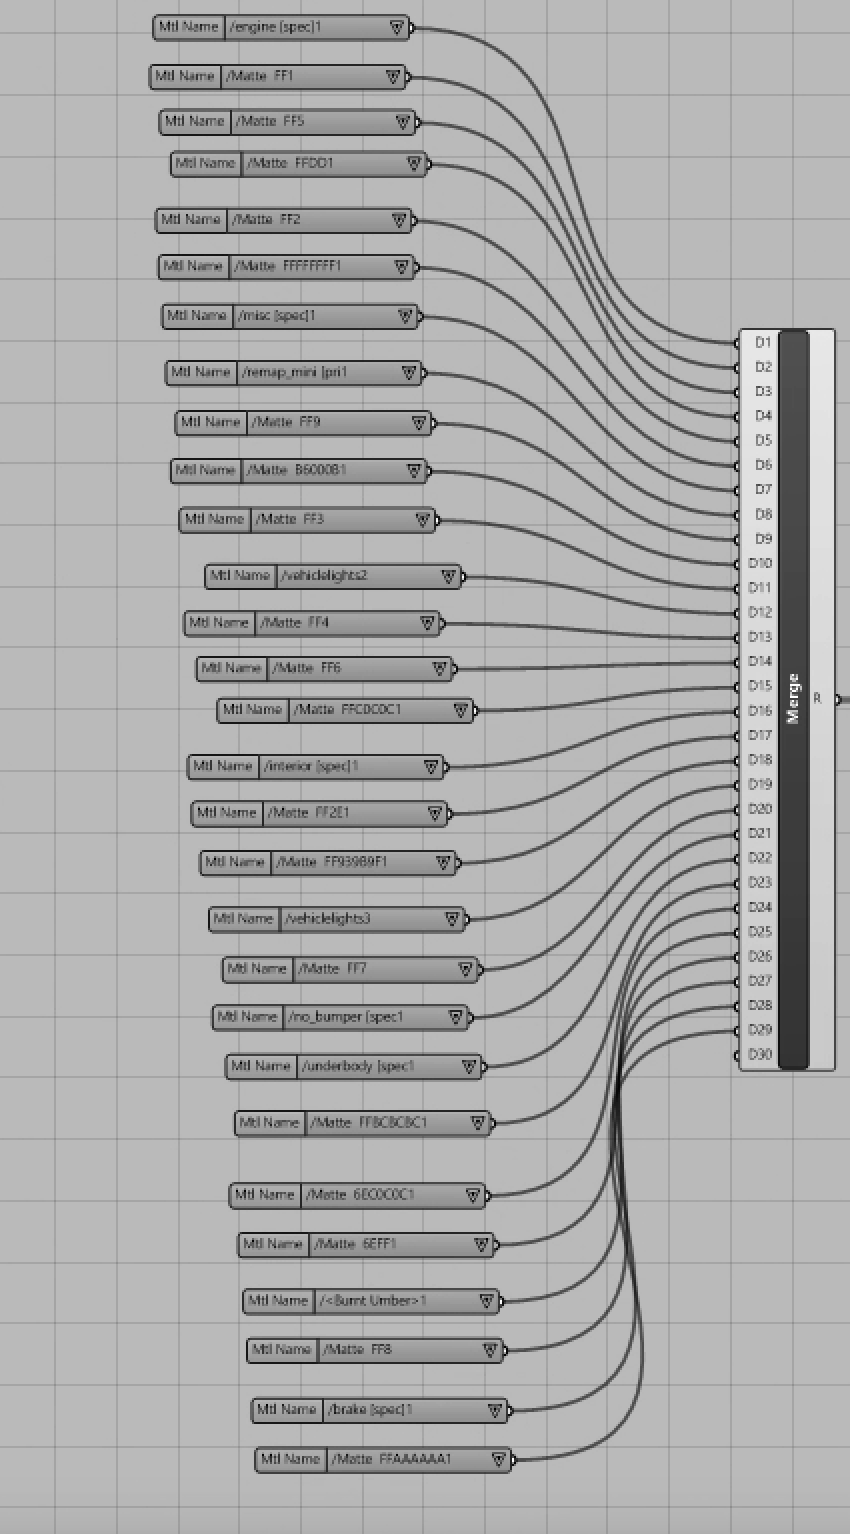
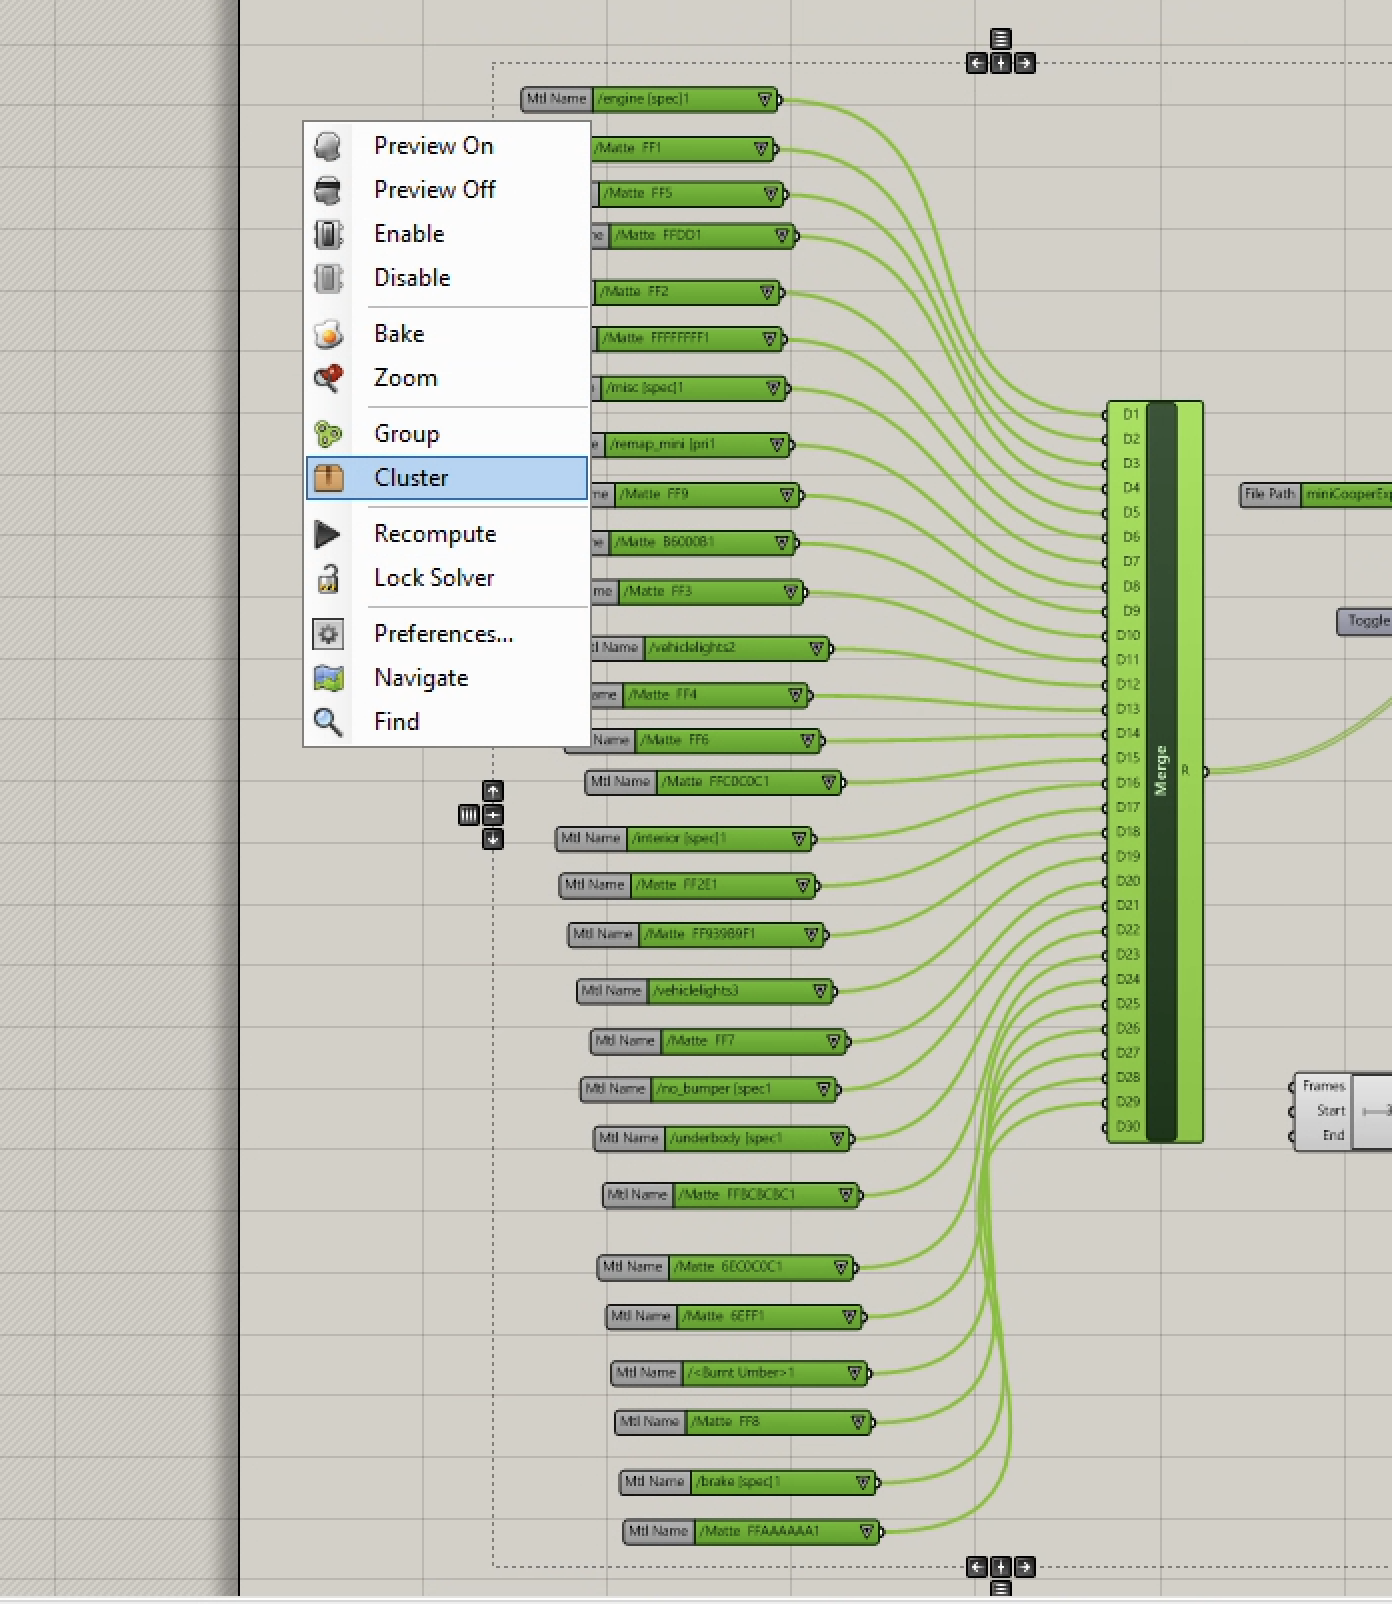
8. For each such material assigned to the proxy file, create a corresponding "V-Ray Material From Project" component in Grasshopper, replicating the same exact same order in the Grasshopper Canvas.
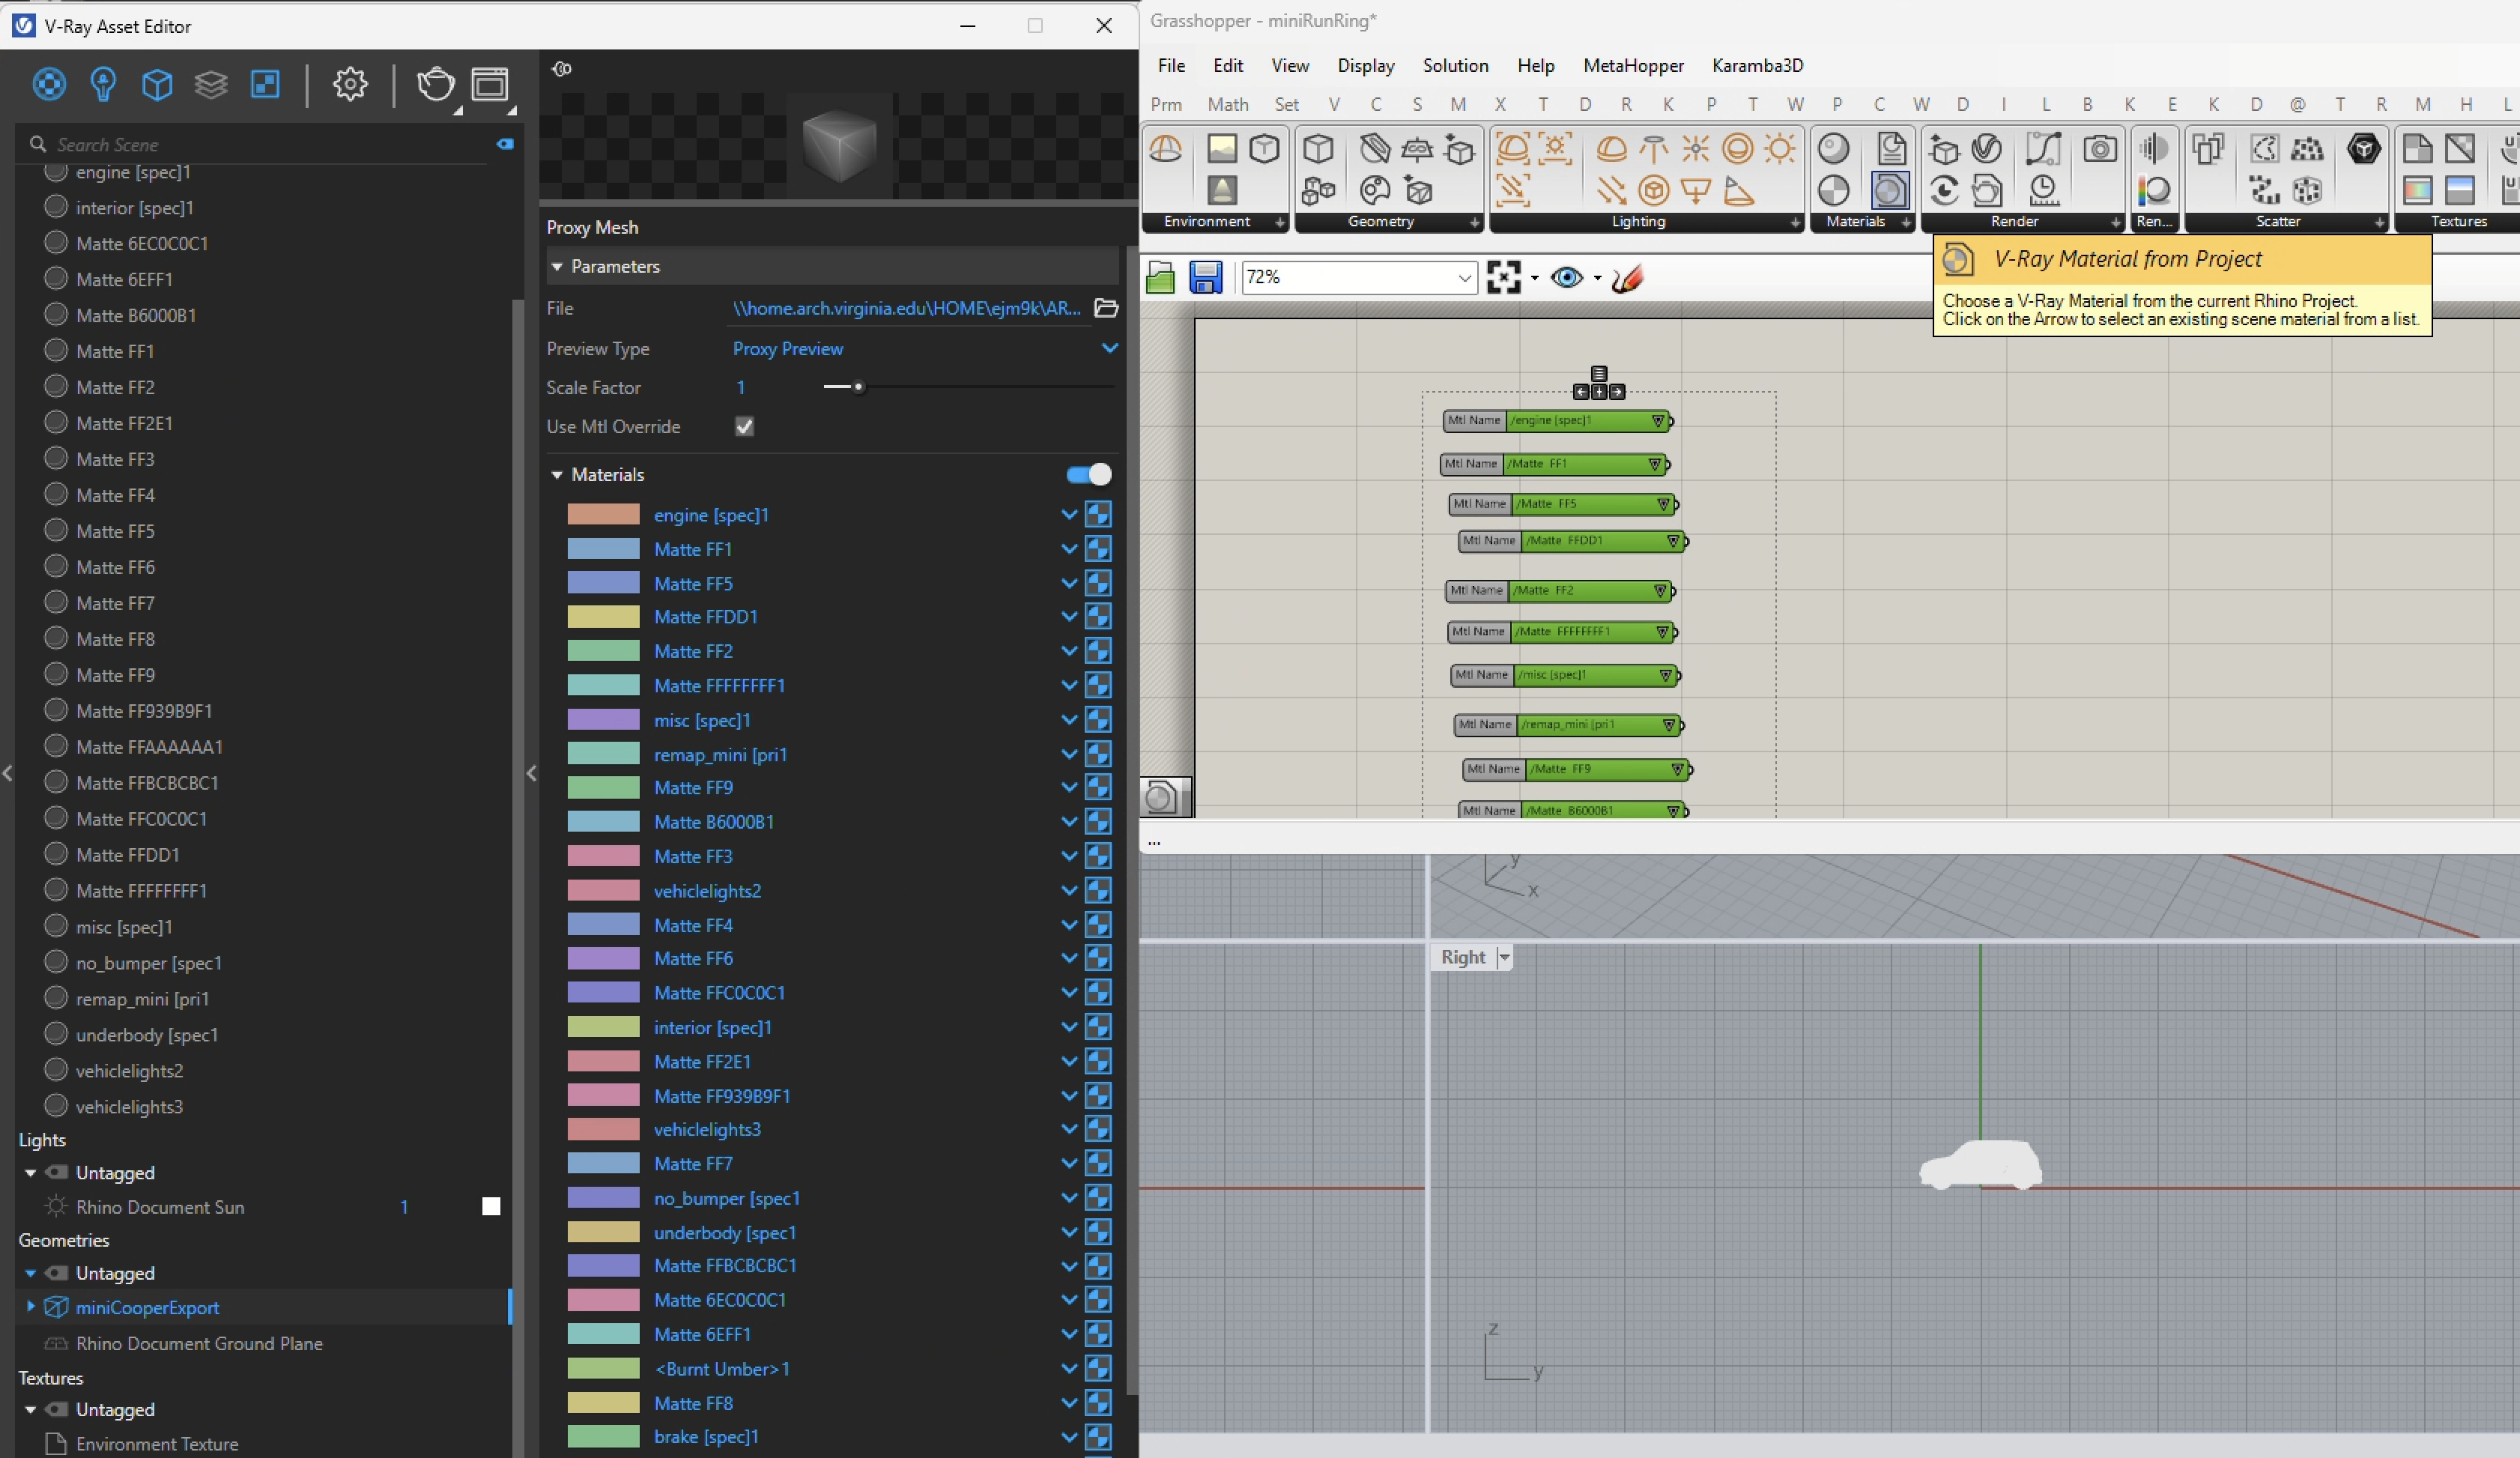
9. Continue building this list for every material associated with the proxy file. Left-mousebutton-click on the image below if you wish to see it in detail (warning: it is greatly magnified!).

10. Type in "merge" in the Grasshopper canvas to create a Merge component.
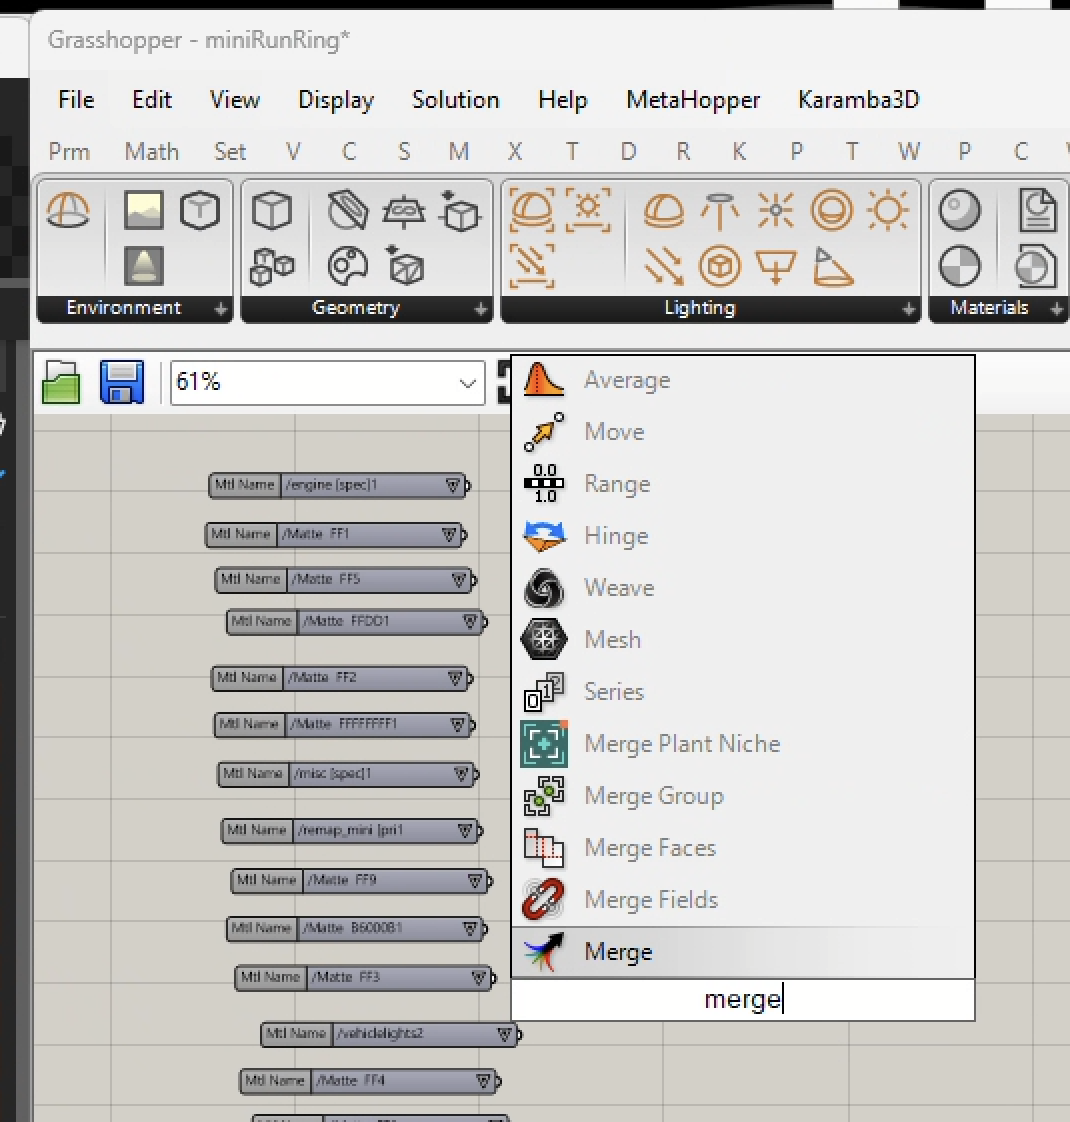
11. Note again that the Merge list must be added to the "Merge" component one step at a time, and in the exact same order as listed from top to bottom in parallel to the order shown in the V-Ray asset editor.
B. Build Up Additional Proxy Components in Grasshopper
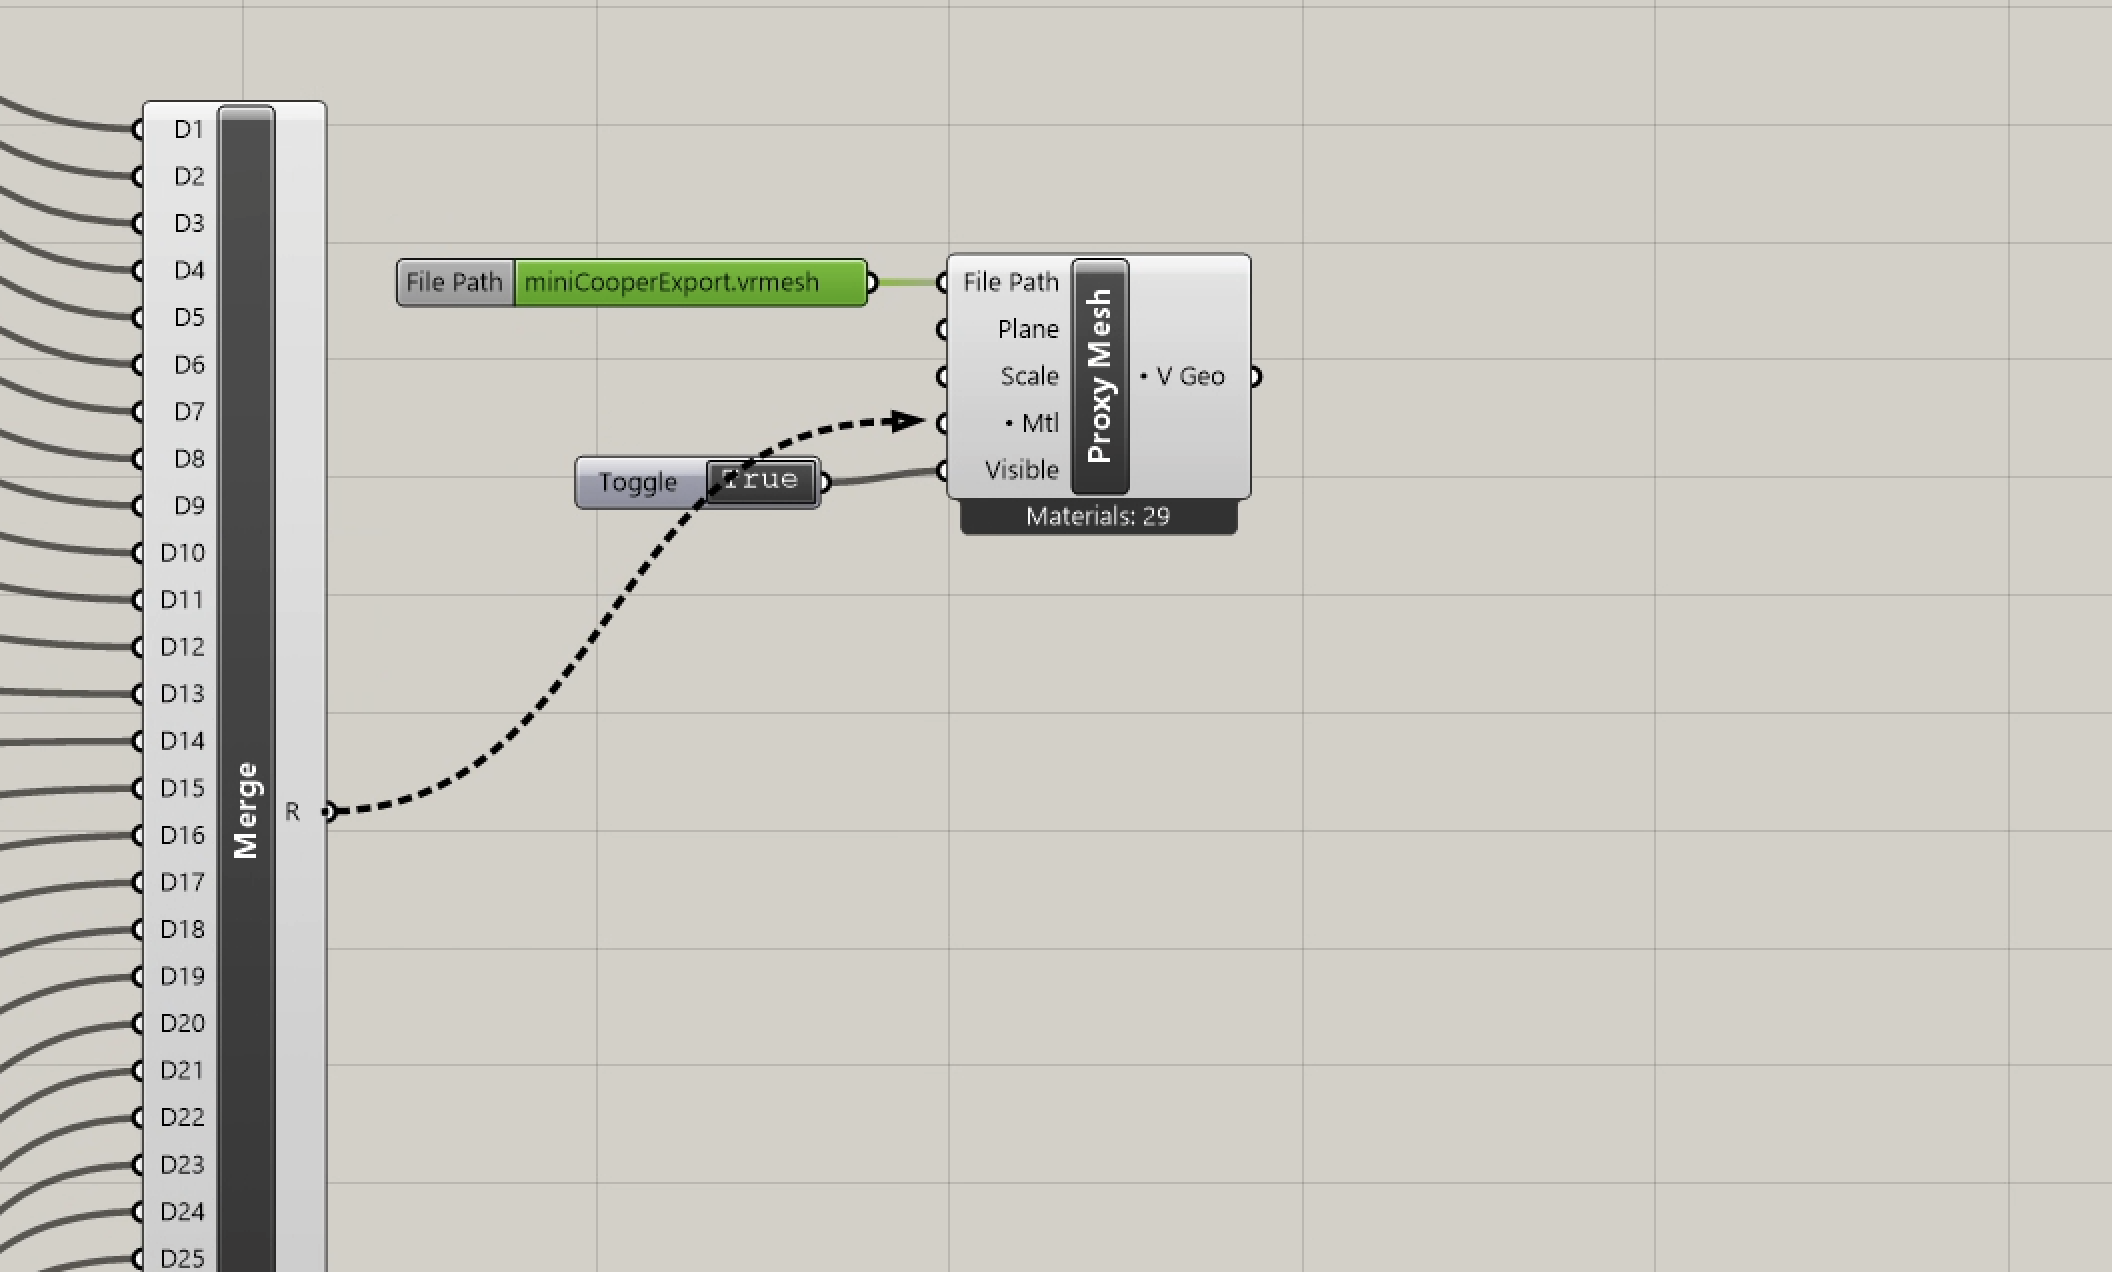
1. Add a V-Ray "Proxy Mesh" component.
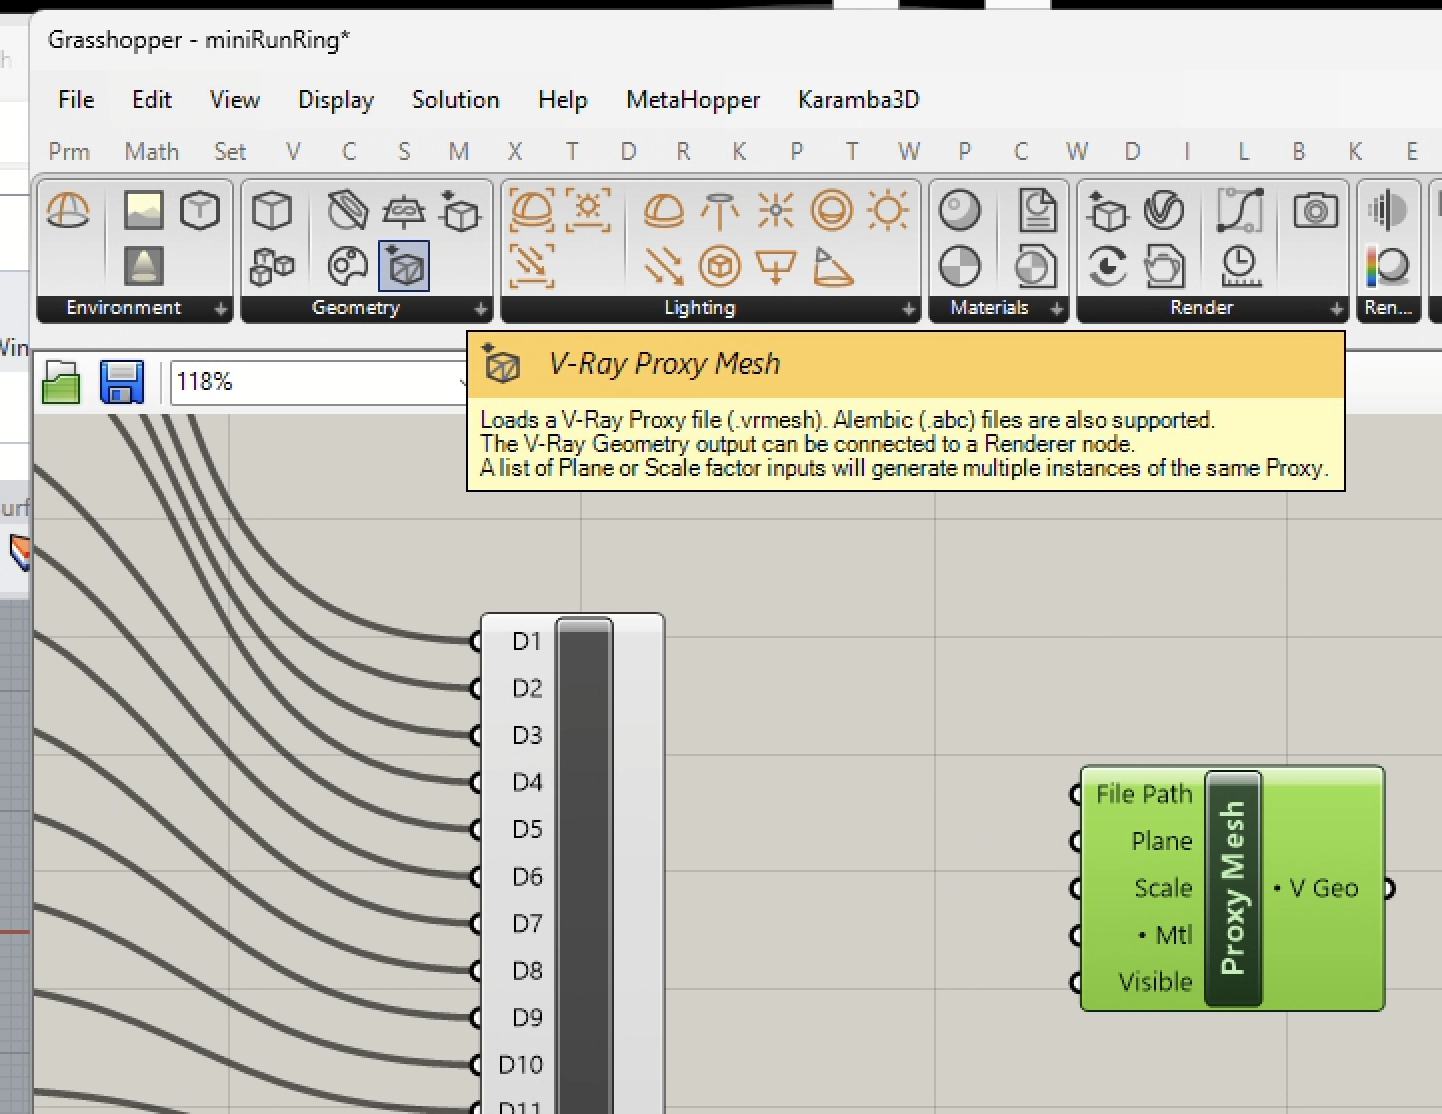
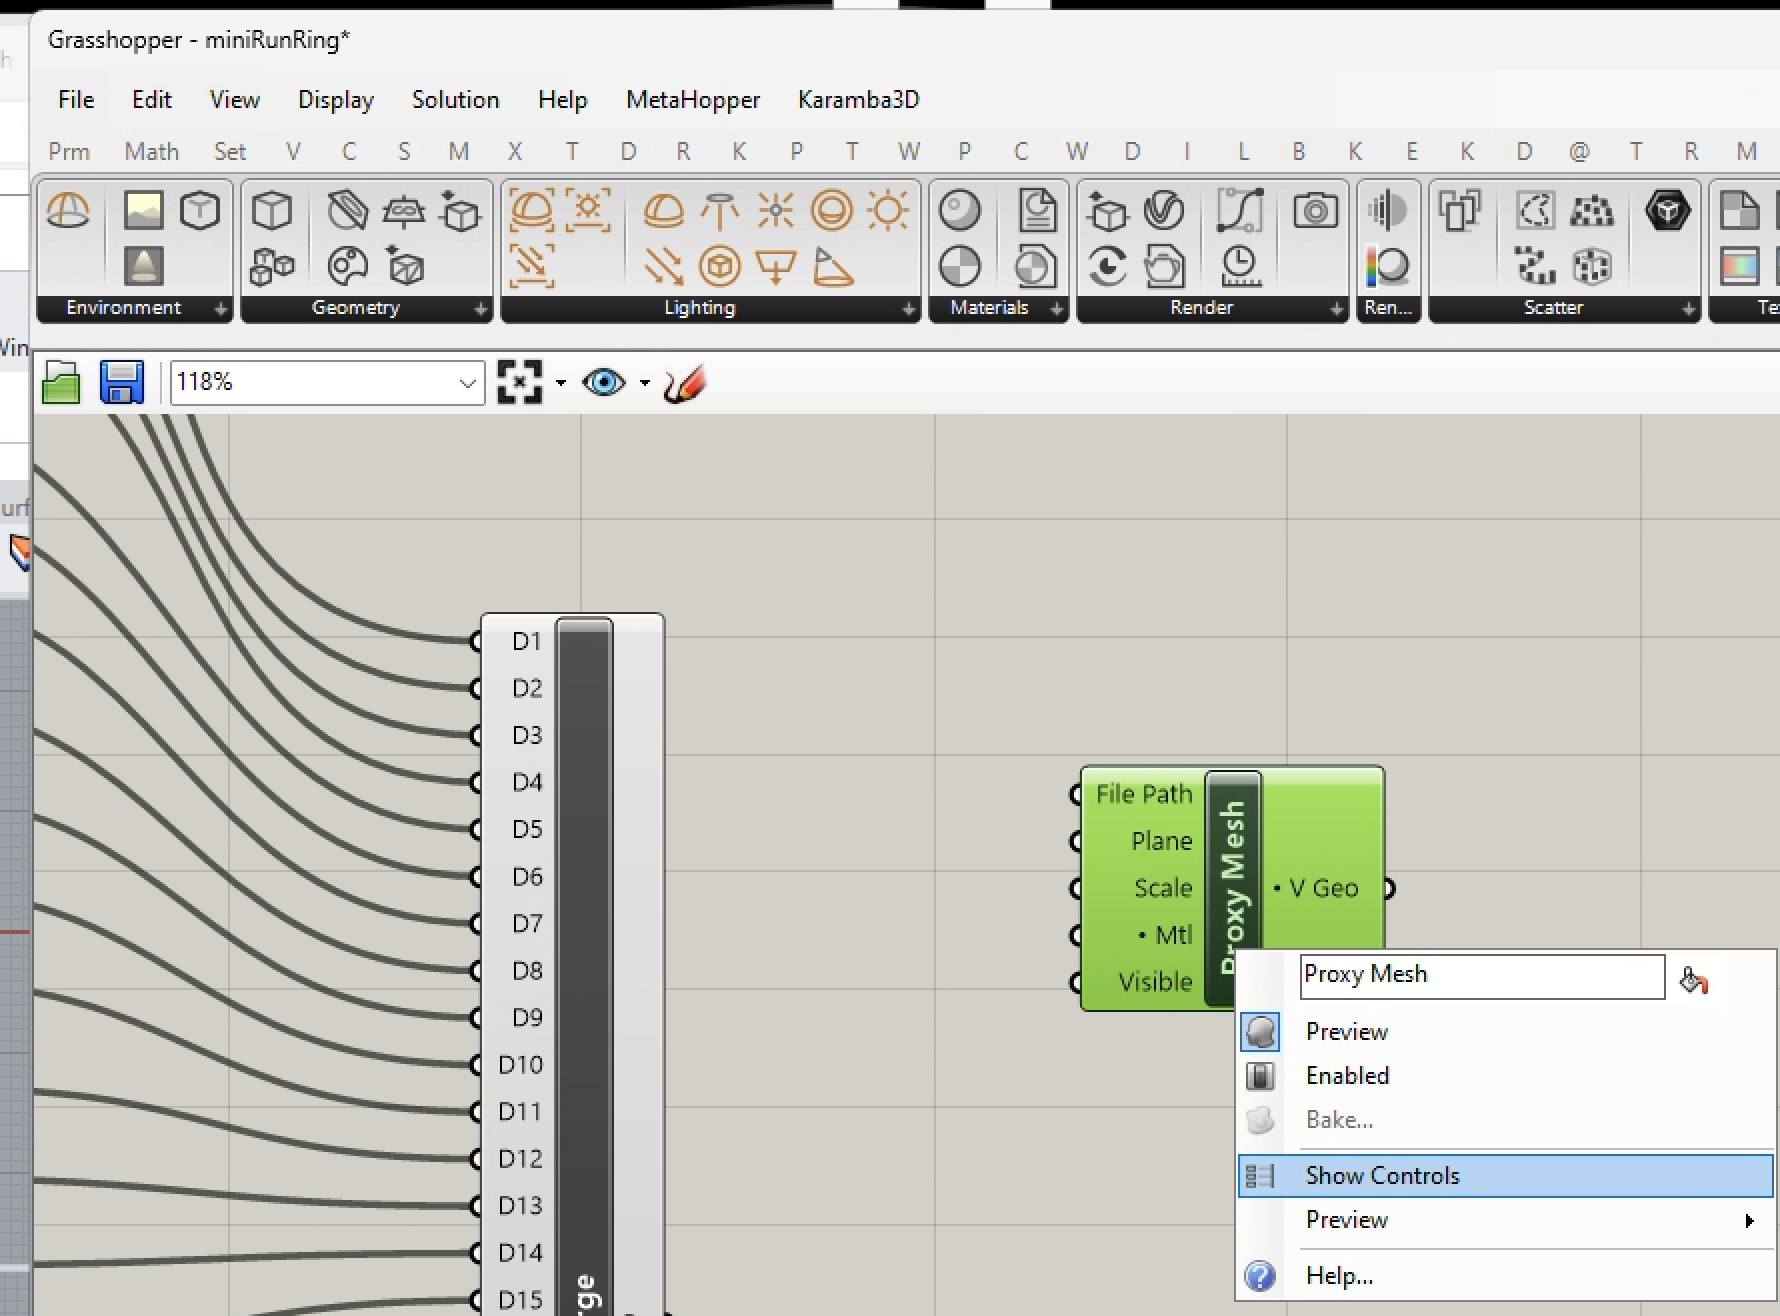
2. Use the "Show Controls" button for the "Proxy Mesh" component.
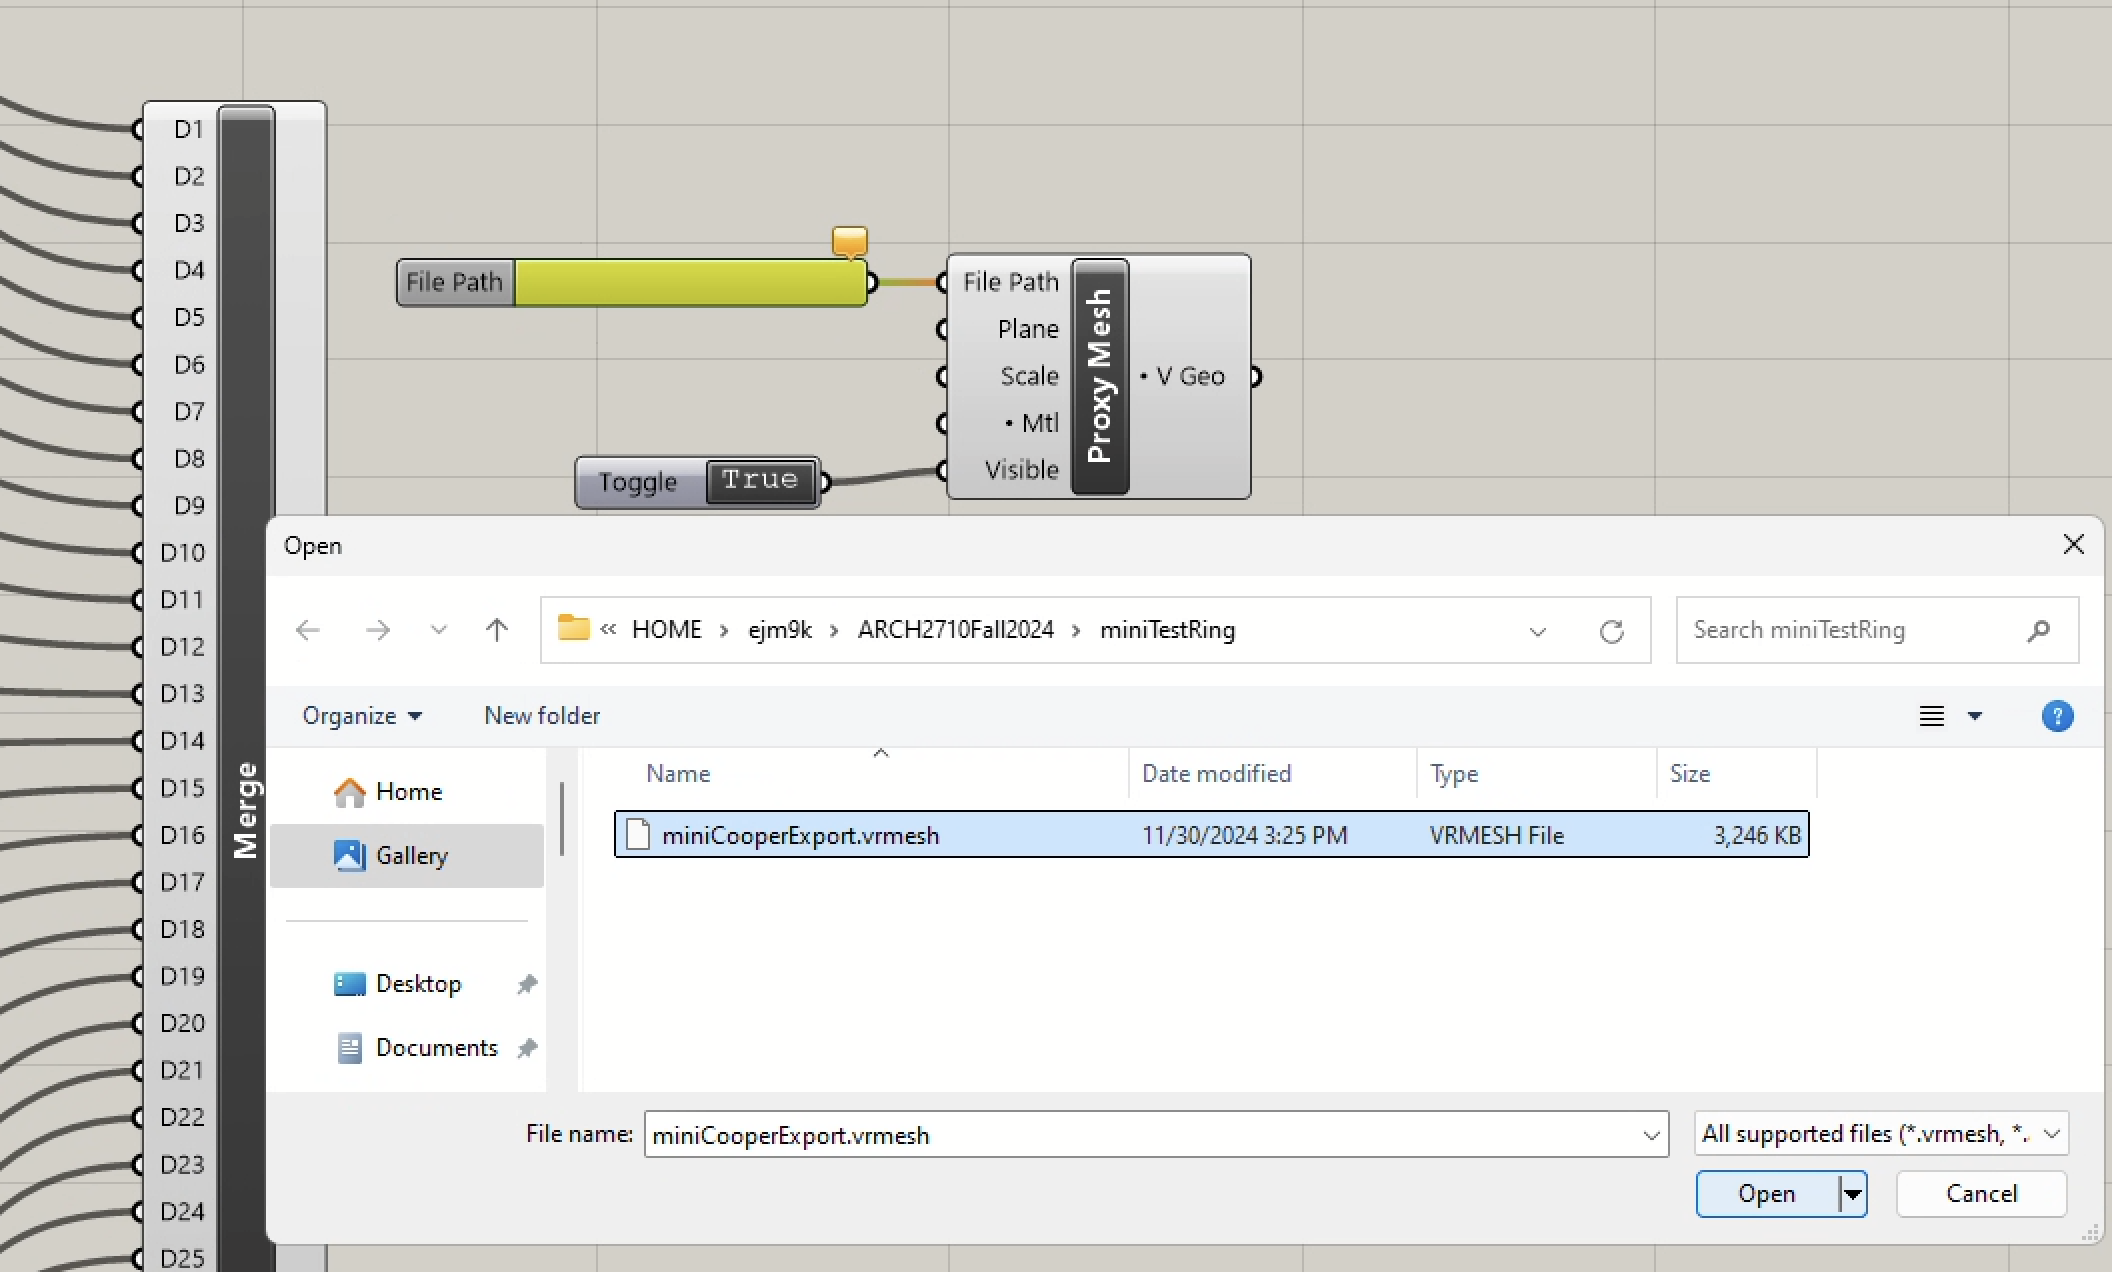
3. Select the "File Path" component and set the filepath to the Proxy Mesh file.
4. Now input the materials from the "Merge" component into the "Proxy Mesh" component..
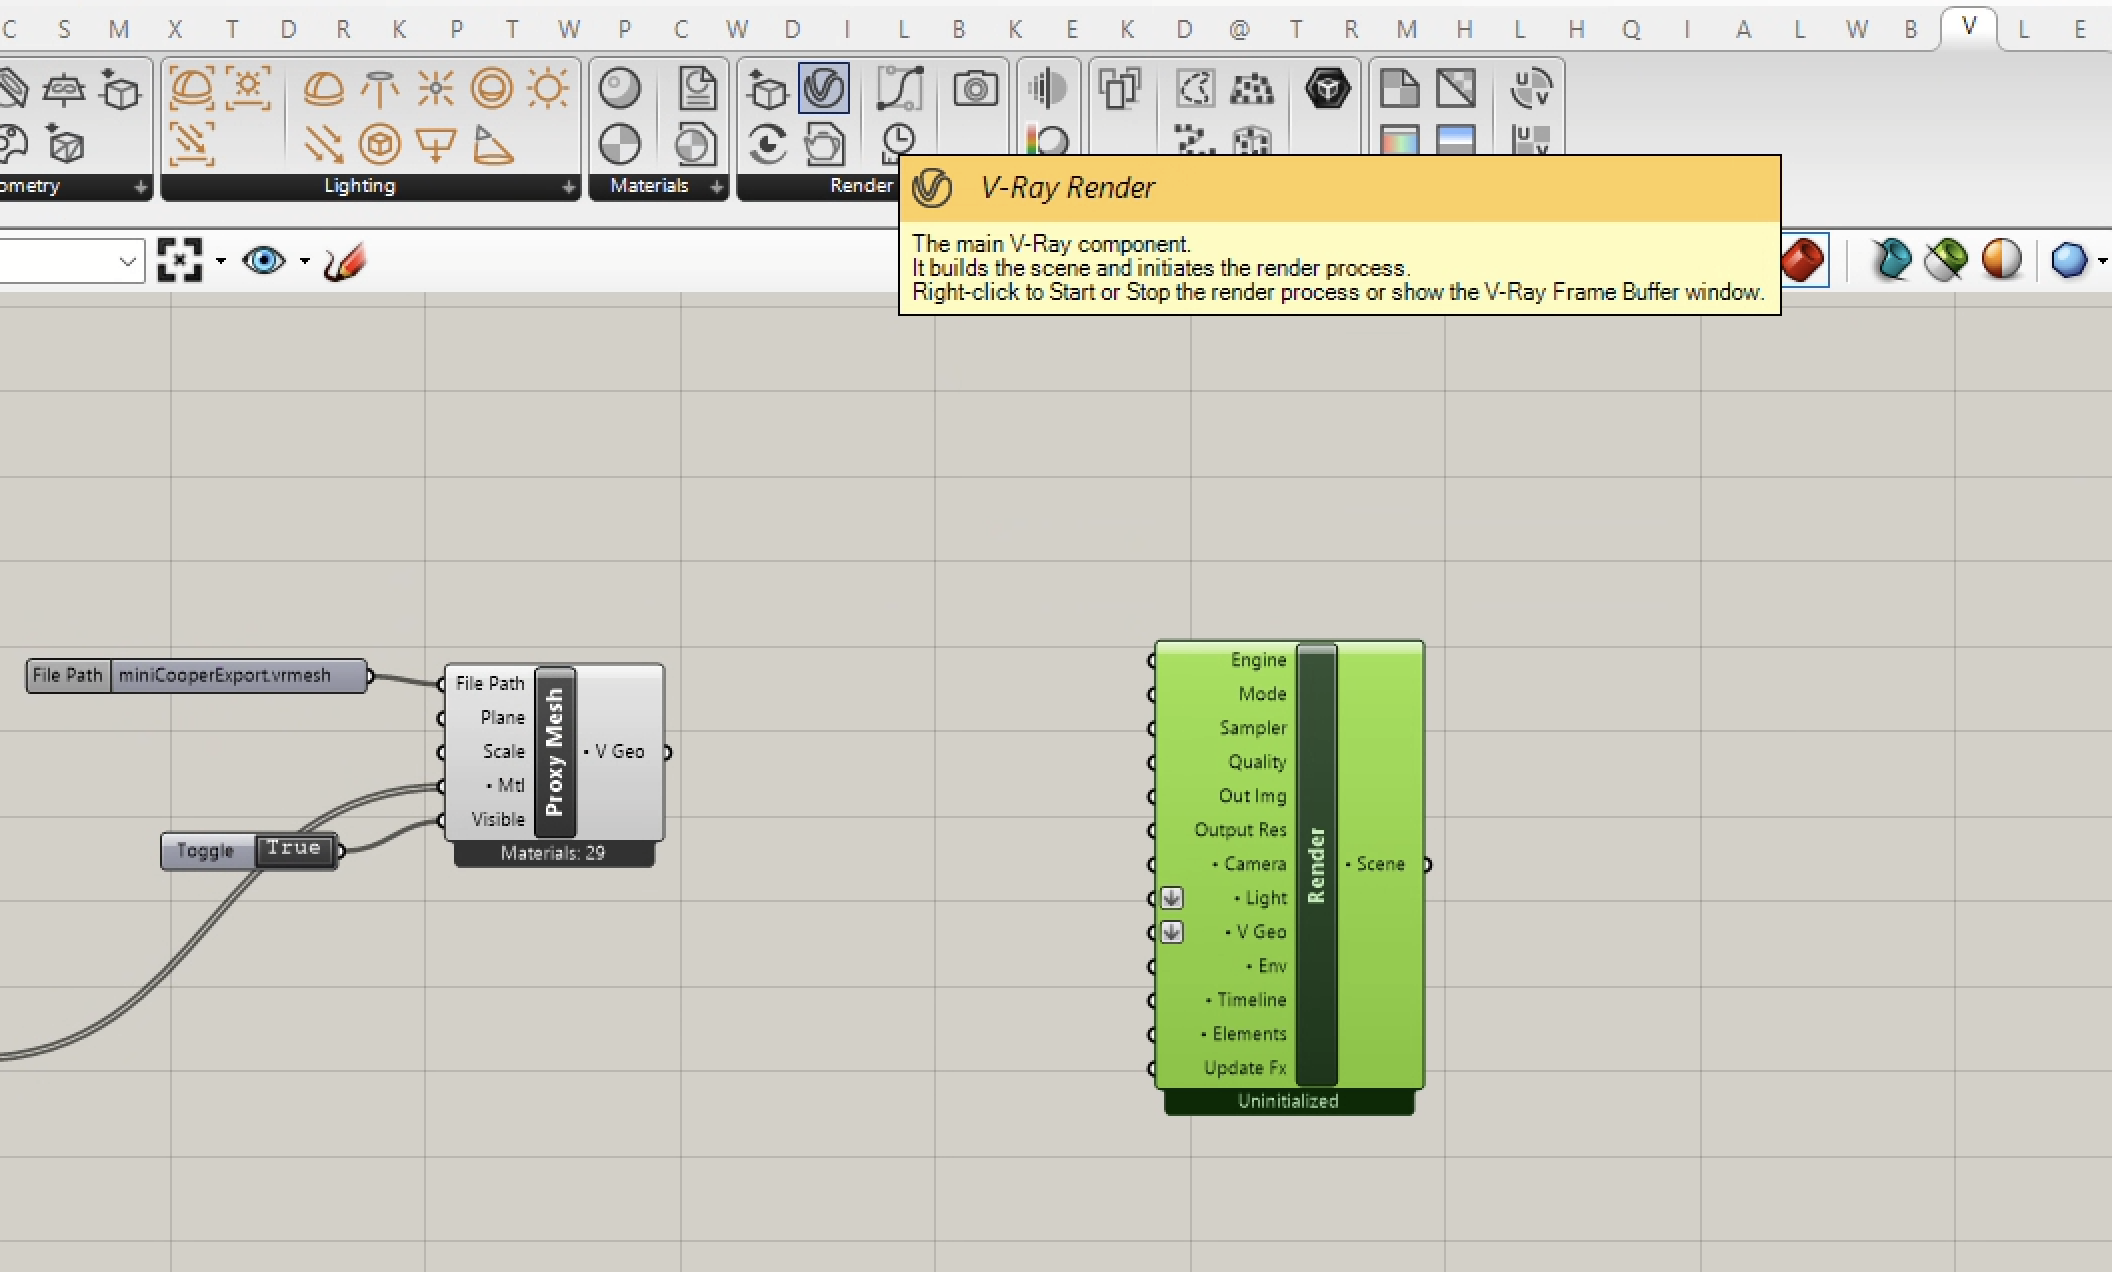
C. Add and test a V-Ray "Render" component."
1. Add a V-Ray "Render" component.
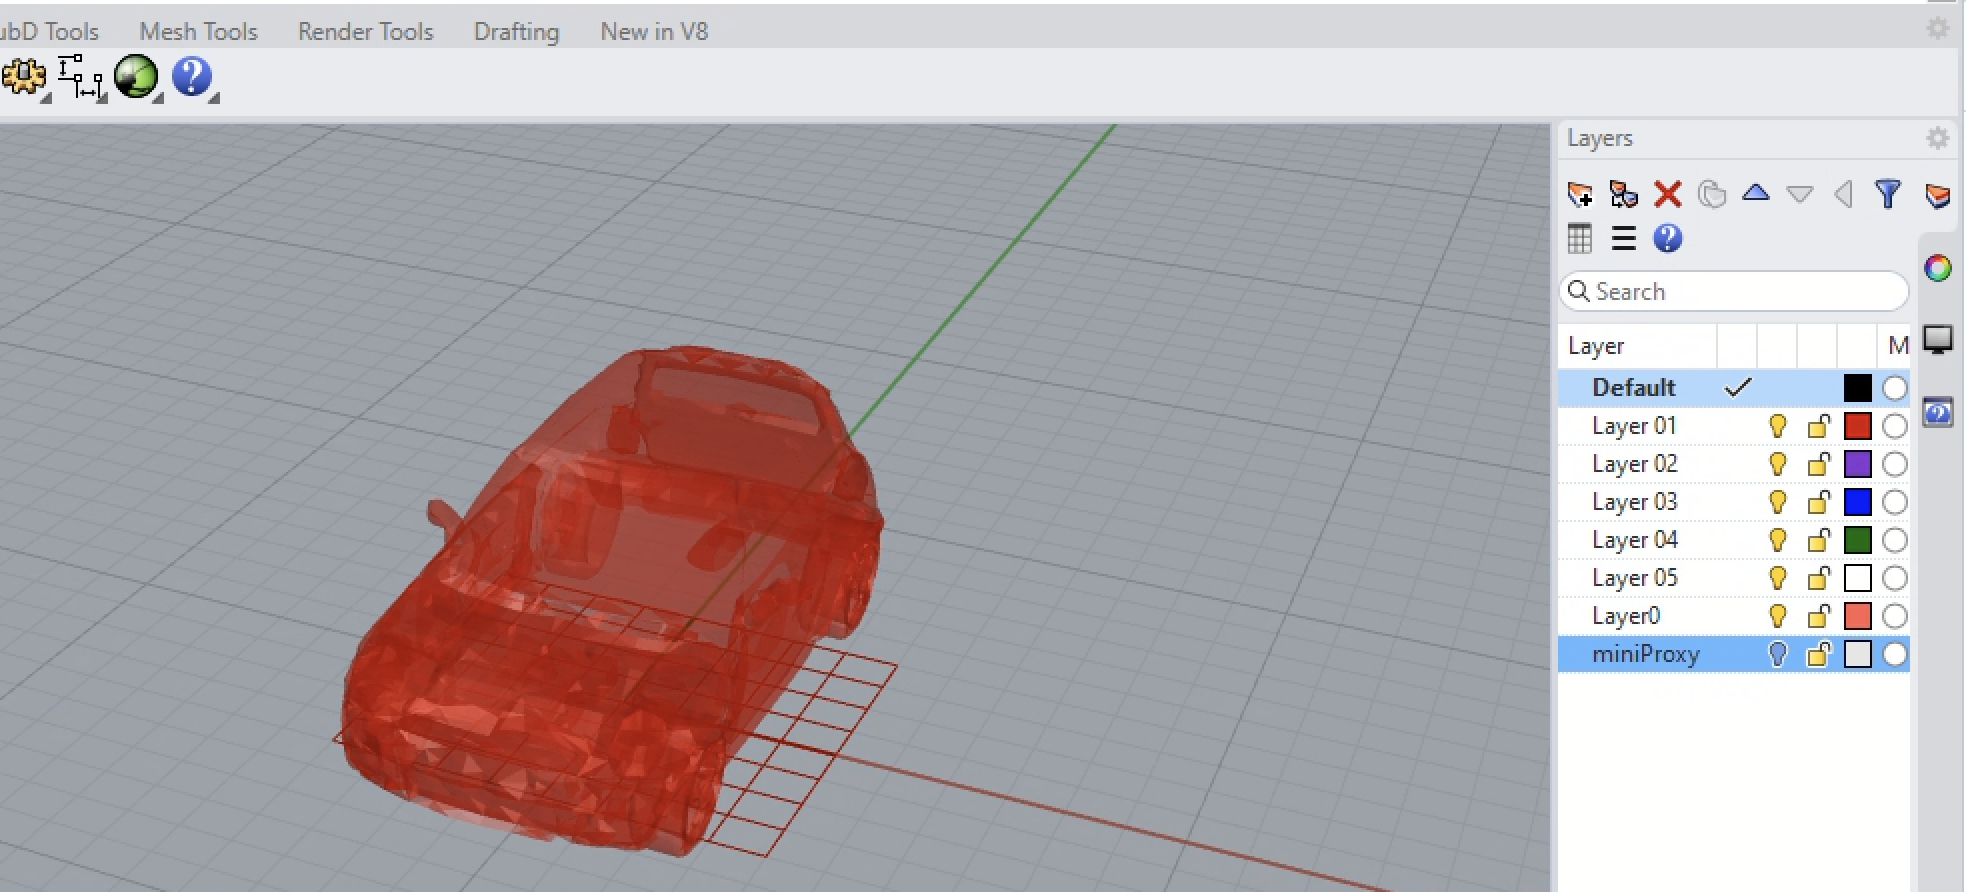
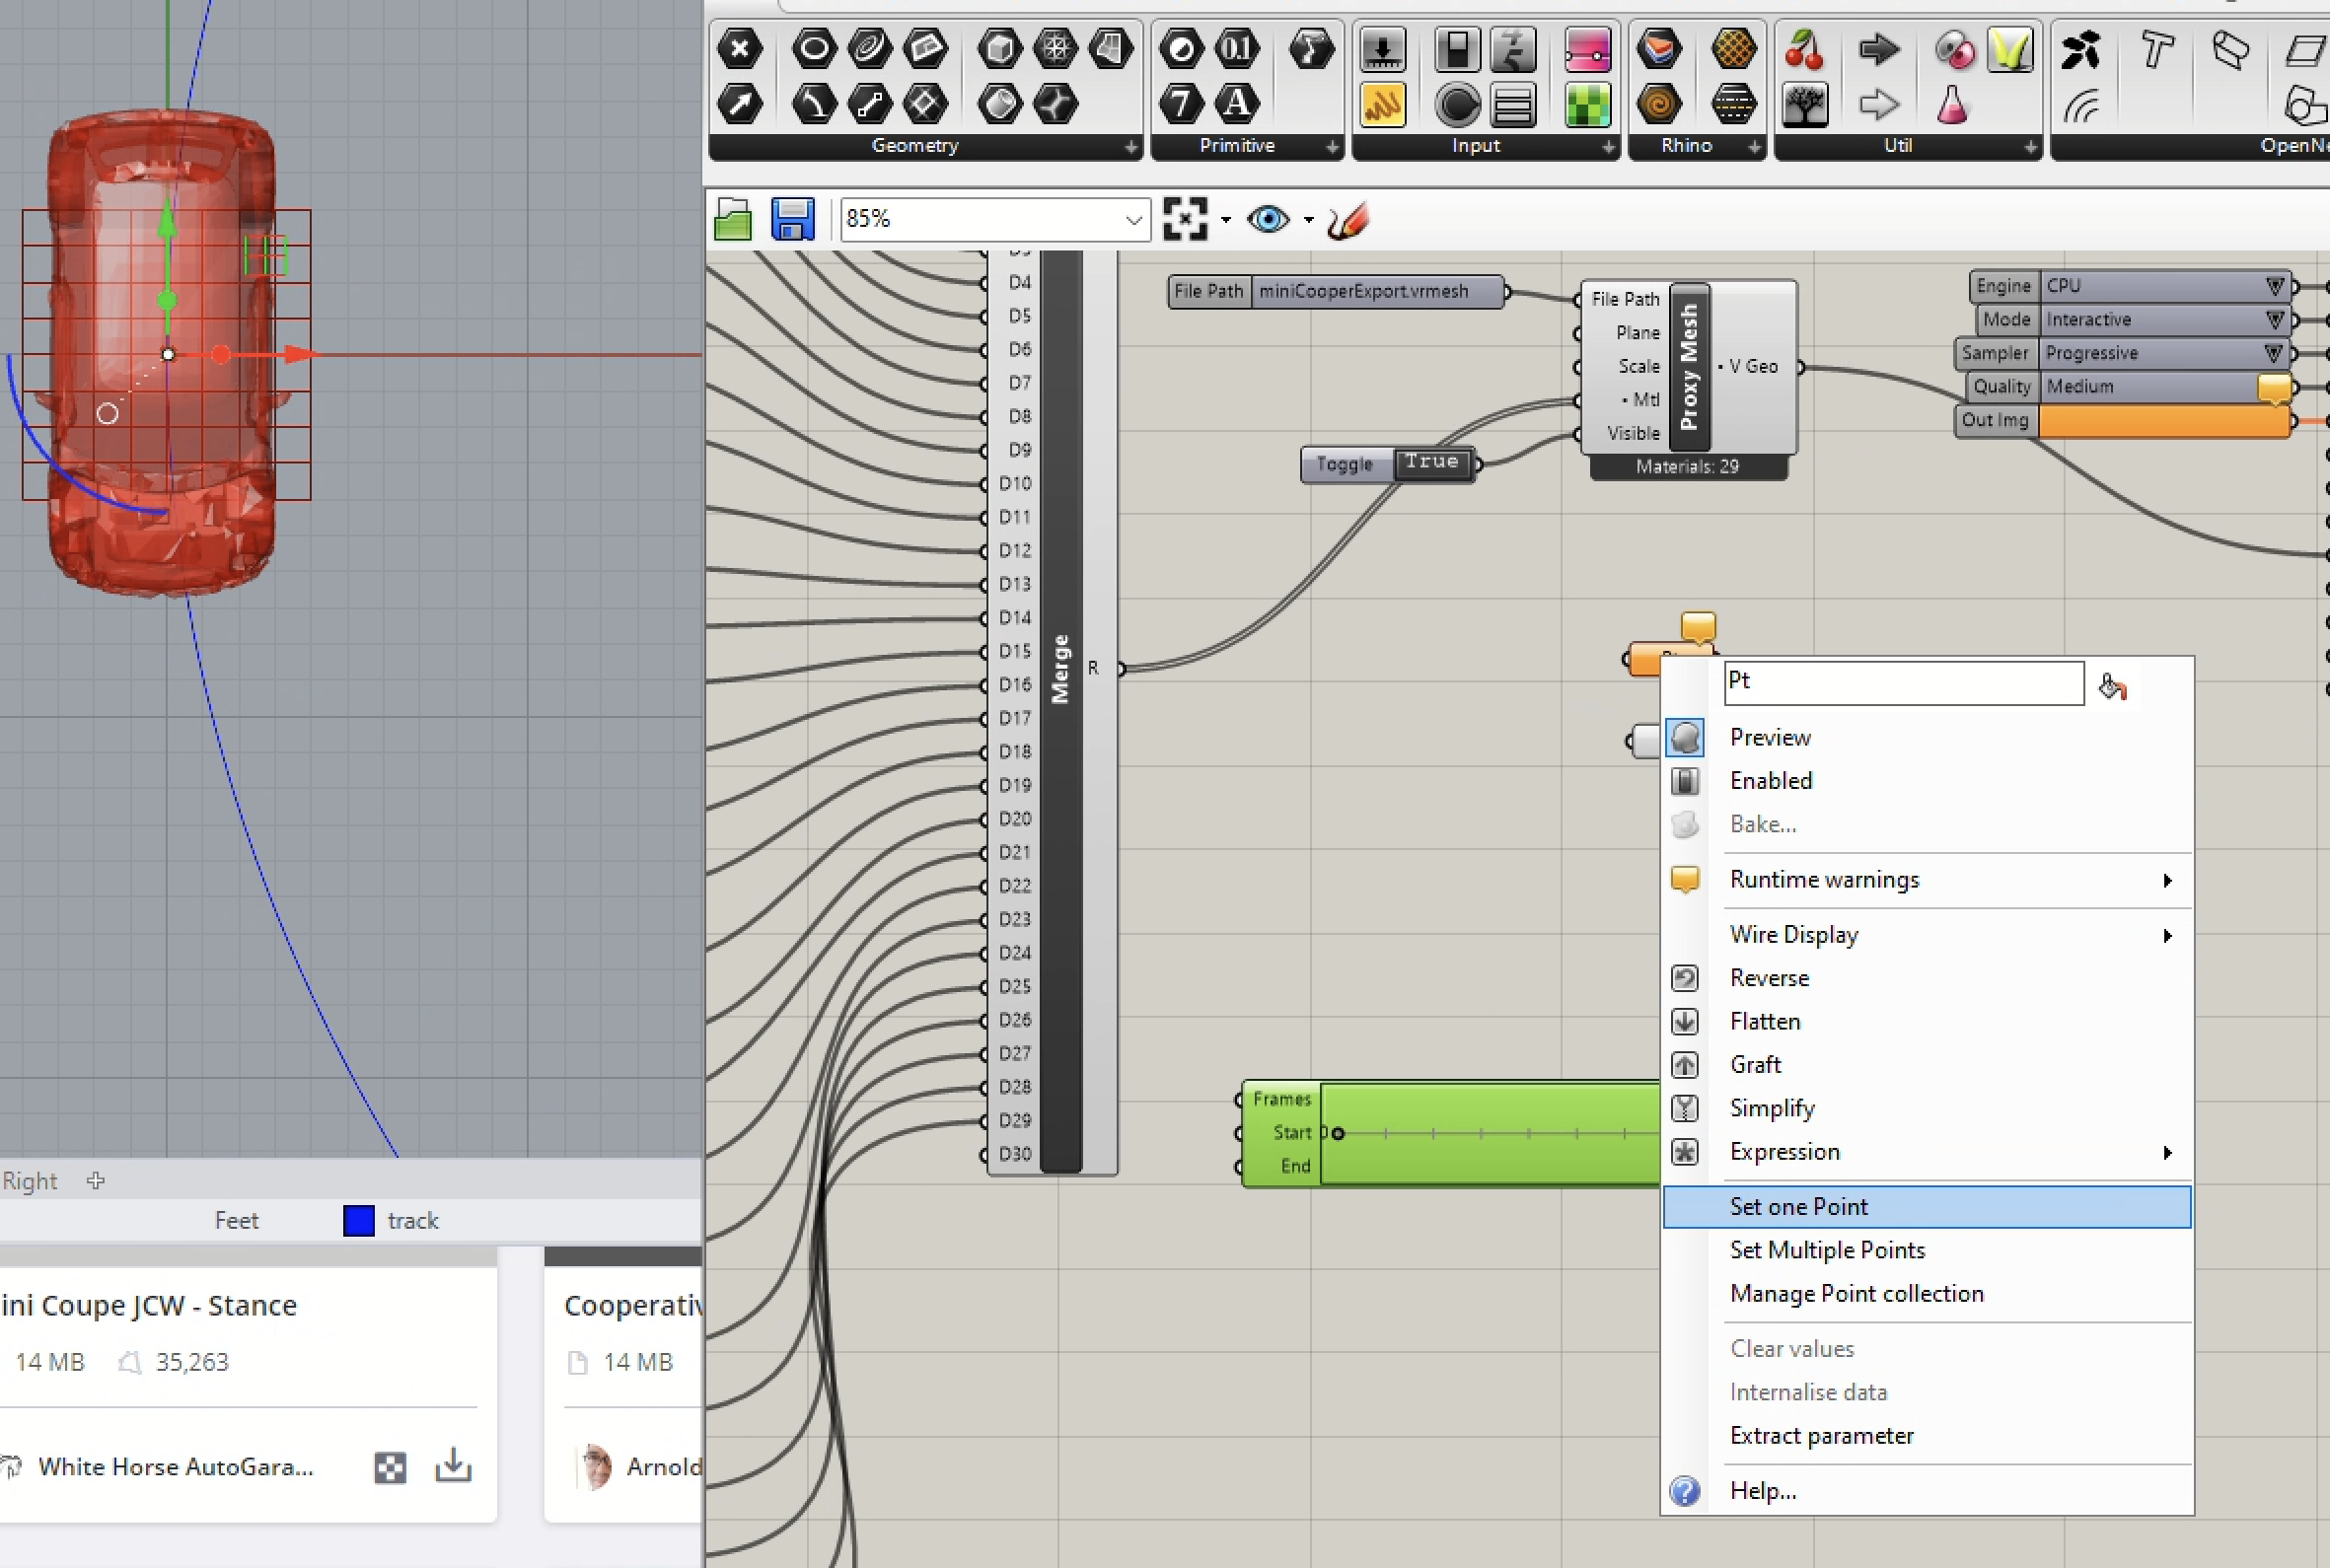
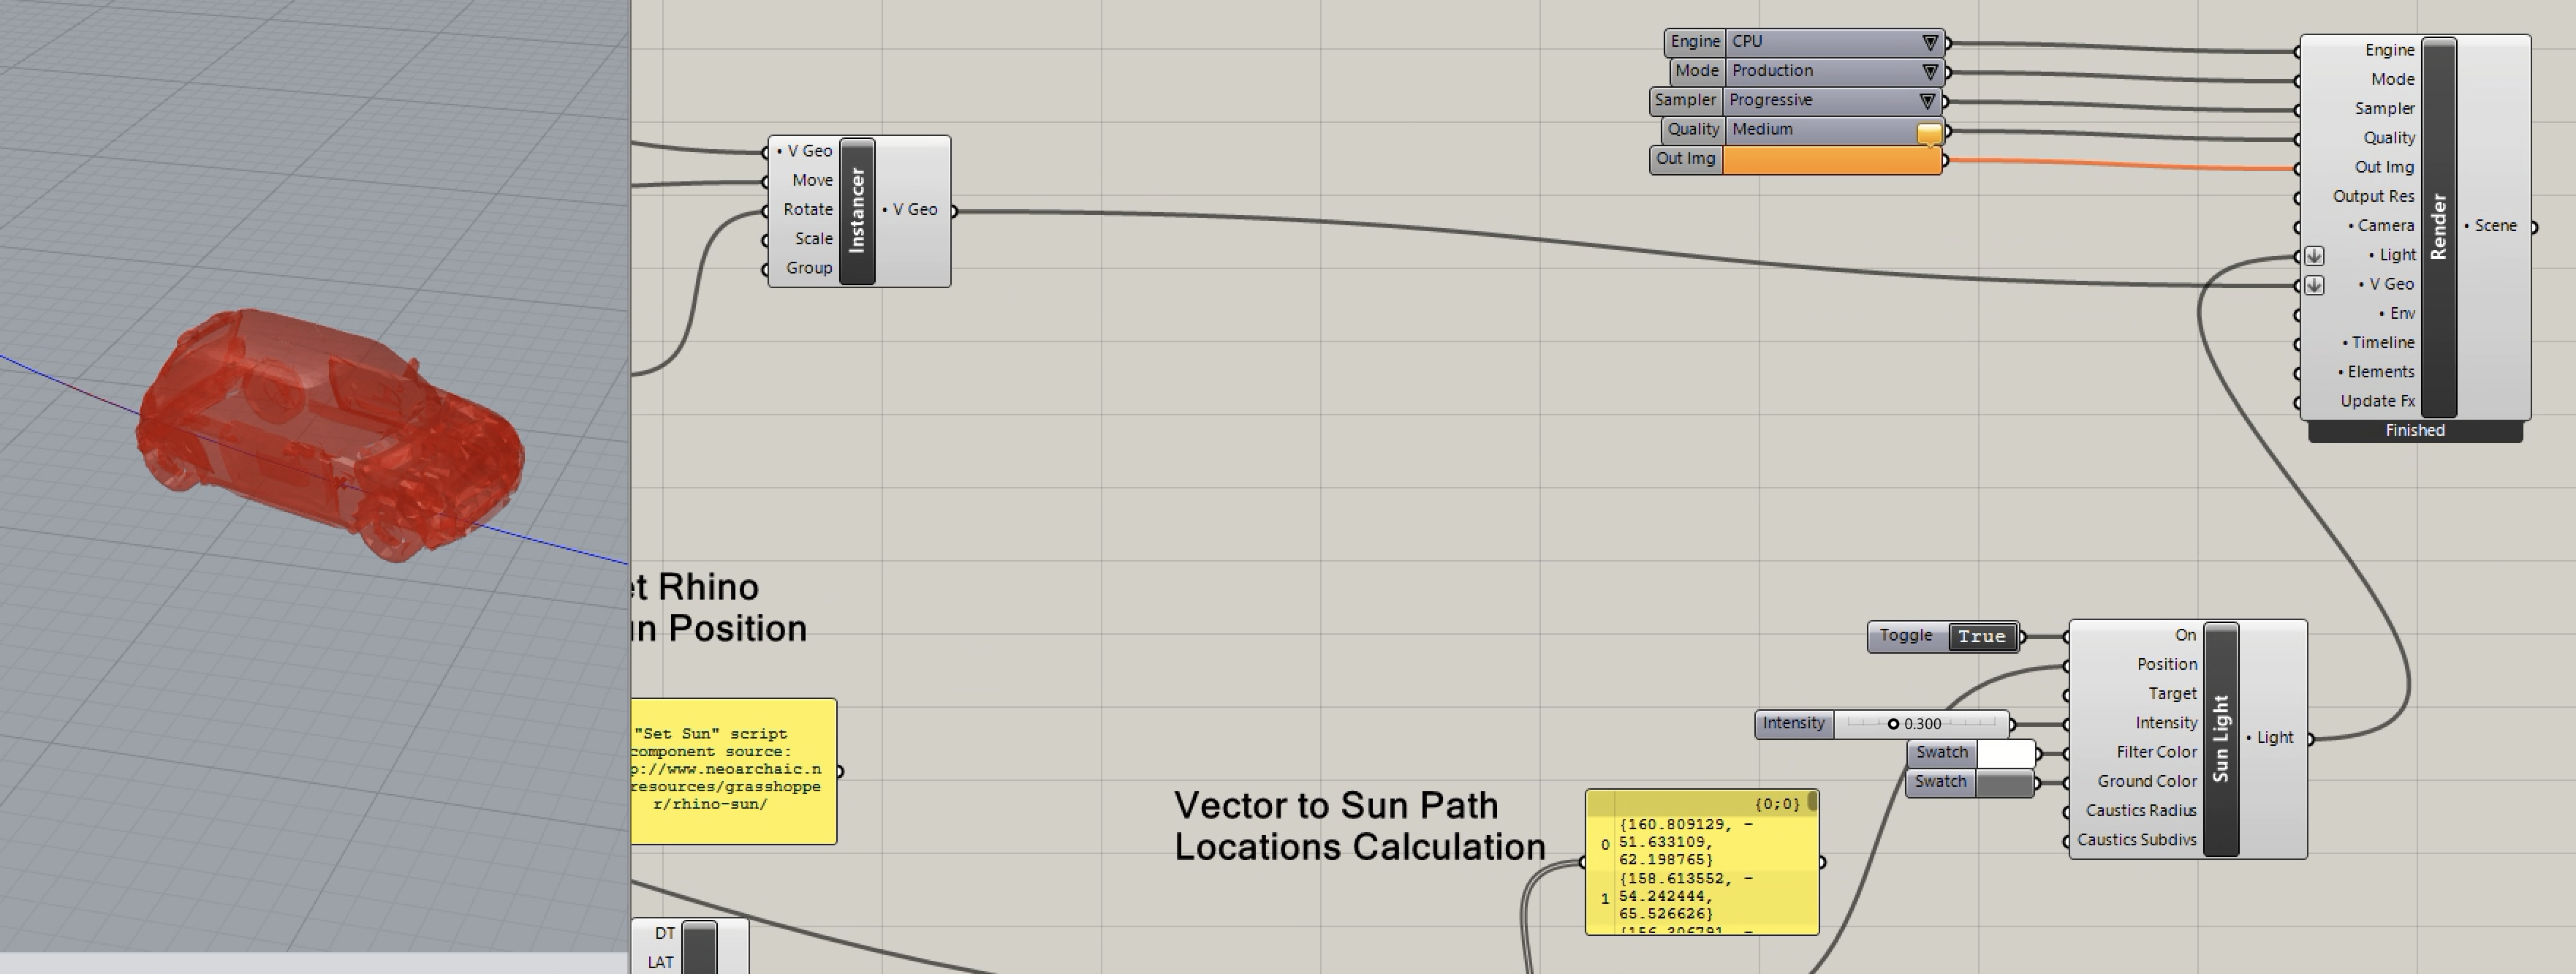
2. Move original Proxy file from within Rhino to a new layer and turn off the visibility of the layer. In the image below, the car highlighted in red is due to the Proxy file being referenced in Grasshopper, but the original Proxy file in the Rhino file is now on the layer "miniProxy" which has been turned off.
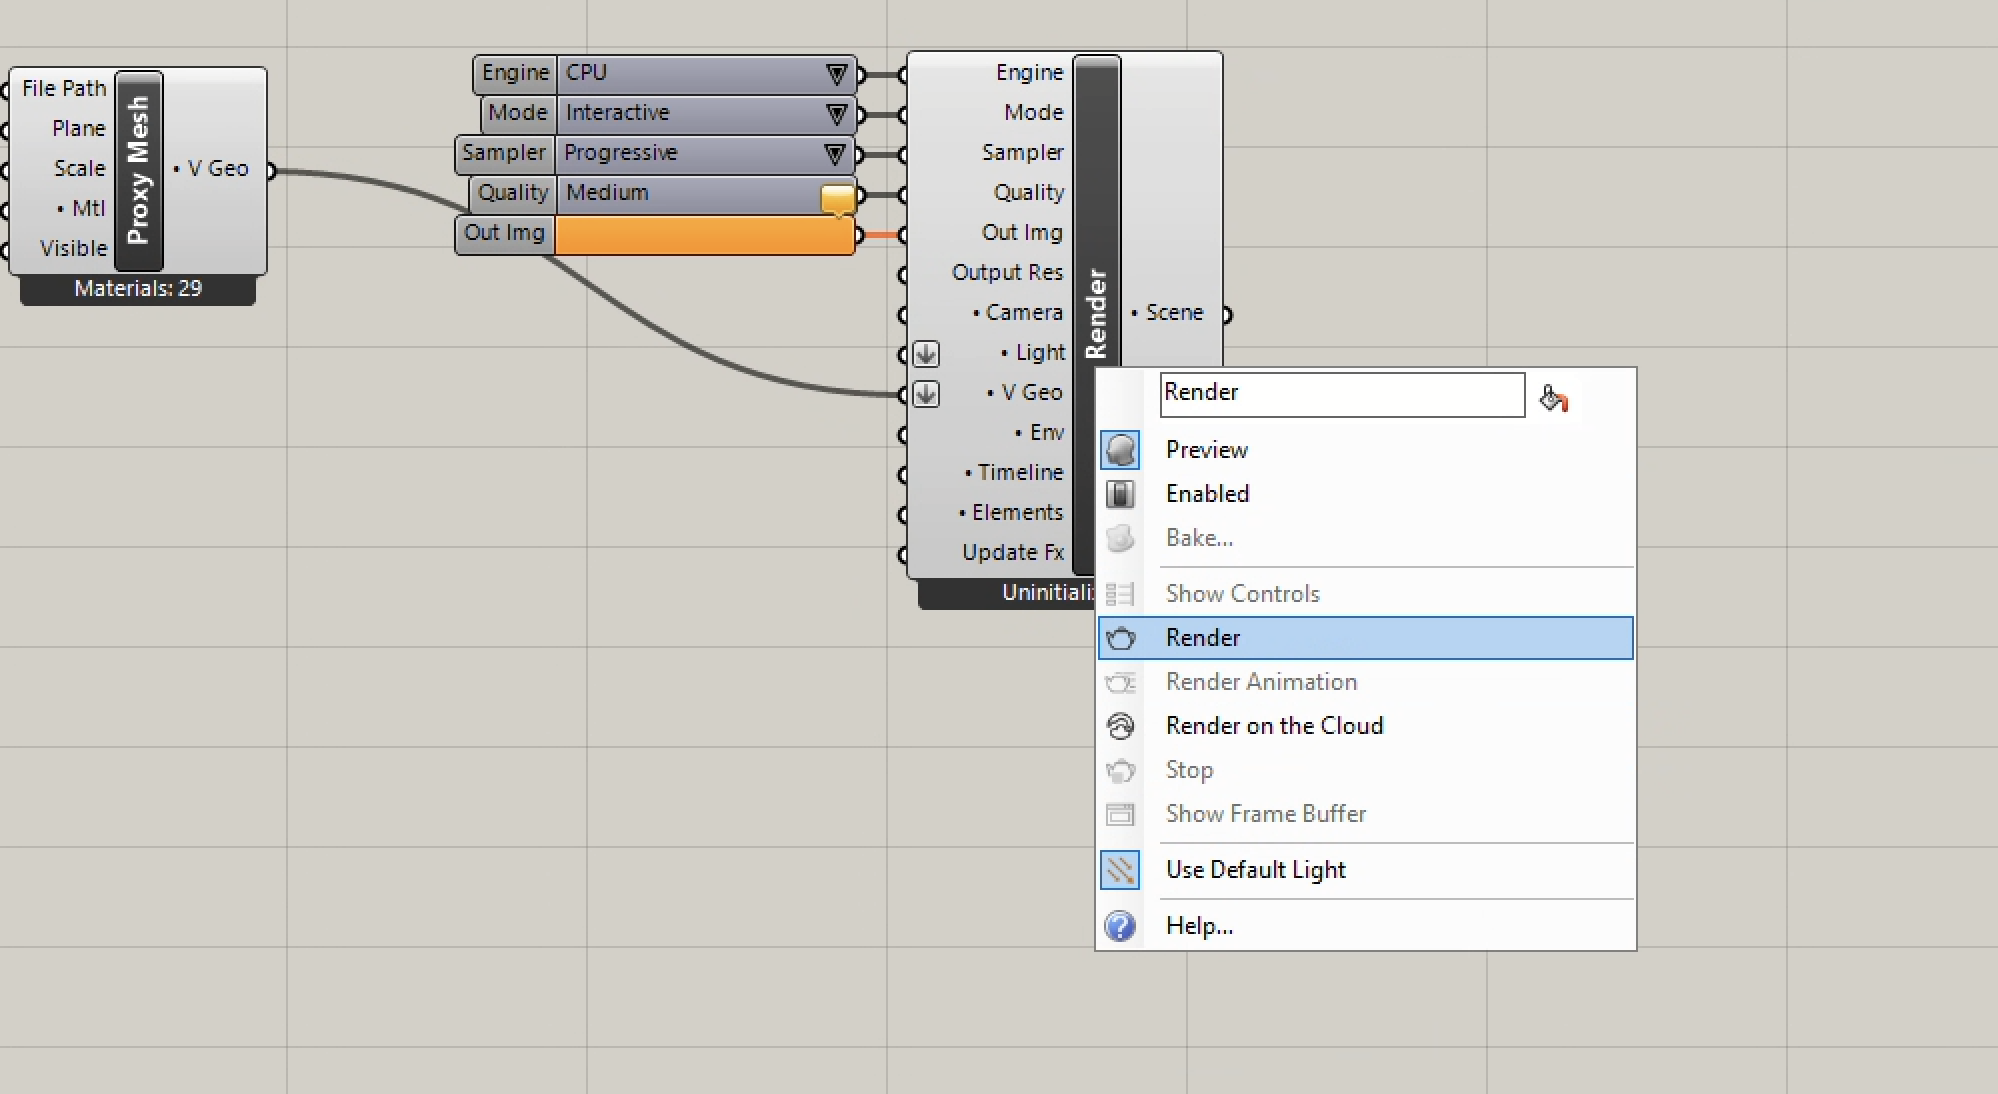
3. Activate the control panels of the "Render" component. Then, link the "Proxy Mesh" component to the "V Geo" data port of the "Render" component.
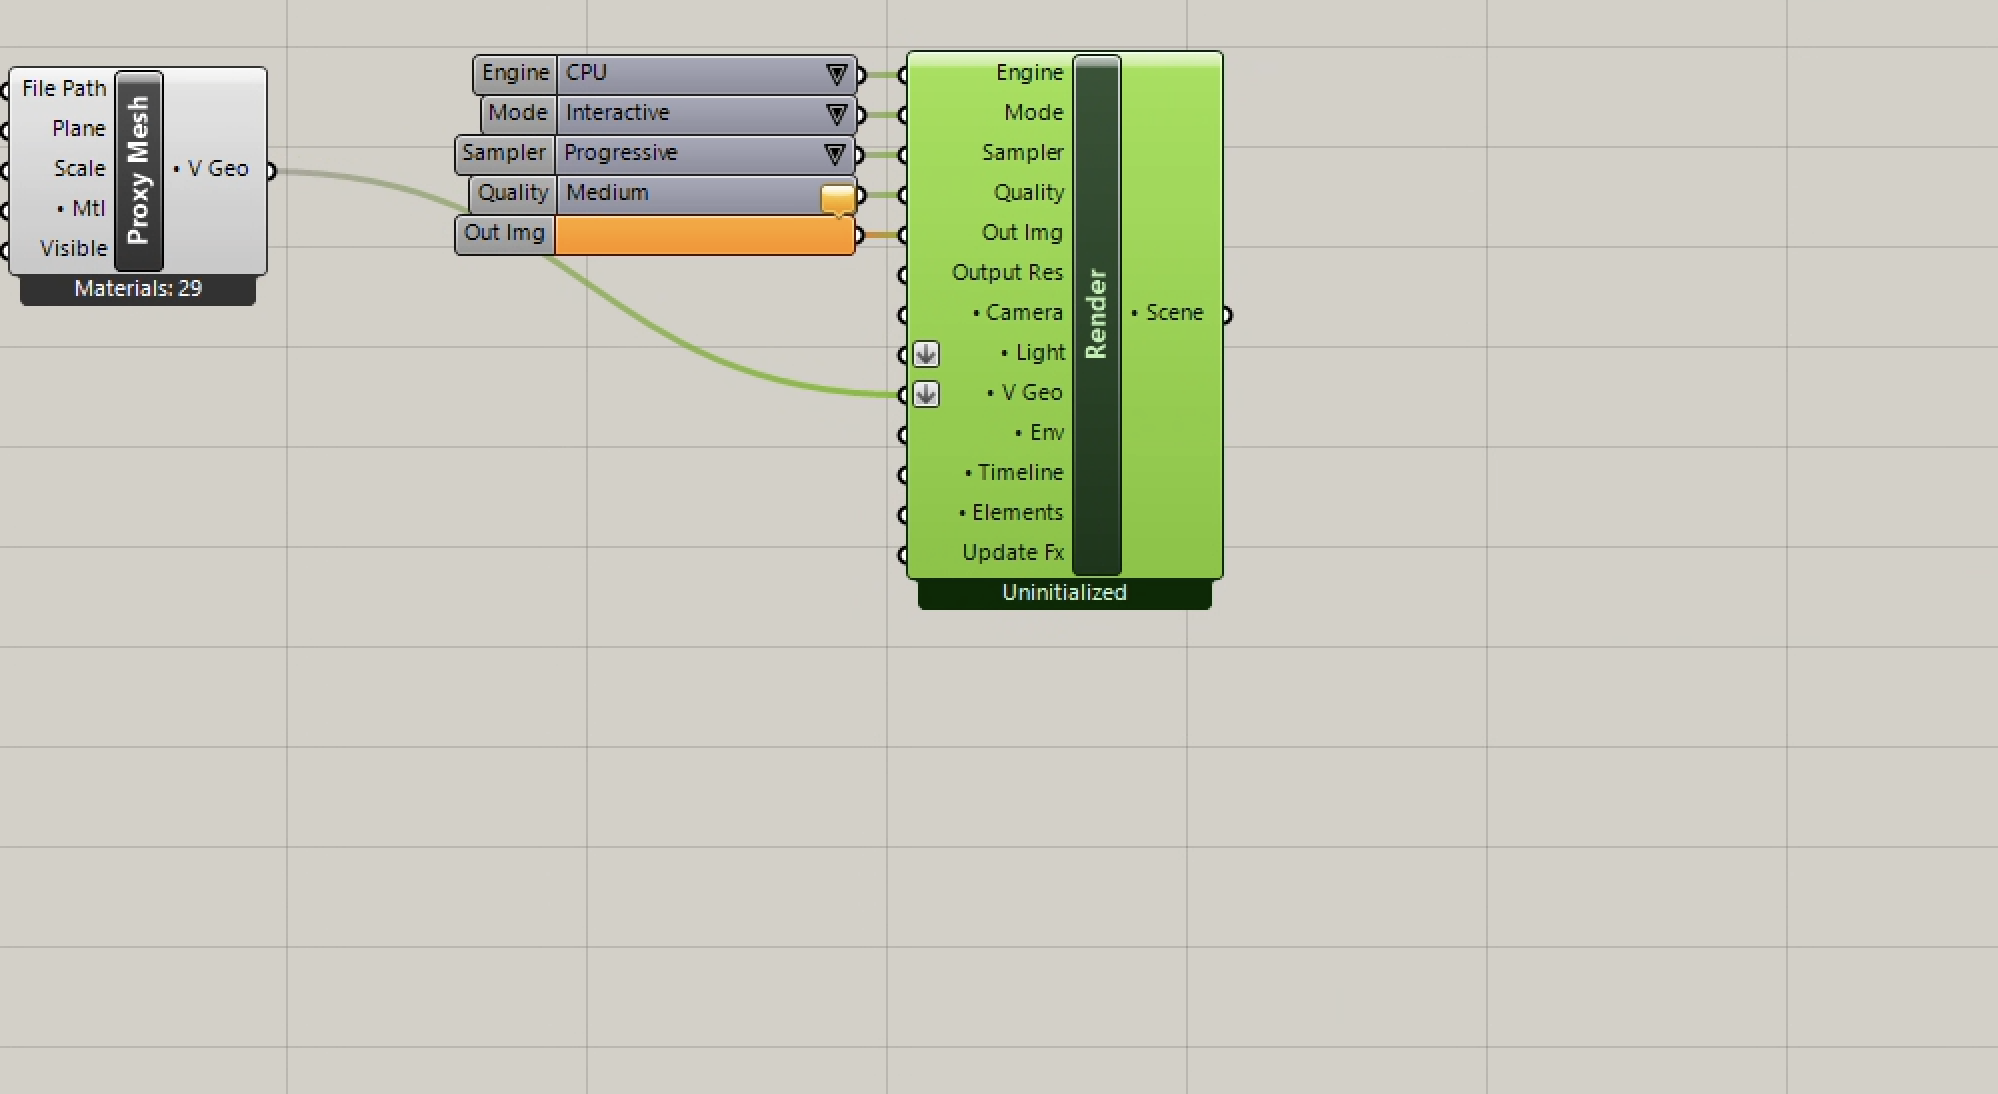
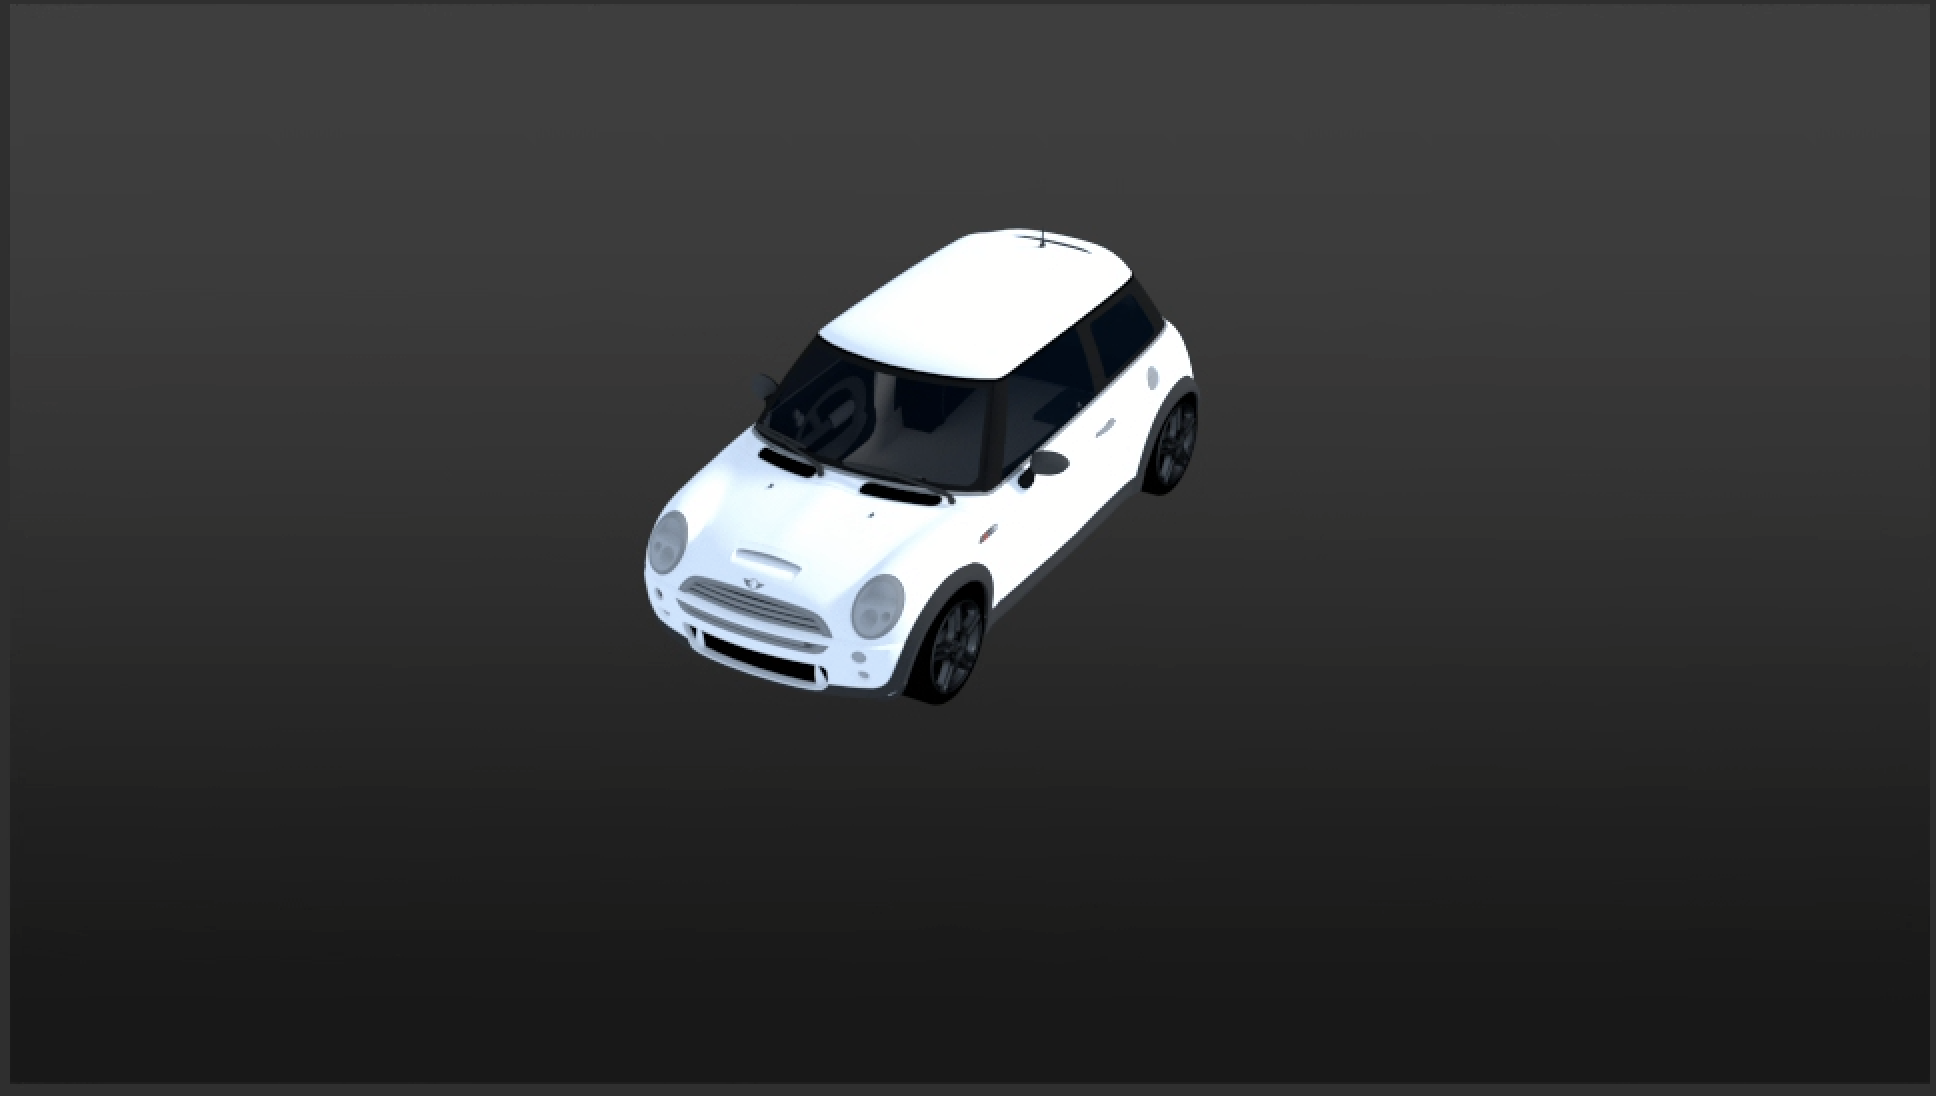
4. Right-mousebutton-click on the word "Render" of the "Render" component, and select the "Render" option to see a still image rendering. Note the test render result below indicates that the material assignments in part II. A. above appear to be working for the Proxy file.
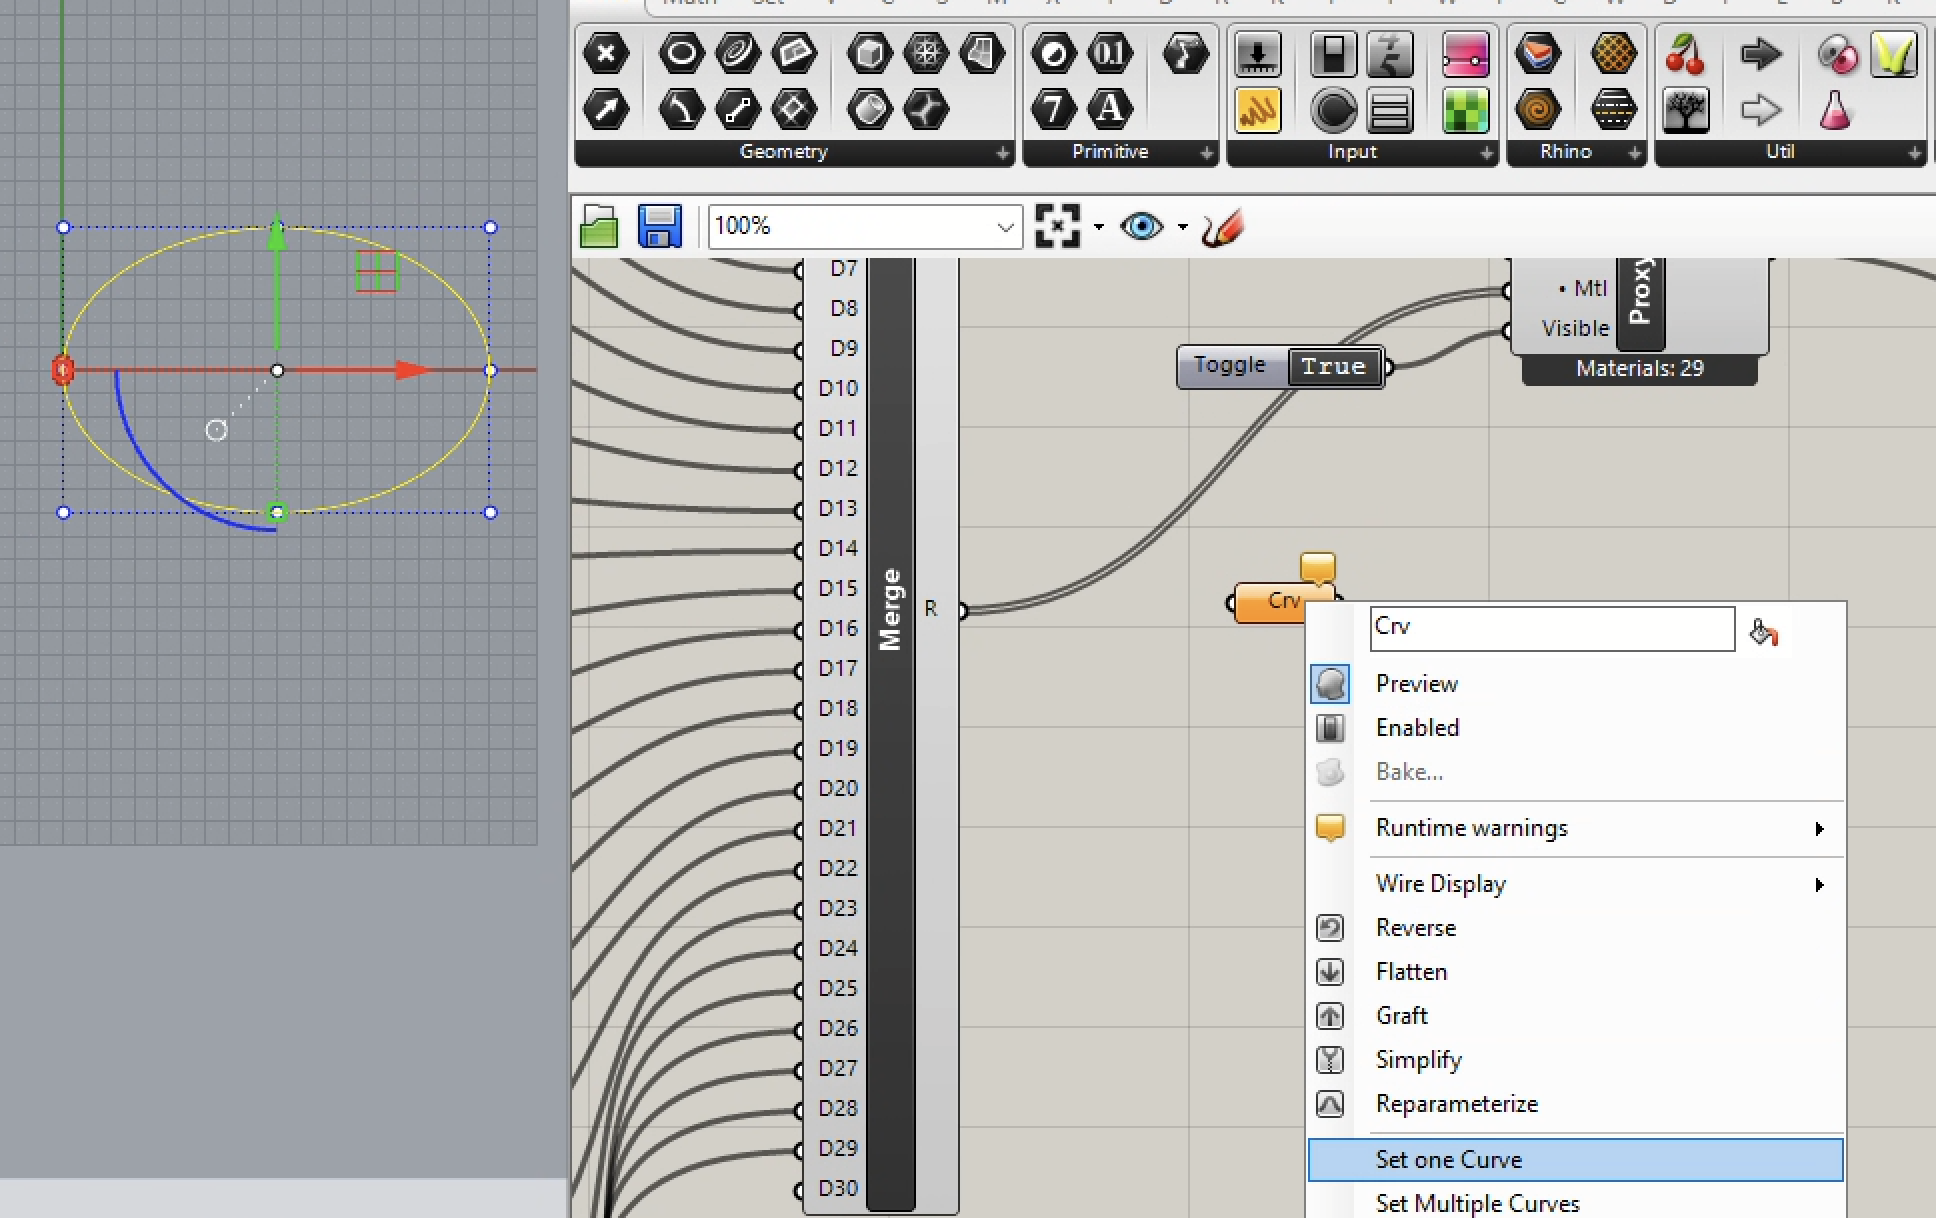
D. Create a ellipse track and explore the Mini Cooper travel along it.
1. Add an ellipse to the plan view of Rhino and connect it to a curve "Crv" componenet in Grasshopper.
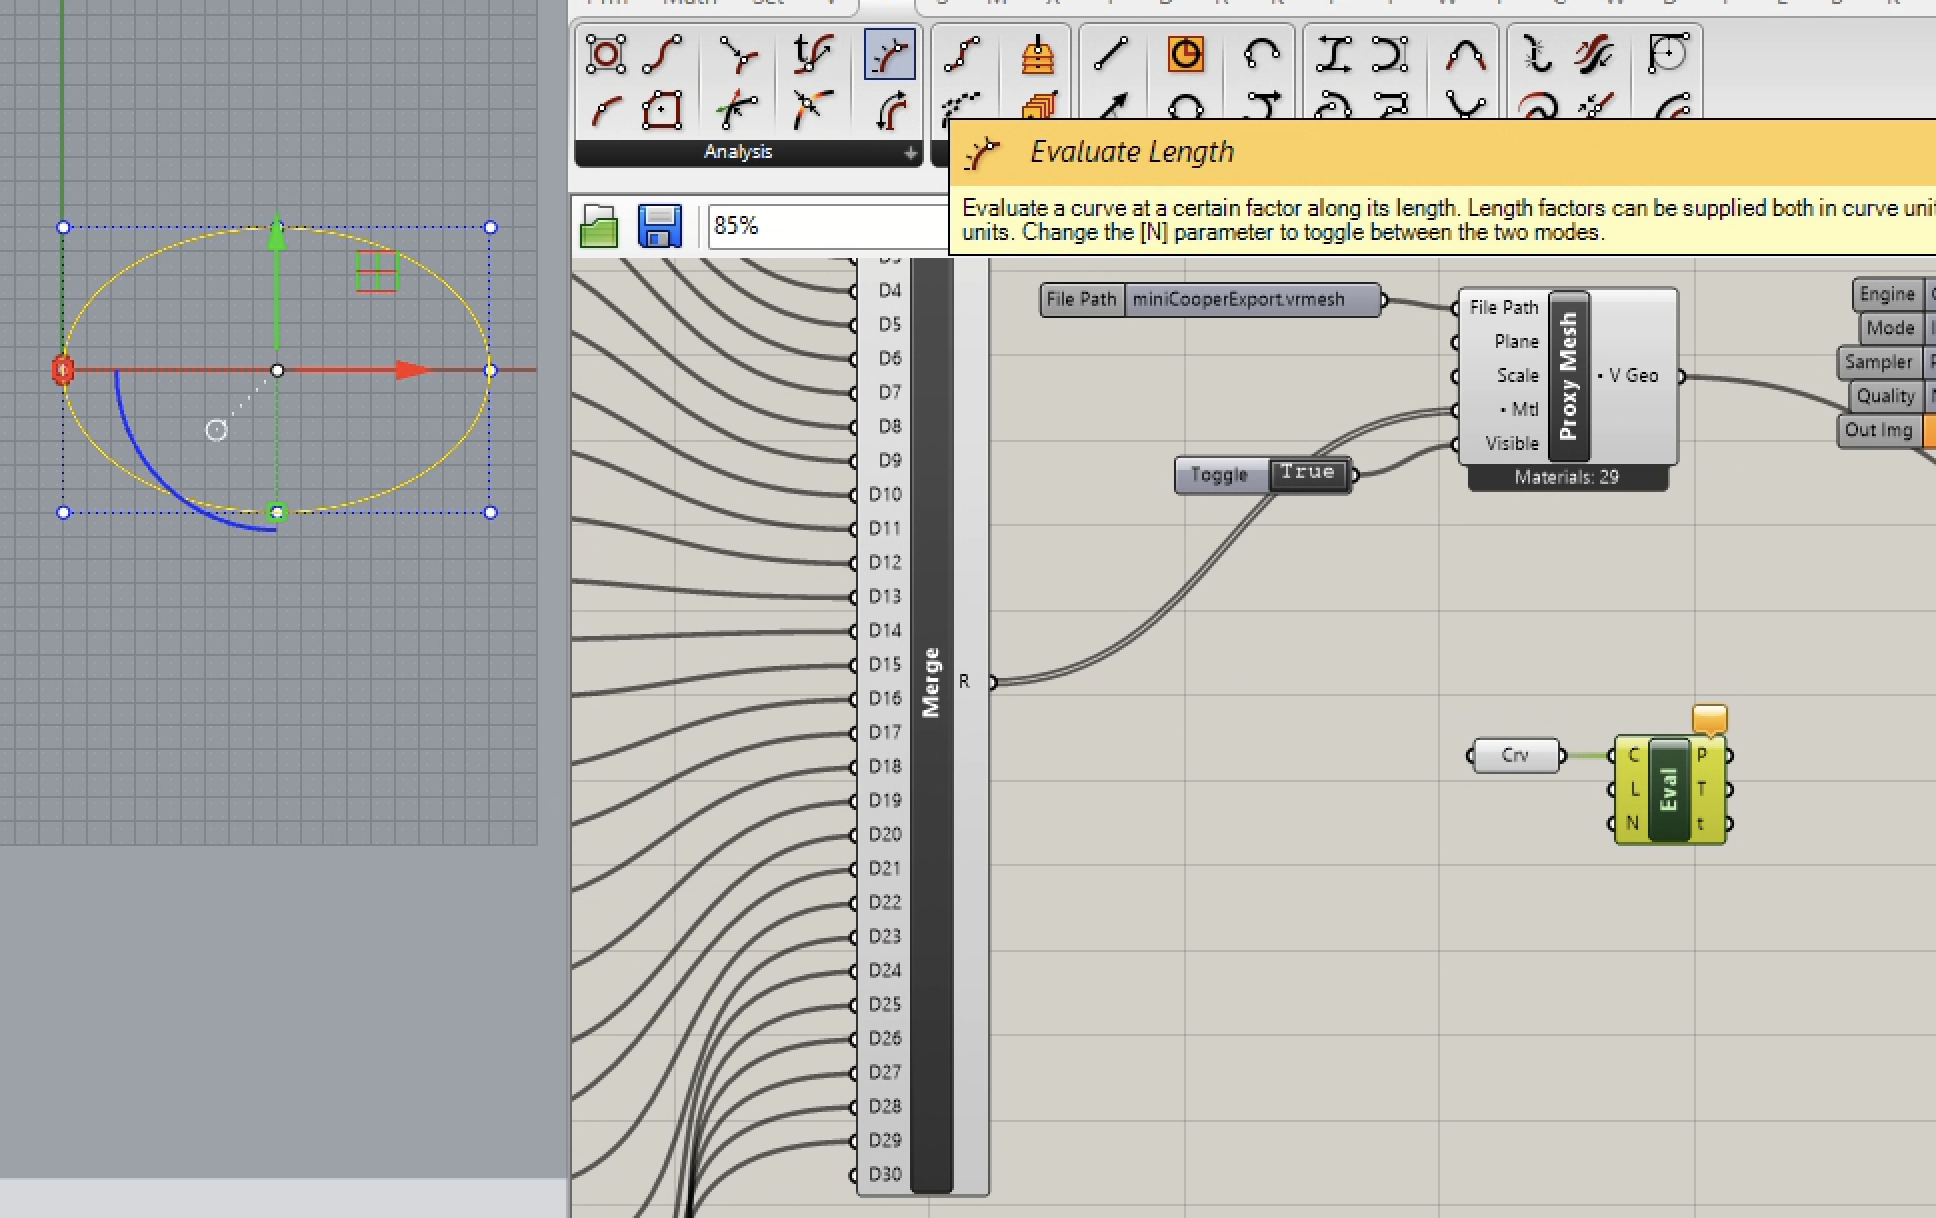
2. Connect the "Crv" component to an "Eval Curve" component in Grasshopper. Note that the left axial end point of the ellipse is coincident with the center point of the Mini Cooper car proxy fie.
3. Add a V-Ray "Timeline" component and connect its "Fraction" output port to the "L" input port of the "Timeline" component.
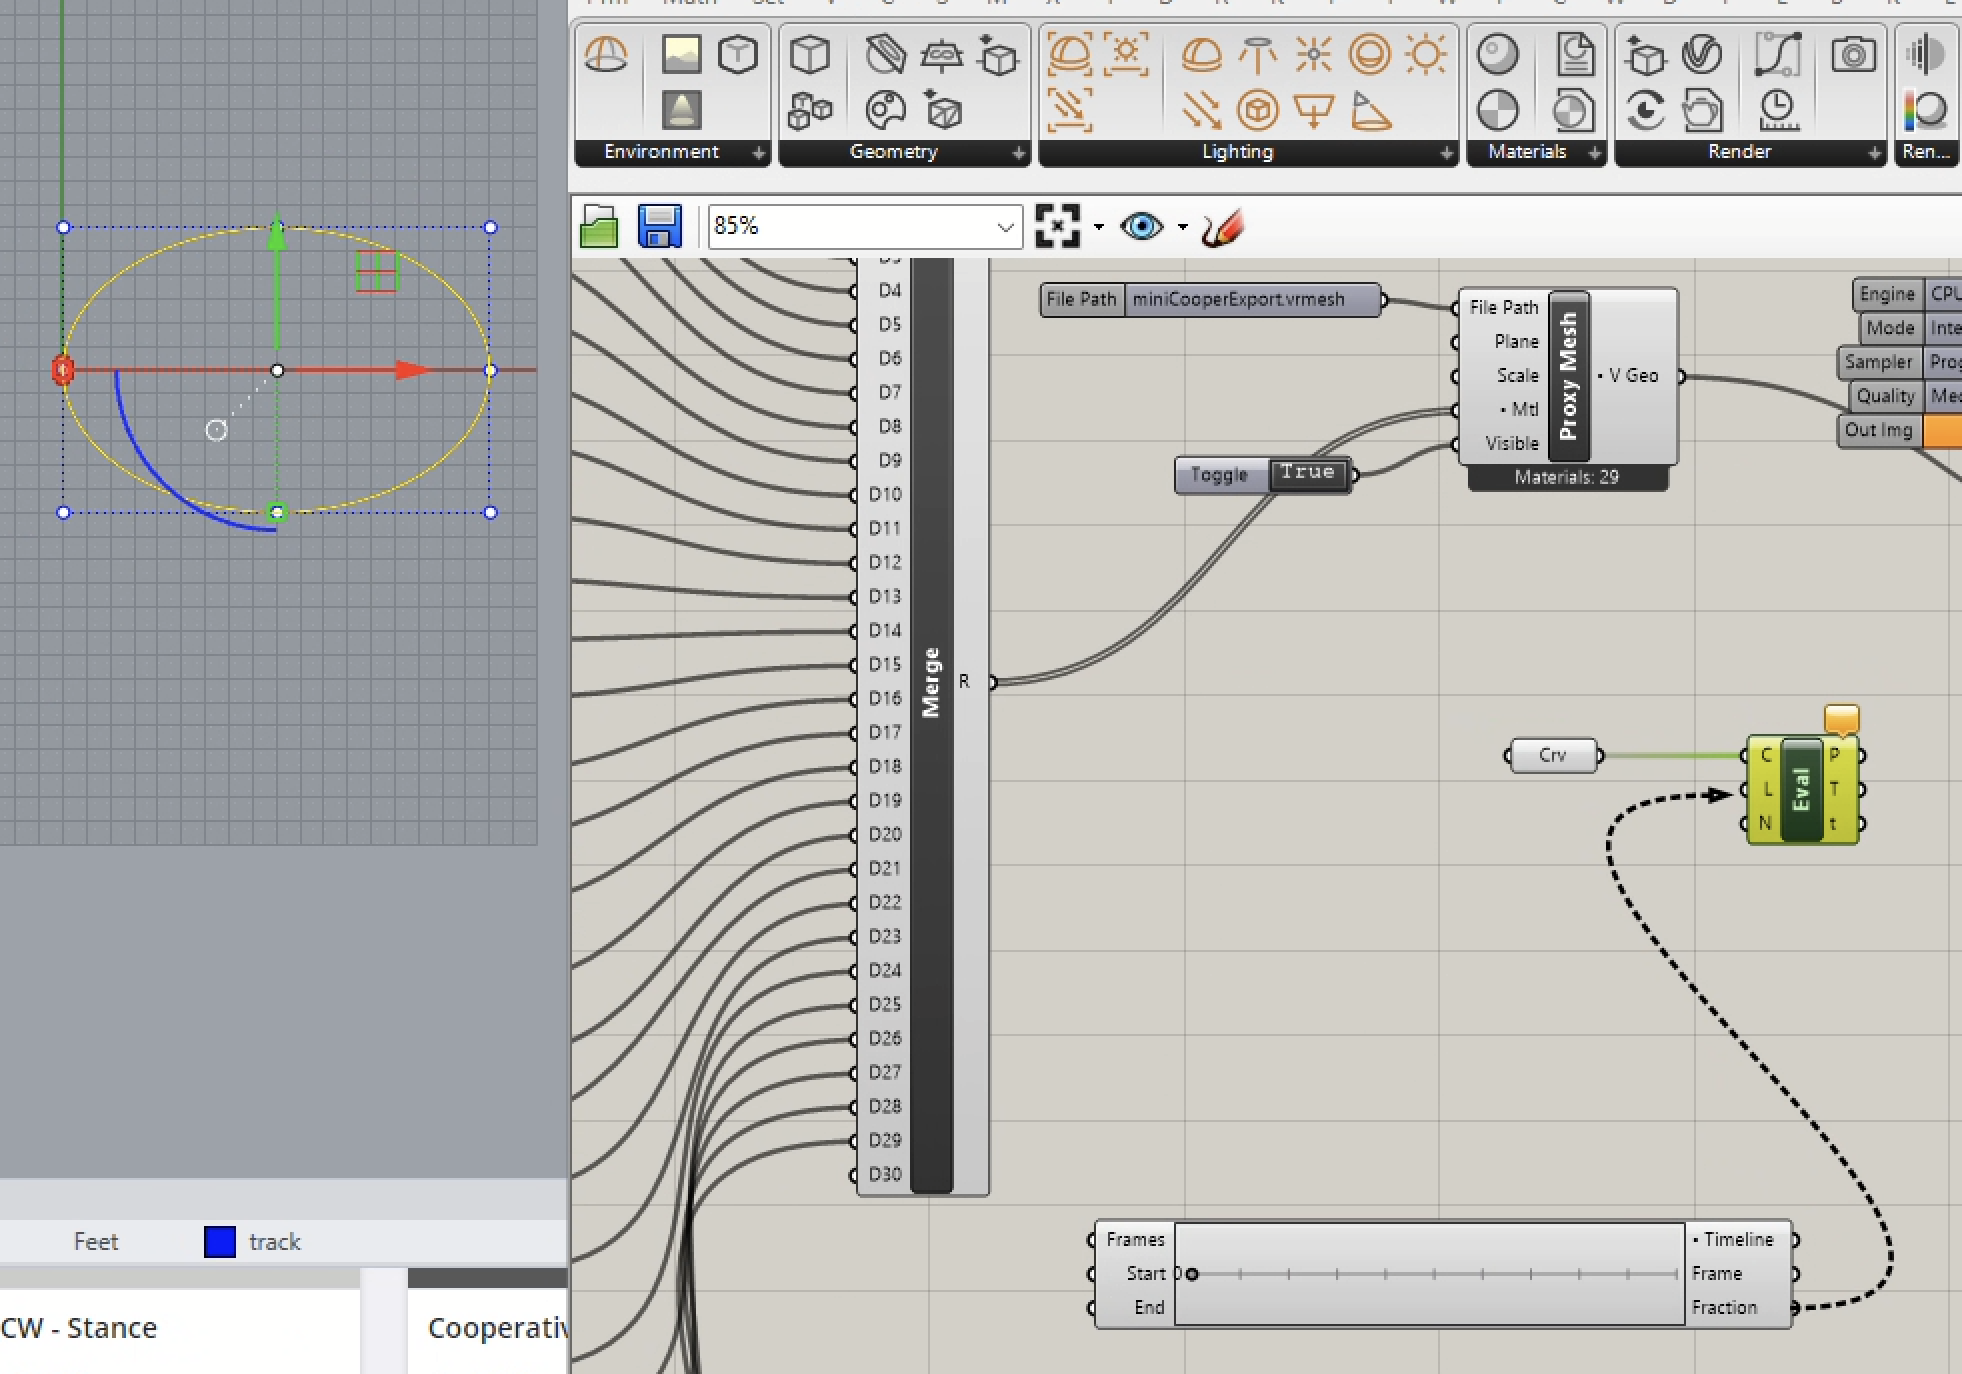
4. Add a point to Rhino at the center point of Mini Cooper car and connect it to a point "Pt" component of Grasshopper. This "Pt" will serve as the start location for the car.
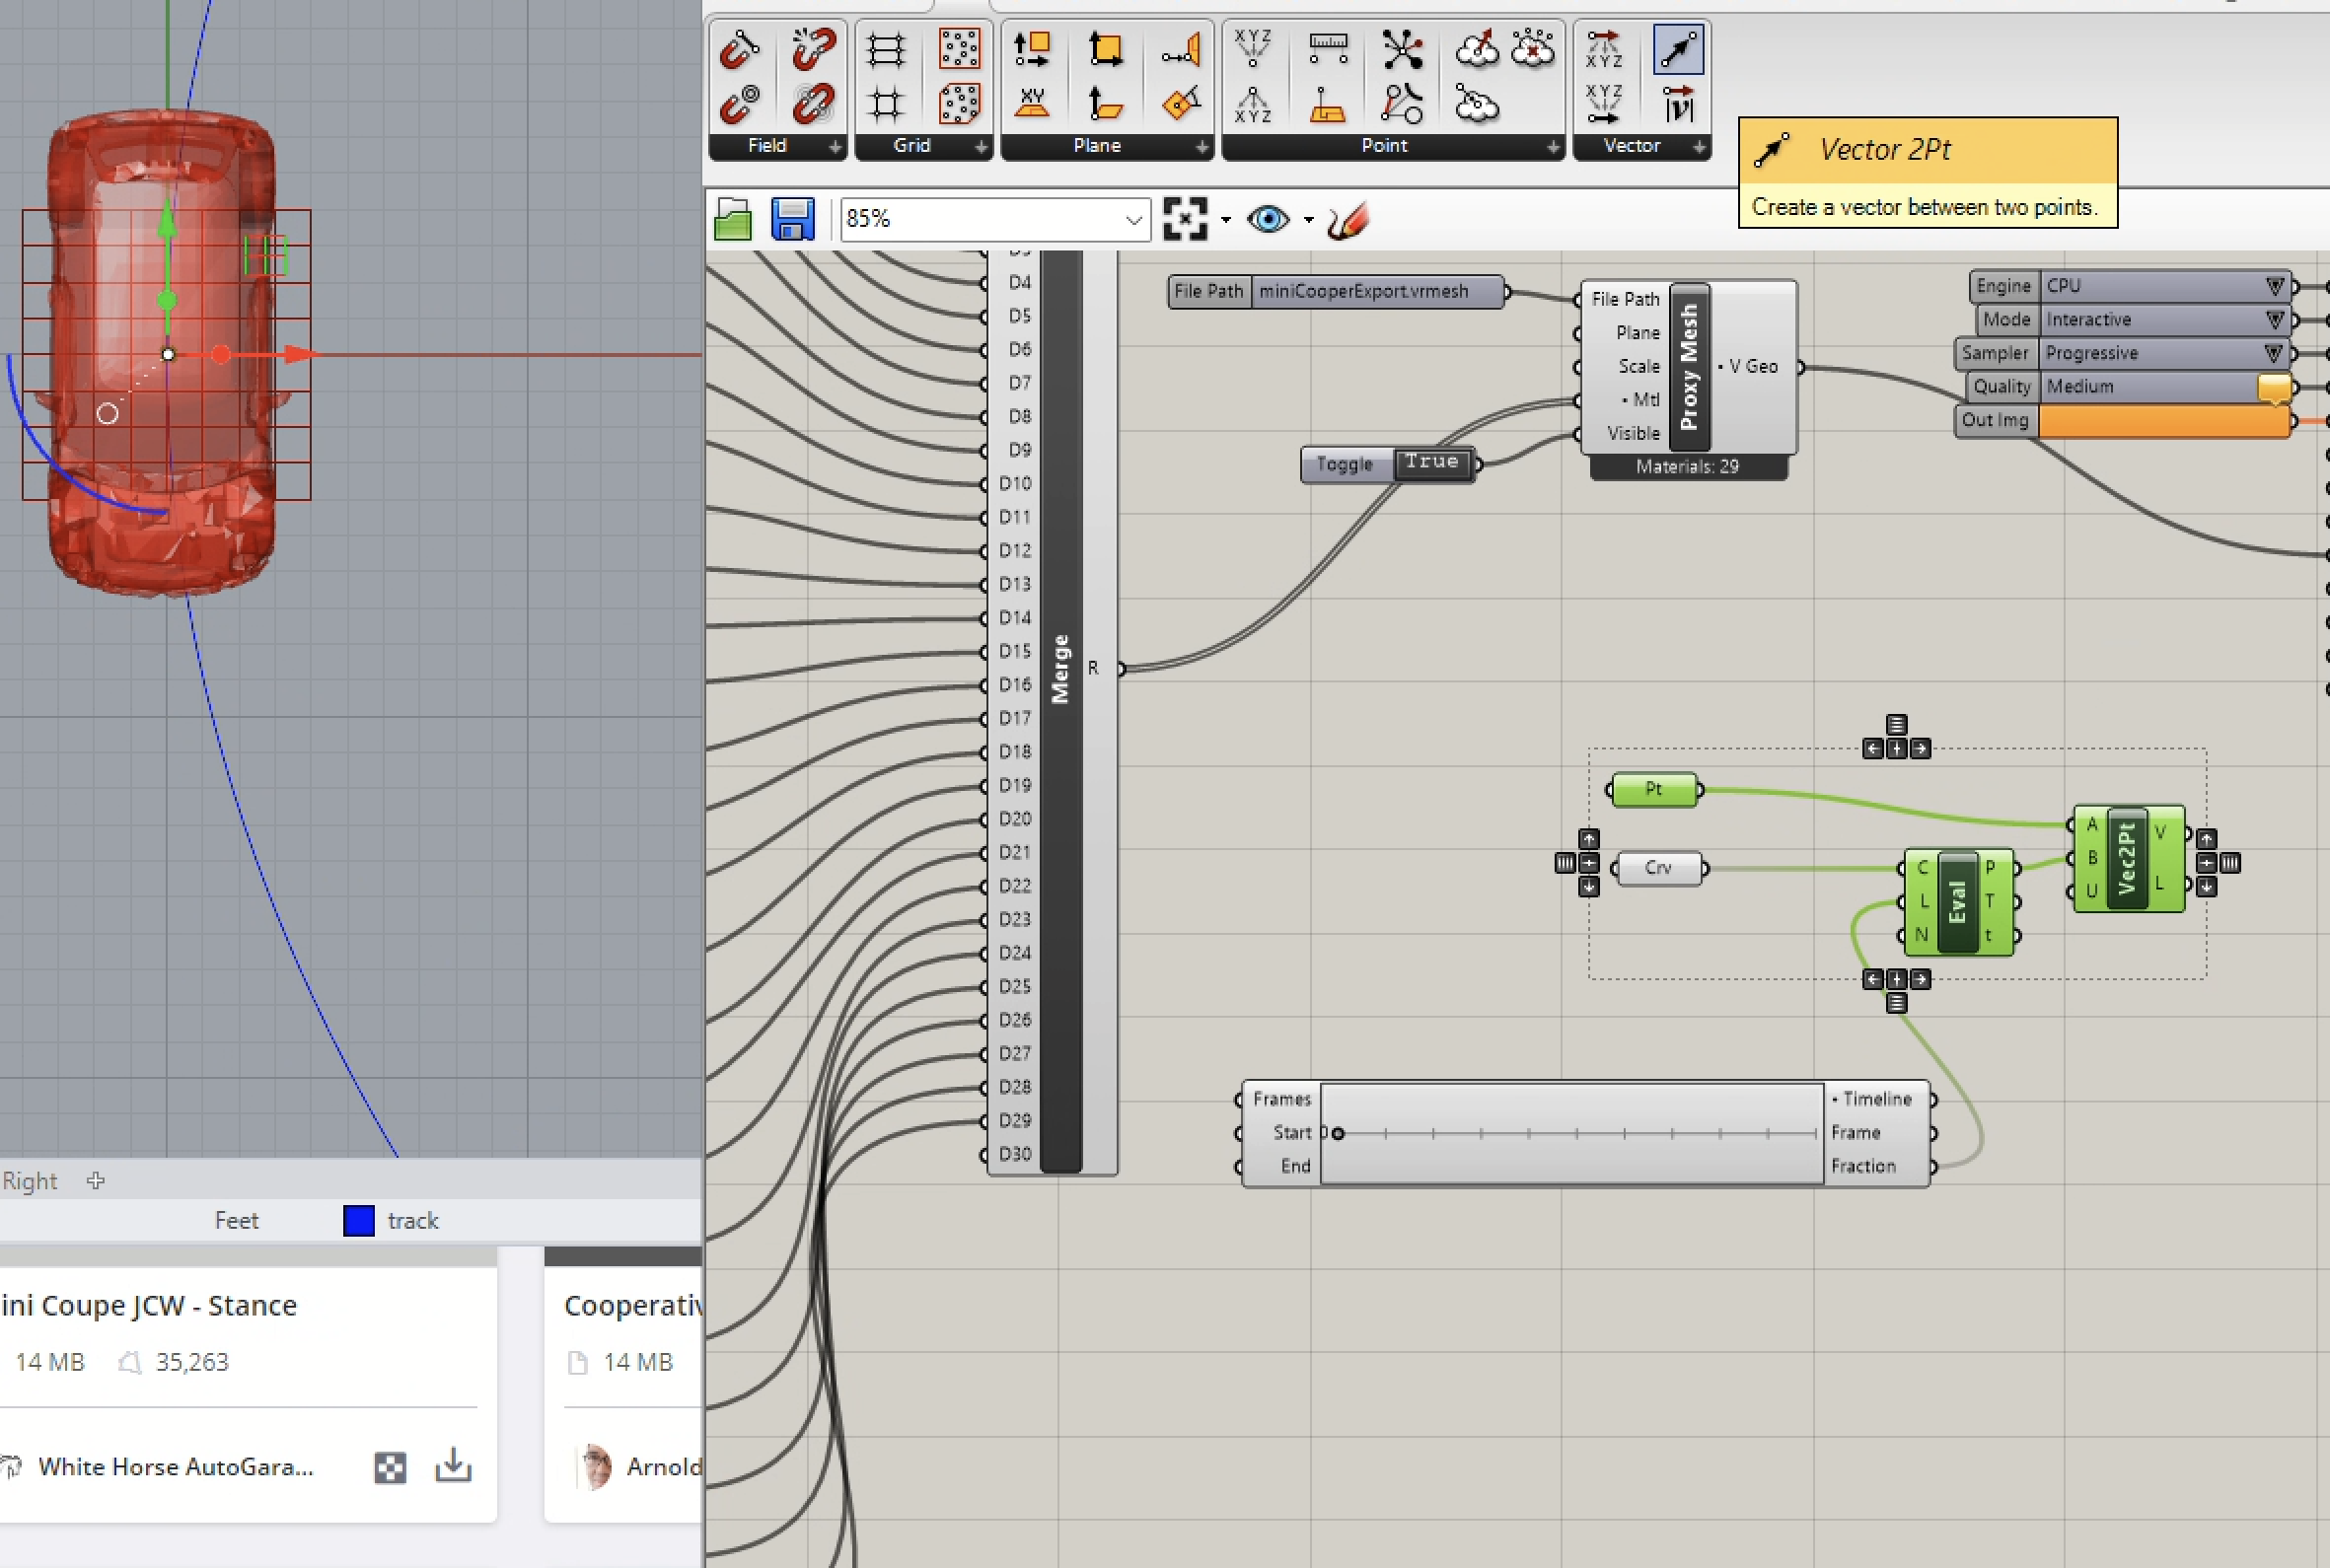
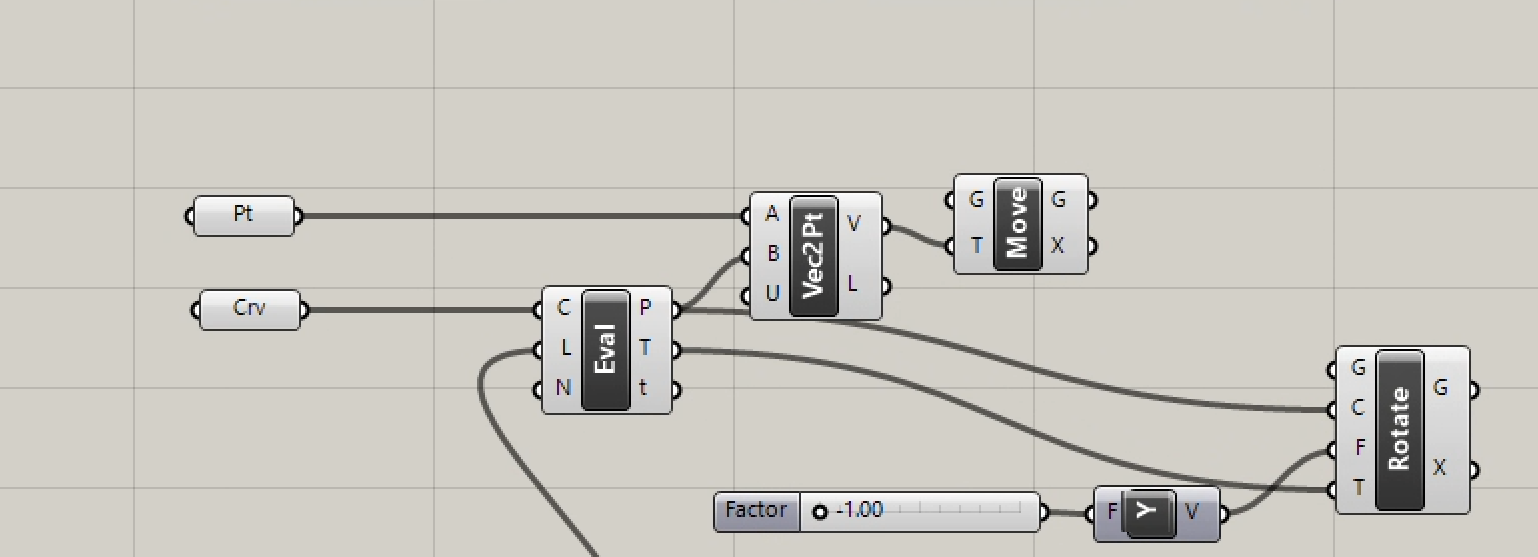
5. Add a "Vector 2Pt" component to create a vector from the center point of the cart to the point that that moves along the curve is export from the "P" port of "Eval Curve" component.
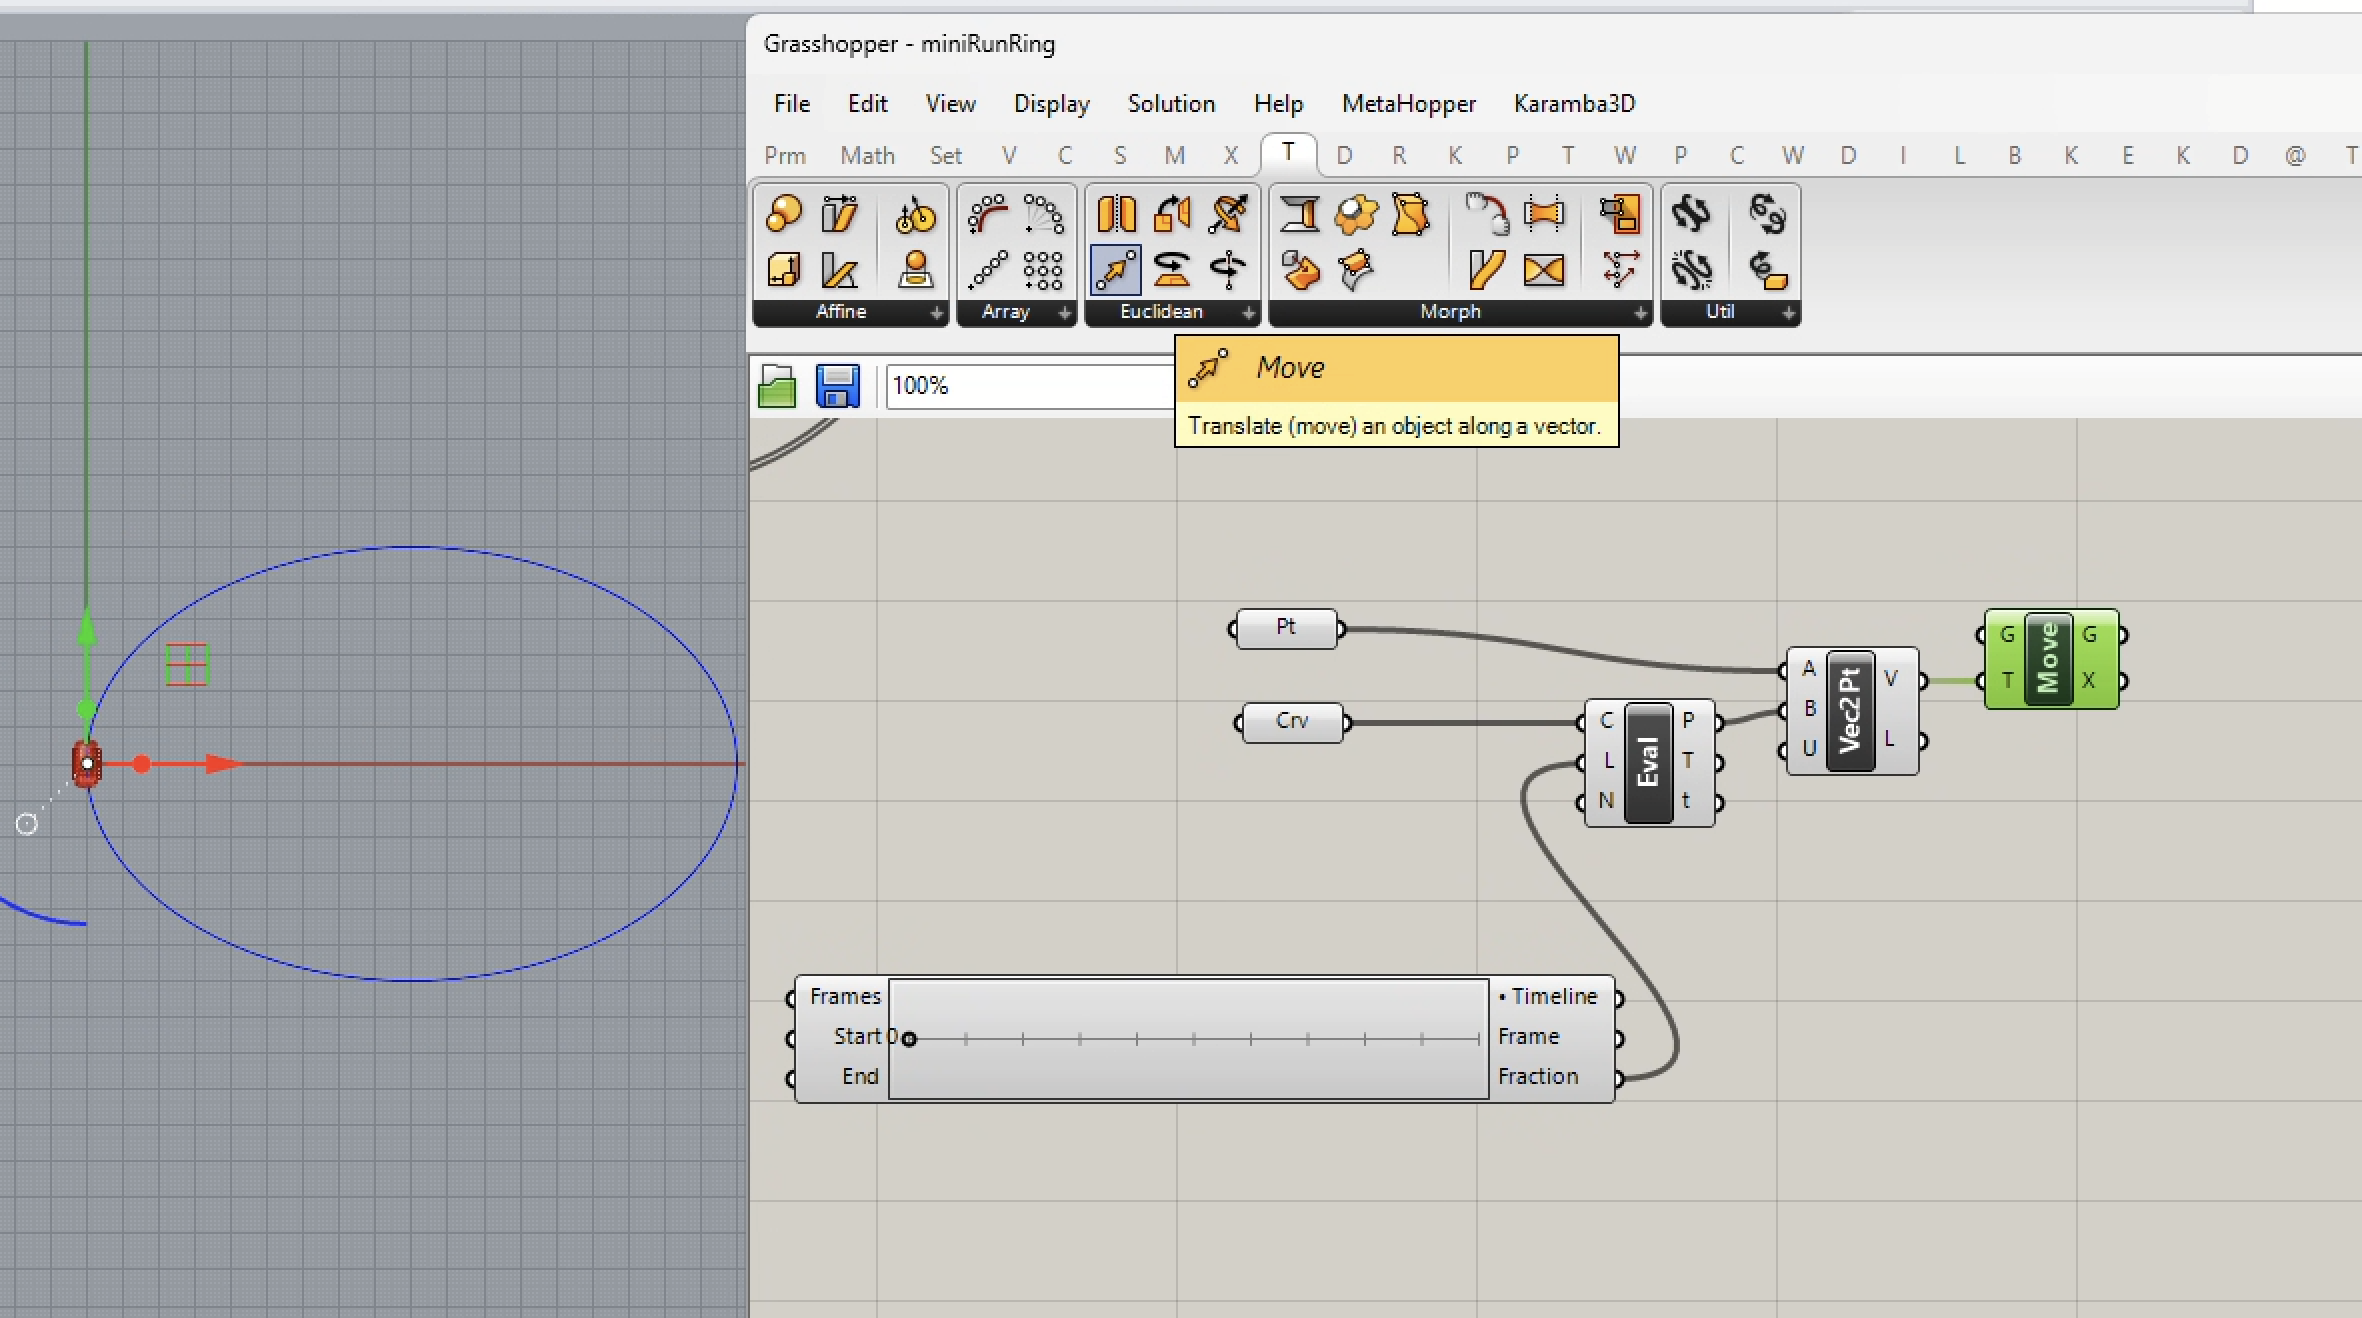
6. Now add a vector "Move" component to generate a point that travels along the ellipse. Note, however, we will not connect the Mini Cooper proxy file directly to this Vector Move component since proxy files require a slightly different approach.
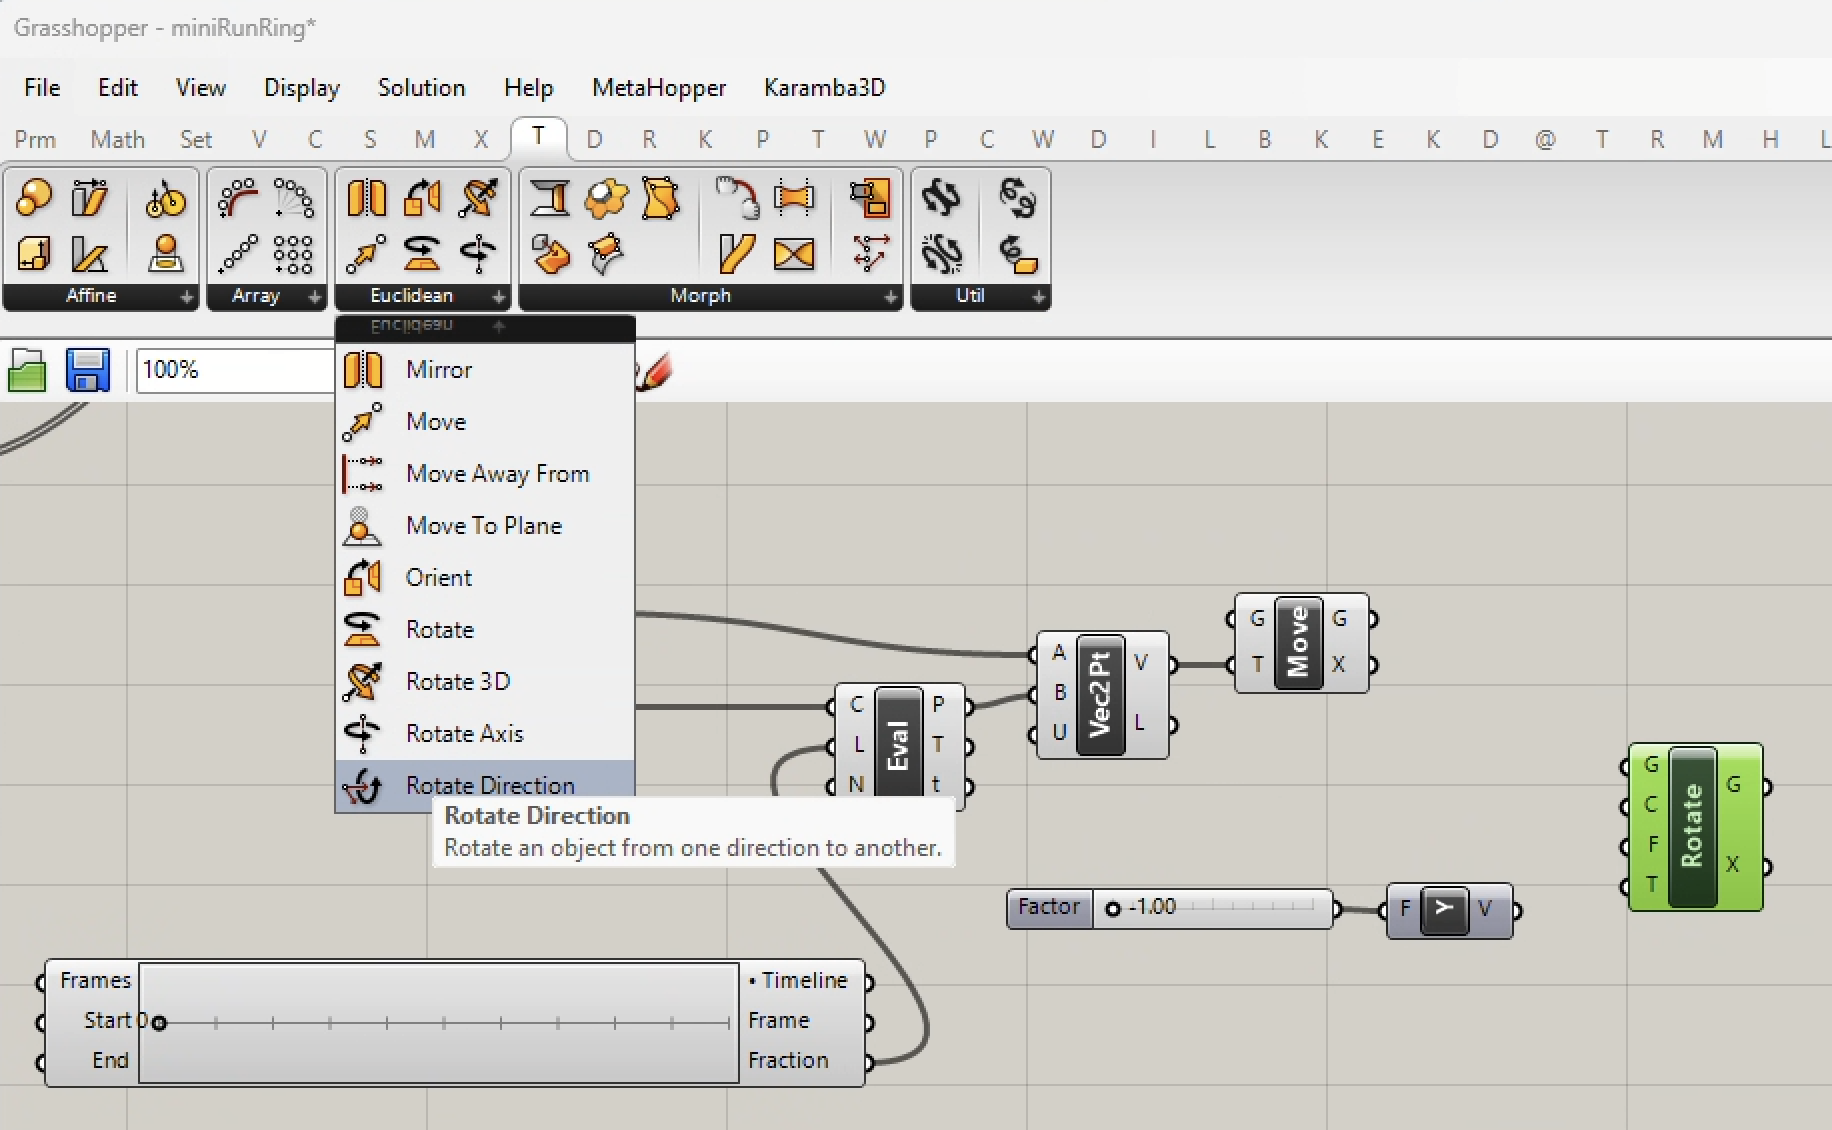
7. Next, add a unit "Y" vector to the Canvas window multiplied by a numerical slider with an output value of -1. This wil reverse the unit "Y" vector and have it point in the direction of y = -1. Also add the vector based "Rotate Directiom" component. indicated.
8. For the "Rotate Direction" component, we undertake two distinct sub-steps:
i. Connect the rotate vectors: connect the "V" output port of the unit "Y' vector to the "F" input port of the "Rotate Direction" component. Connect the "T" (tangent along the curve) output port of the "Eval Curve" component to the "F" input port of the "Rotate Direction" component. These two input ports represent the "From" and "To" vectors determining the rotation of the Cooper Mini at the point traveling along the ellipse curve that is represented by the output port "P" of the "Eval Curve" component.
ii. Connect the center of rotation: connect the output port "P" to the inpot port "C" (center of rotation) of the "Rotate Direction" component..
9. Add a "V-Ray" Instancer" component, and connect it to the transformation matrices (transformation information) output from the "X" ports of the "Vector Move" and "Rotate Direction" components.
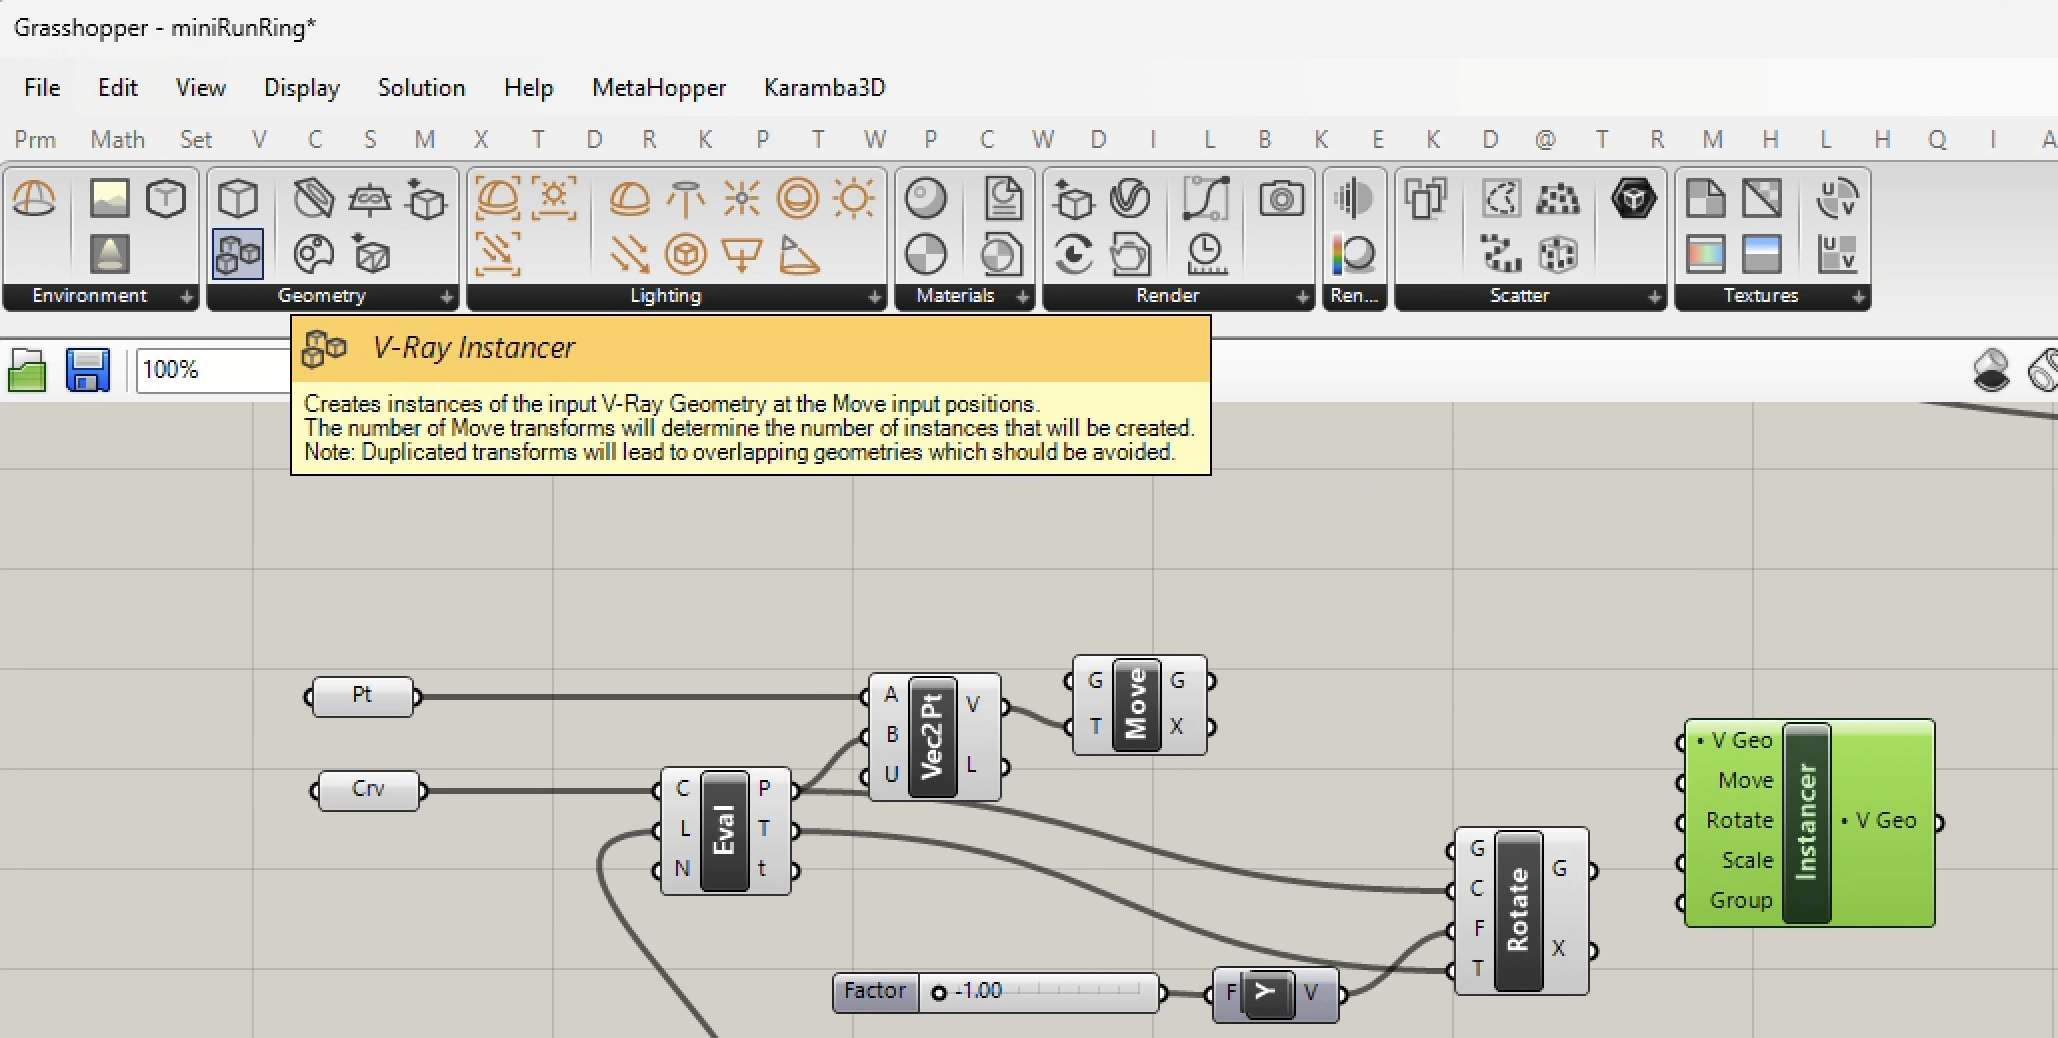
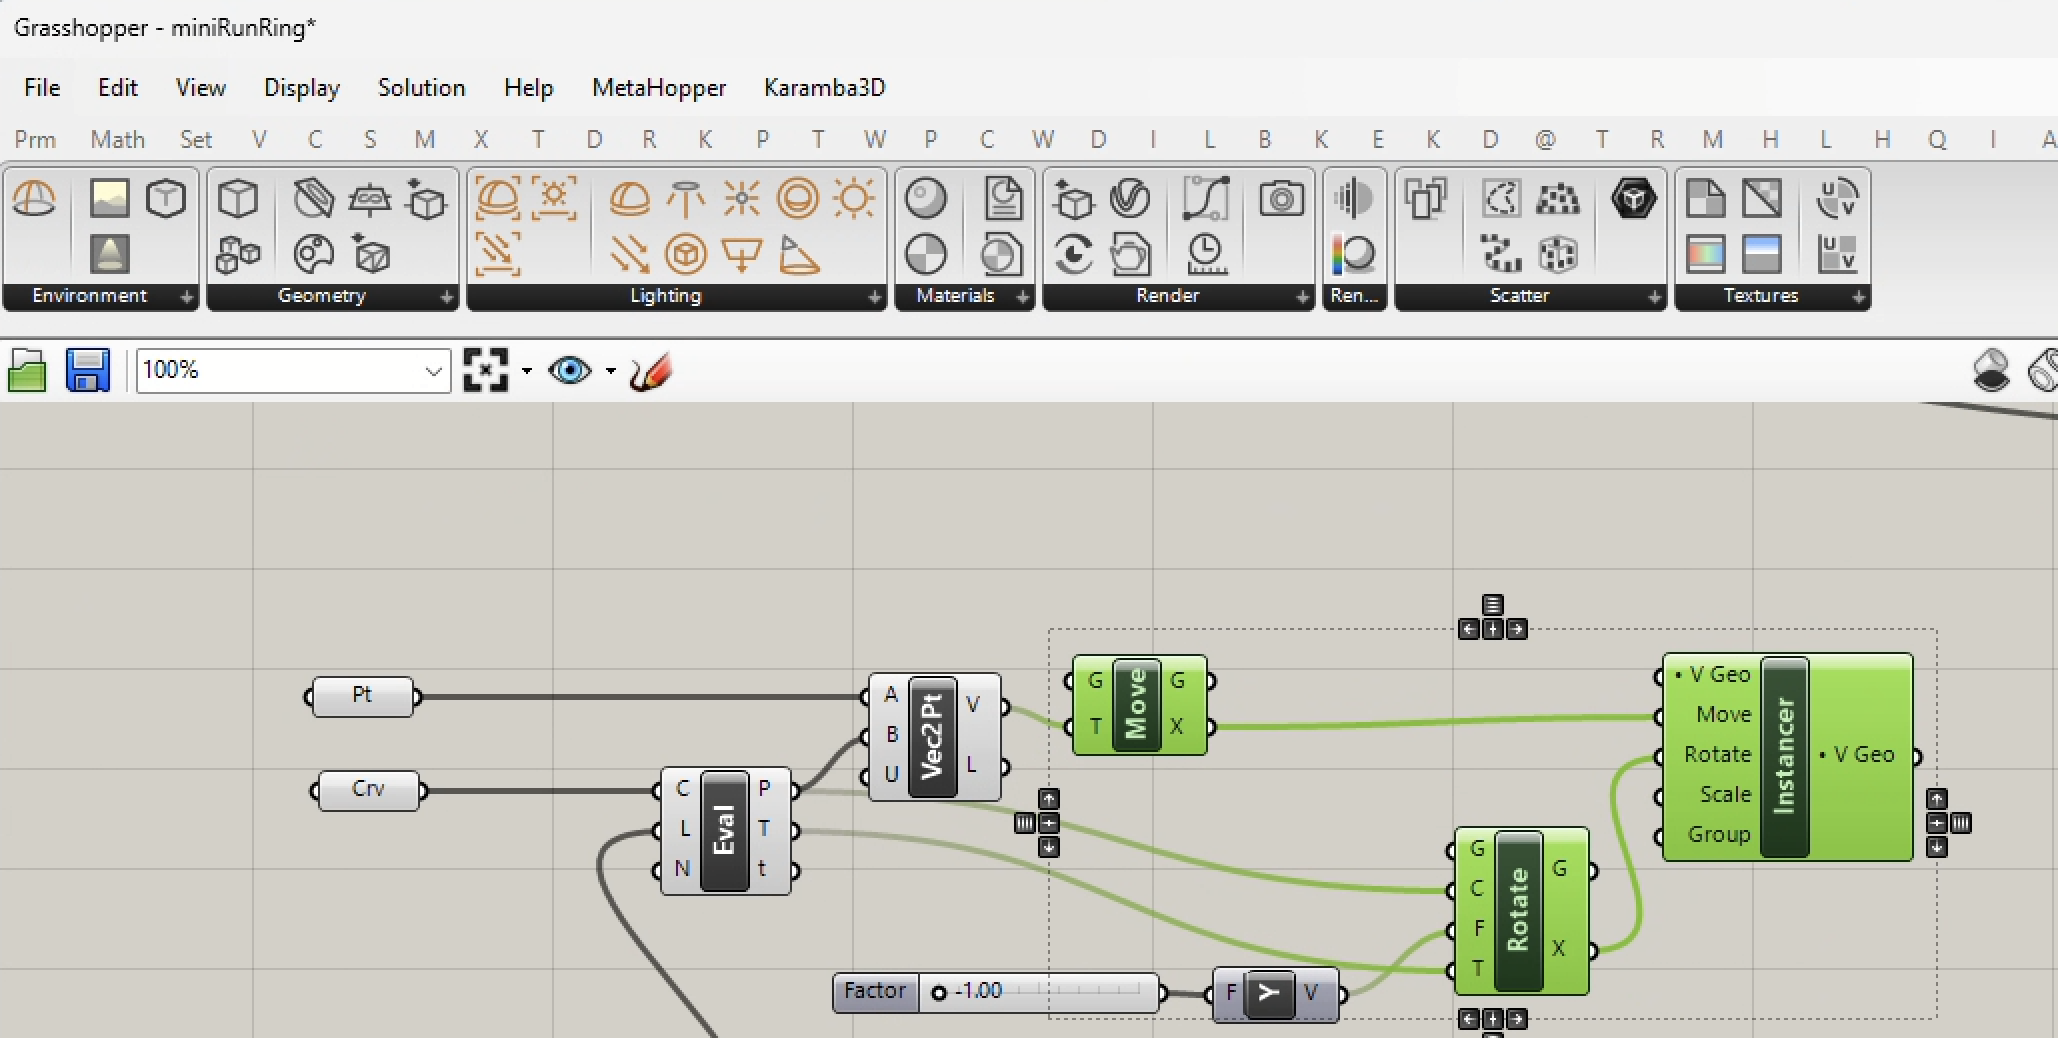
10. Connect the V Ray "Proxy Mesh" component to the V Ray "Instancer" component, and in turn connect the Instancer to the "Render" . Note that this step supplants the direction connection of the "Proxy Mesh" component that was tested in Part C, 4.
E. Simplify representation of Material Input to Proxy Mesh component.
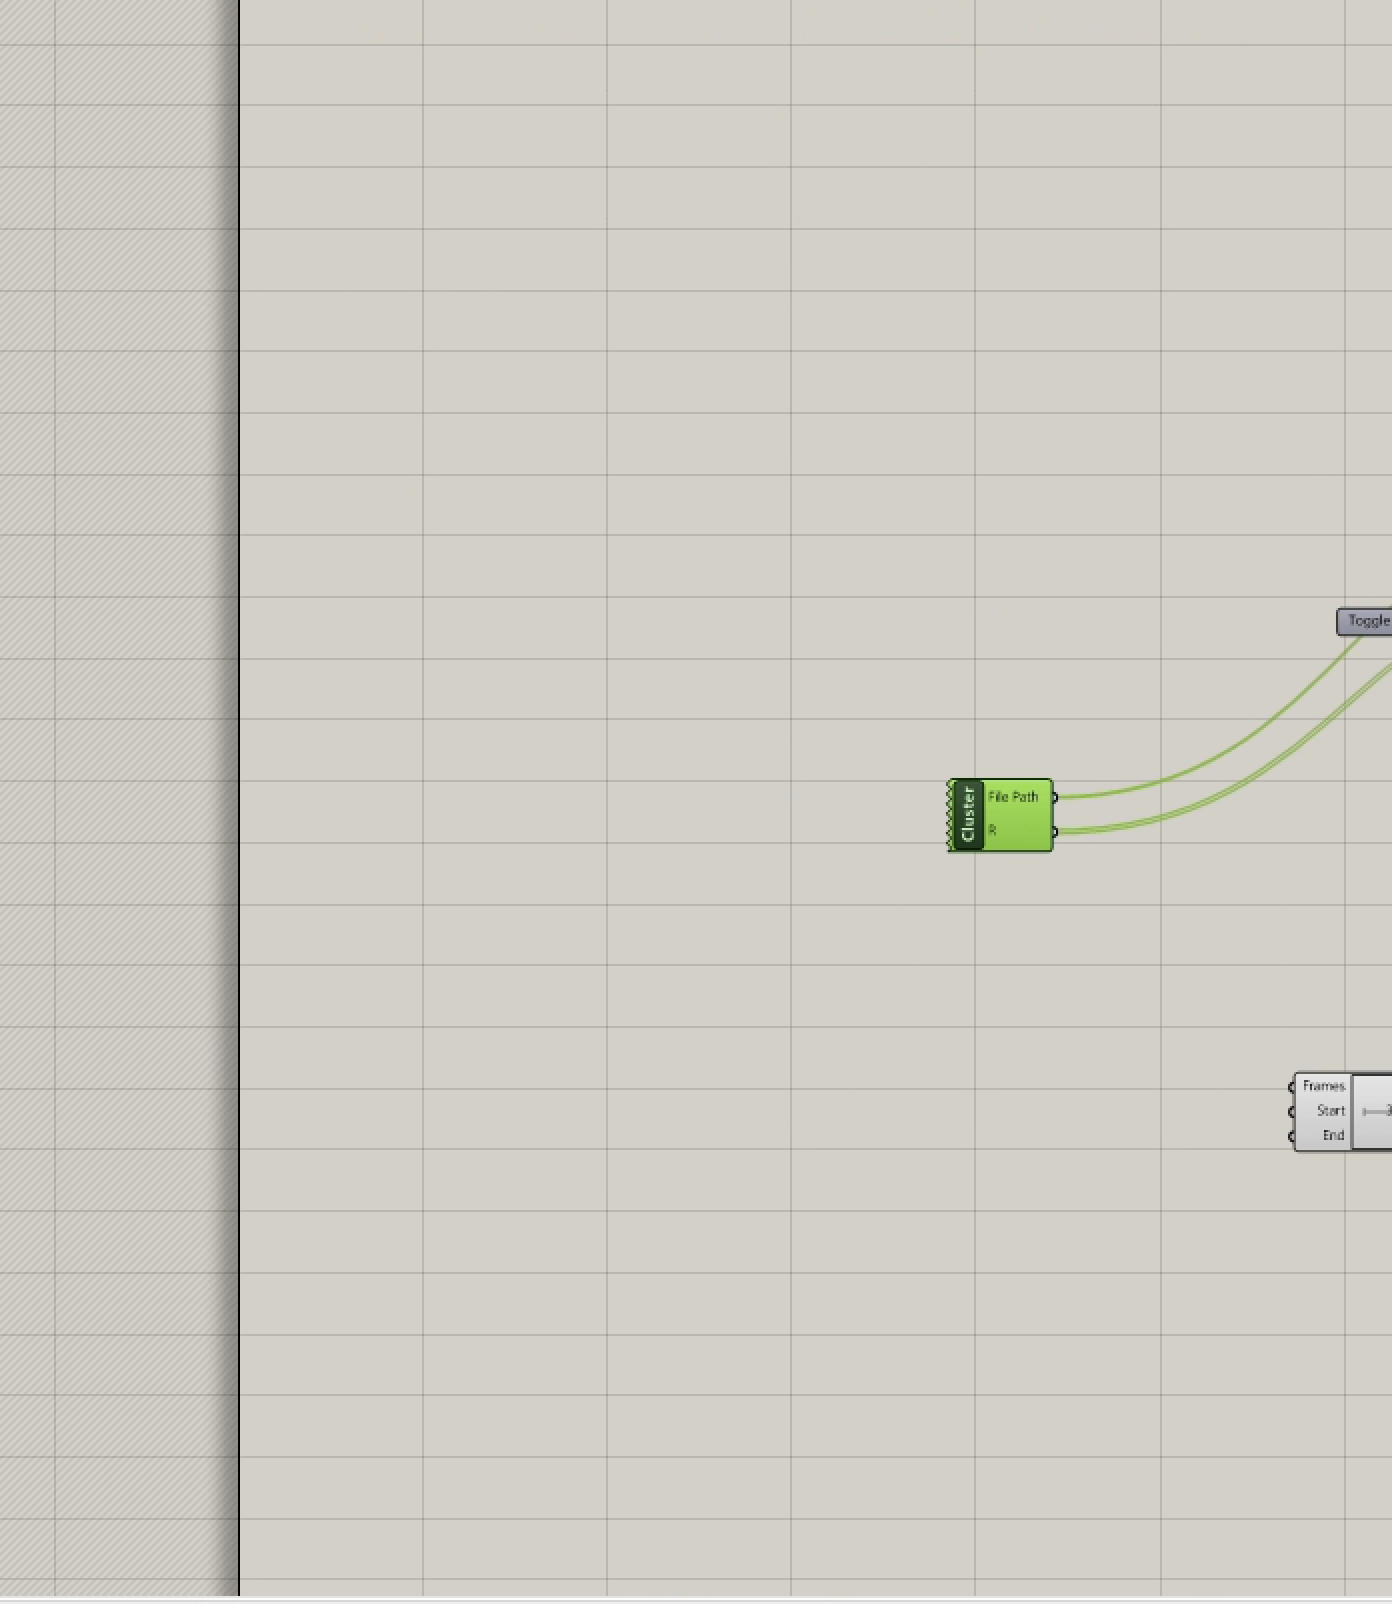
1. The 29 materials that are input to the Proxy Mesh component take up a lot of space on the Grasshopper Canvas. To reduce the amount of space it takes, select all the materials and the Merge component, and do a right-mouse-button click and select the "Cluster" option..
2. Confirming the selection with the left-mouse-button, reduced the representation to a simpler "Cluster" component as indicated in the image below. Double left-mouse-button clicking on the "Cluster" allow you to either view and edit what's inside or you can use the Rhino explode tool to return all the components inside to being more directly visible on the Canvas page.
F. Car Test
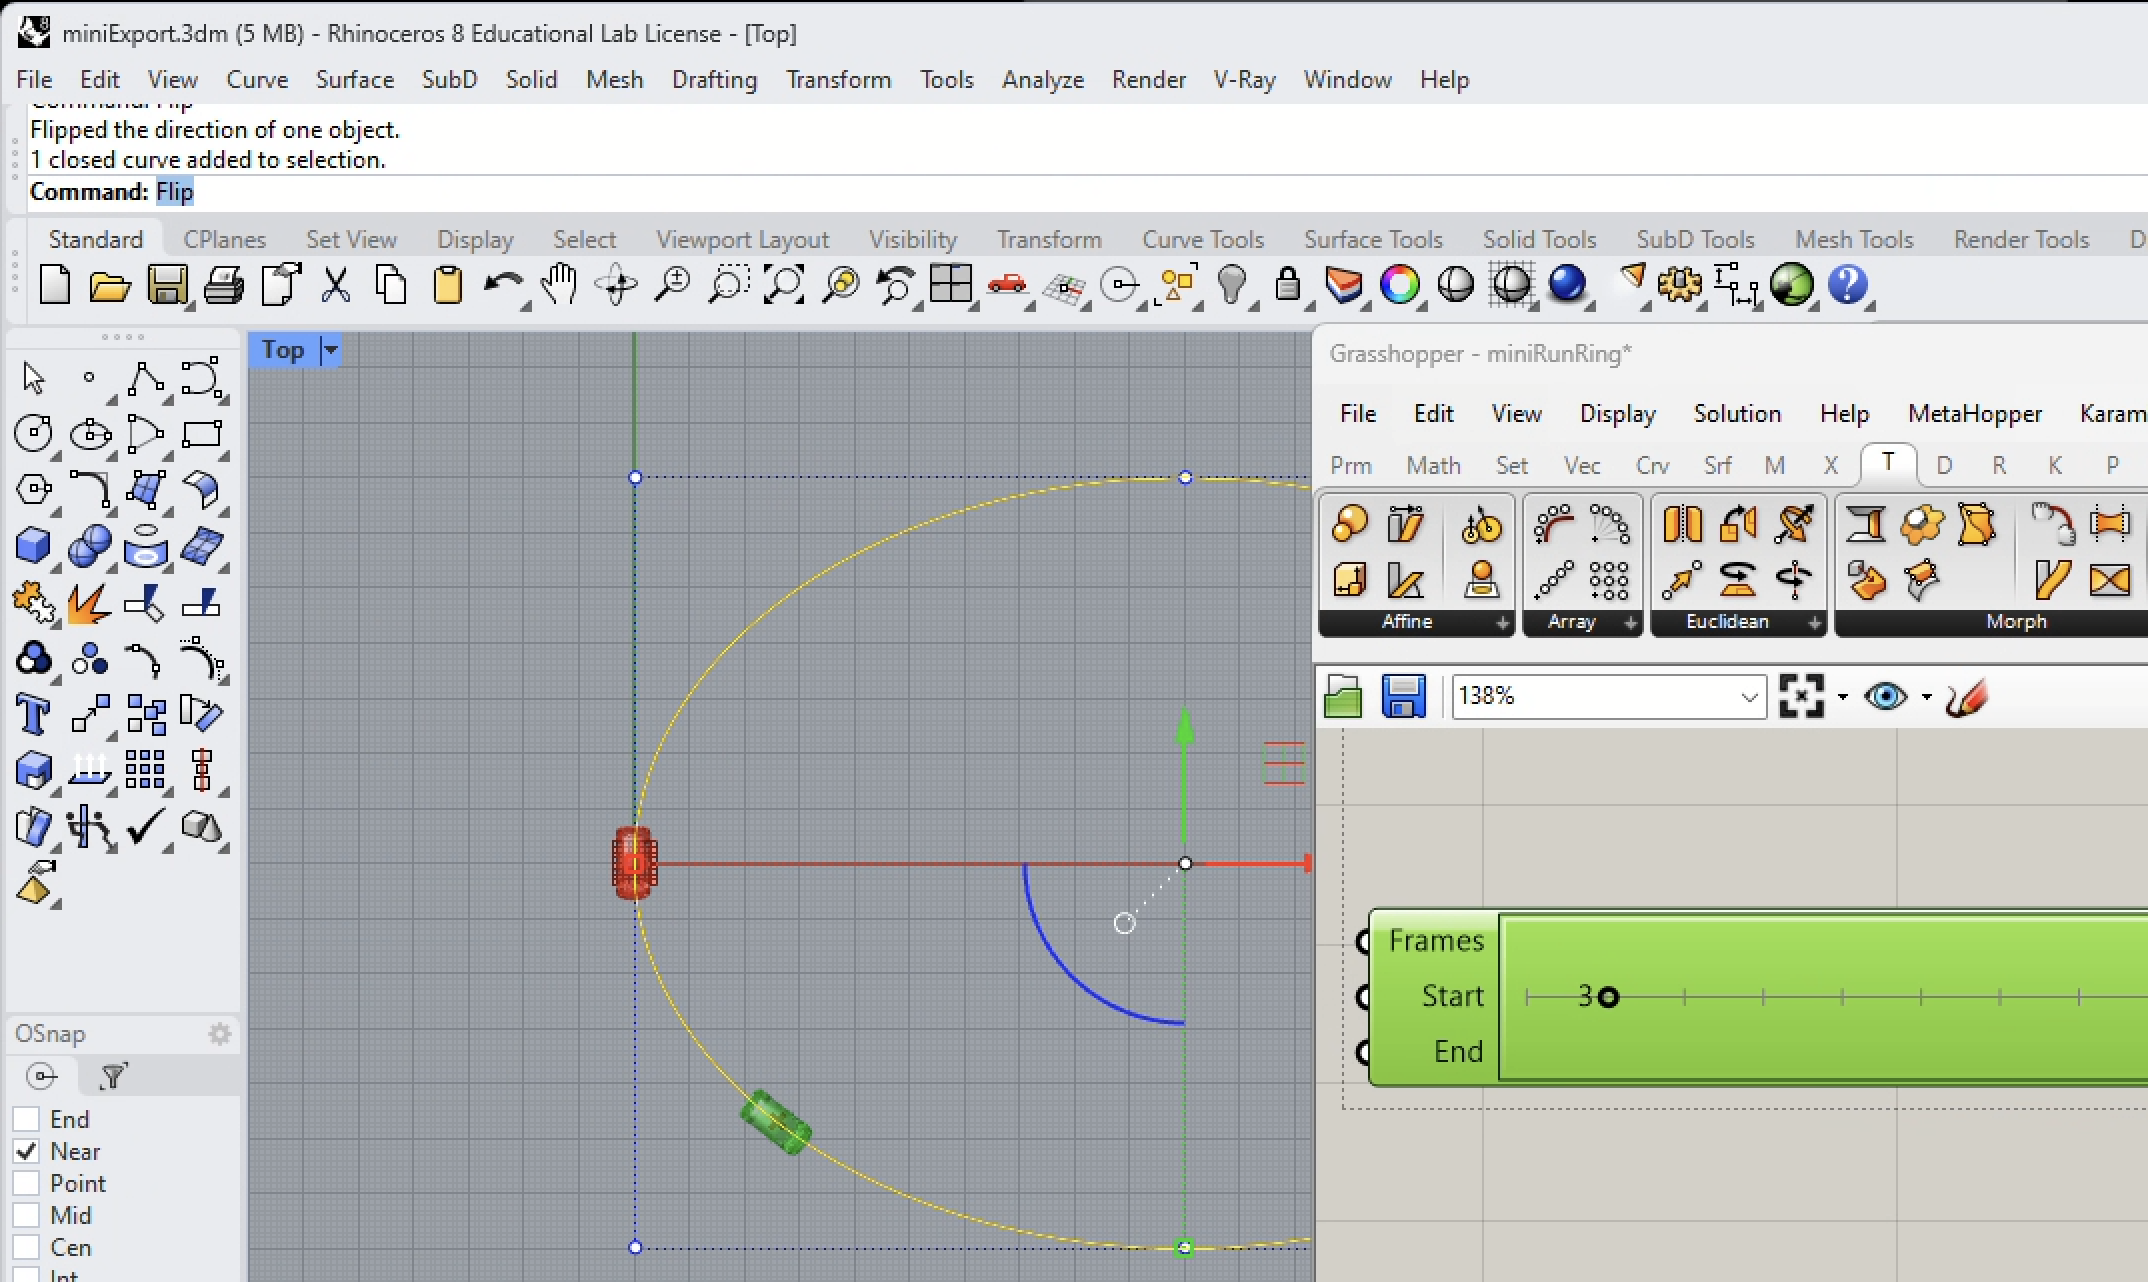
1. Advance the frame count in the "V-Ray Time" component, and note that the car moves in the clockwise manner.
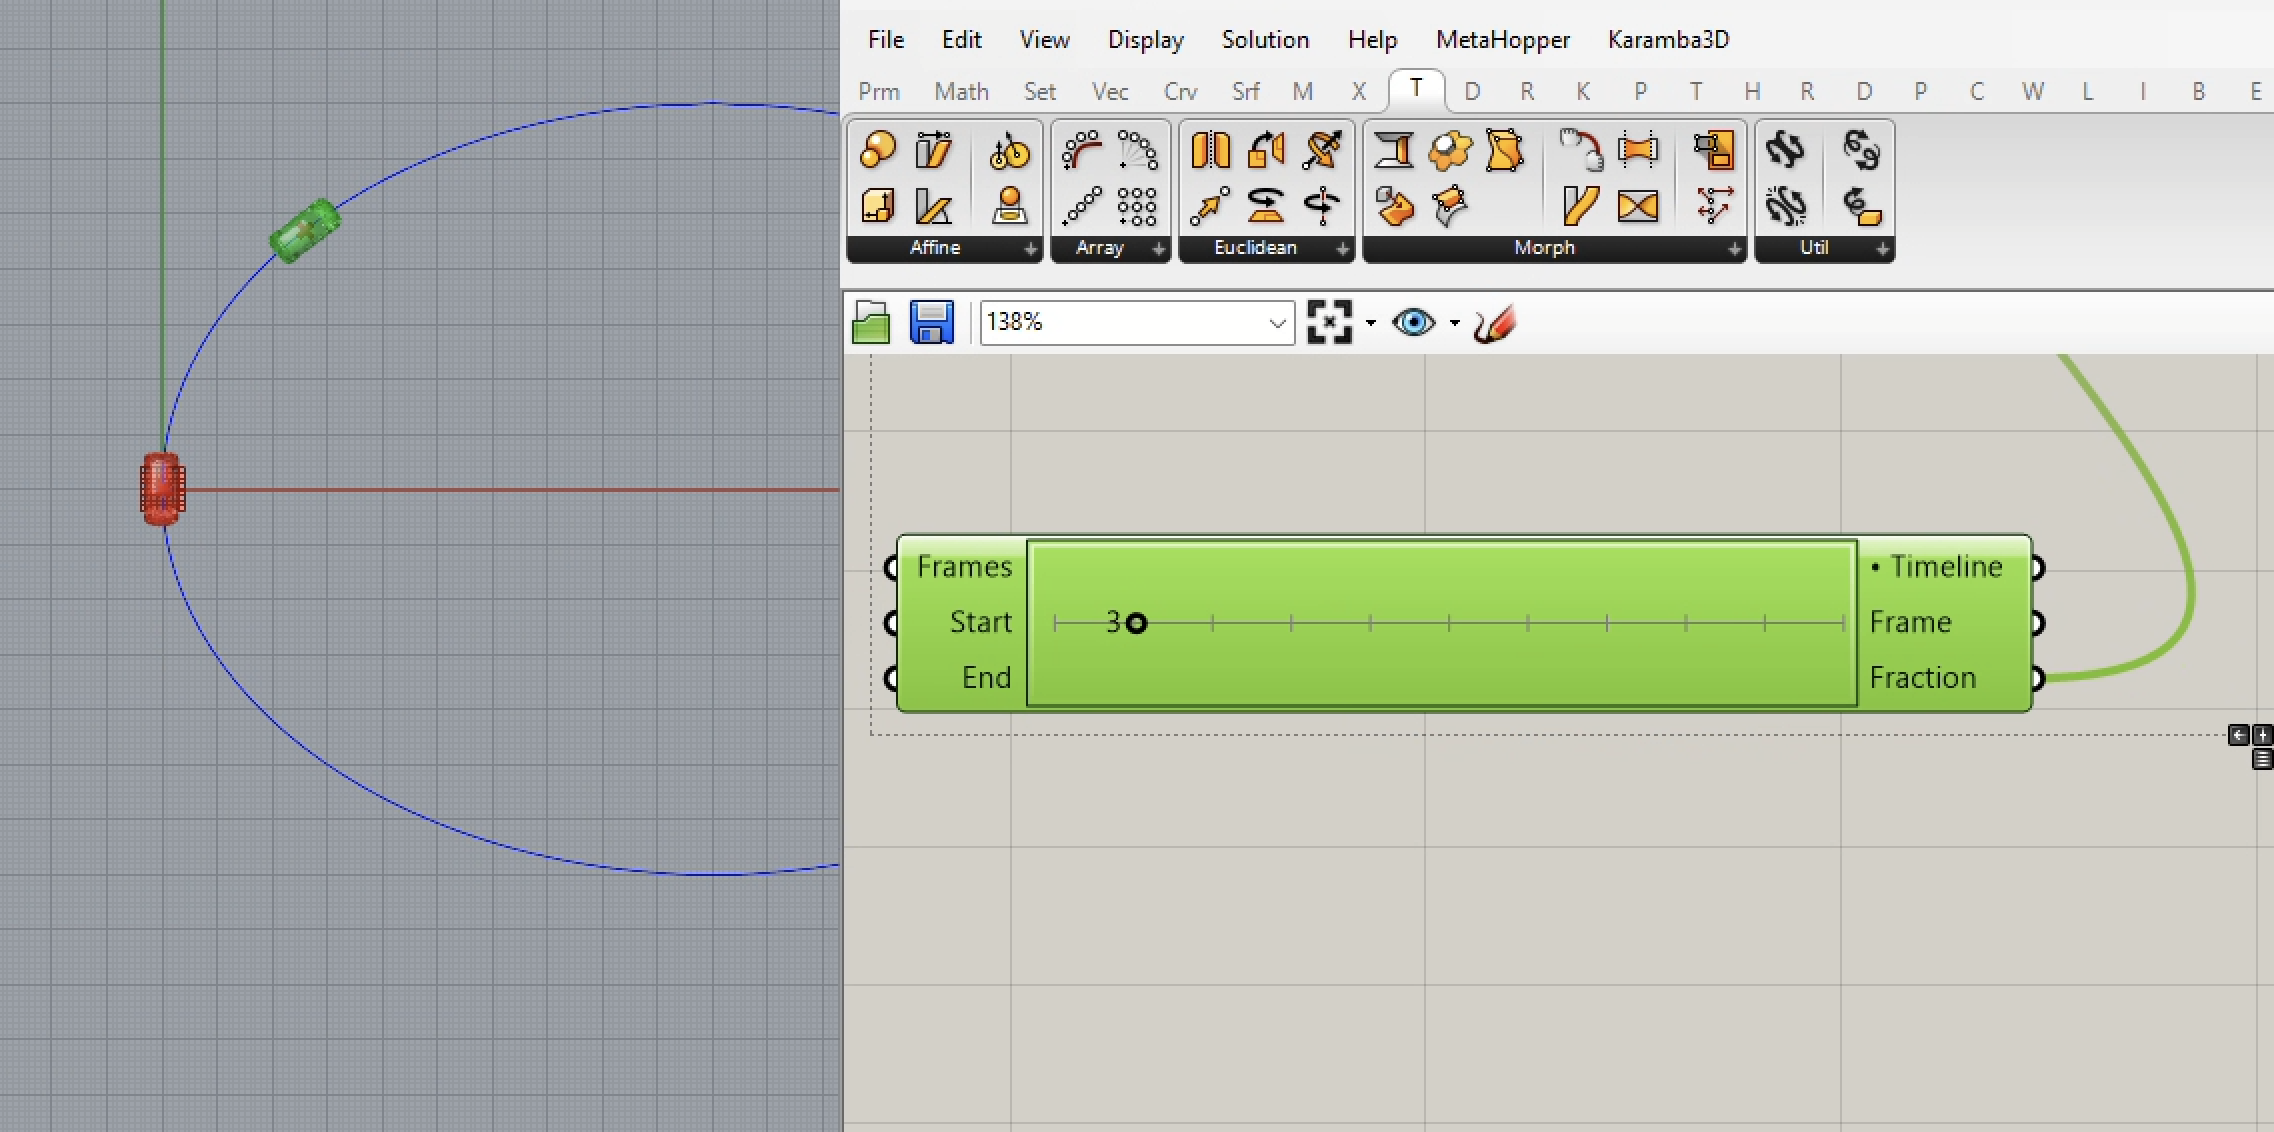
2. However, if we select the ellipse and use the "Flip" command in Rhino, we reverse the direction of the curve and then the car will move in the clockwise direction. Since the car was facing down the negative Y axis, this is the direction of the movement that seems more appropriate.
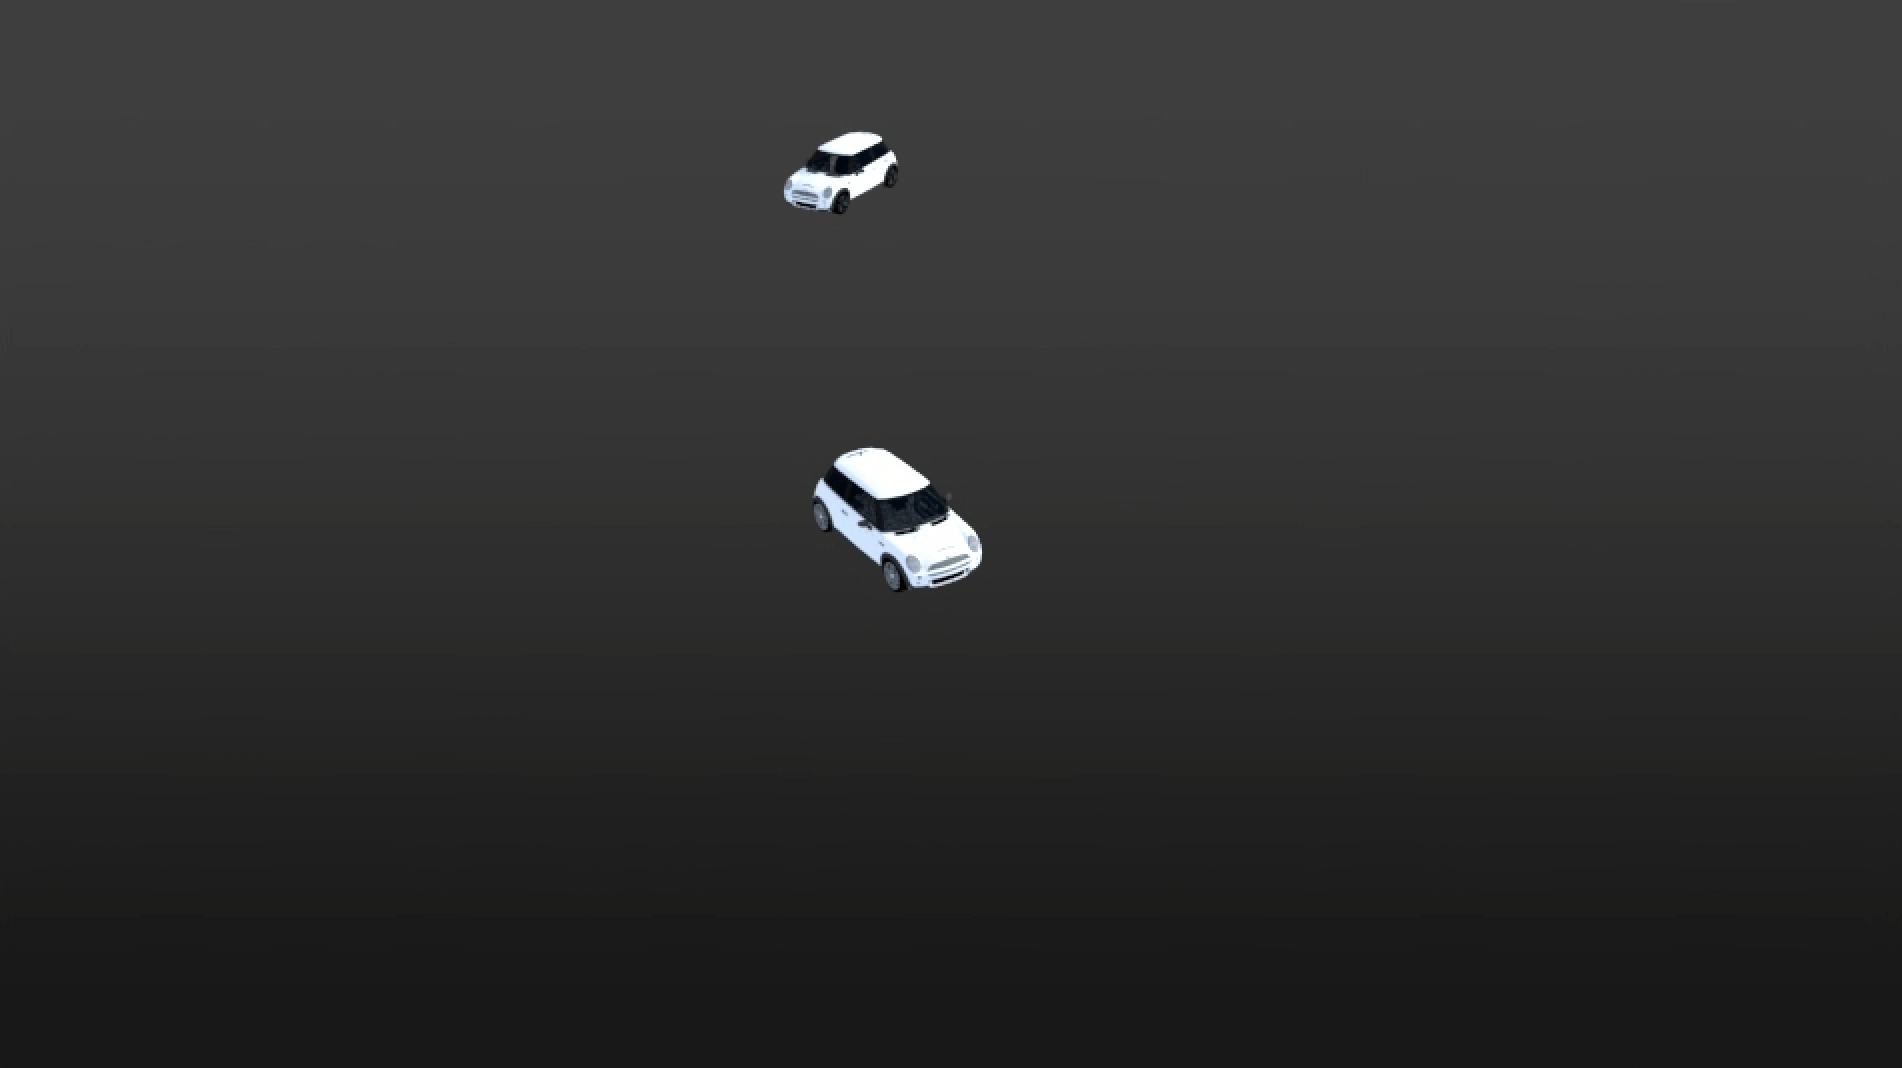
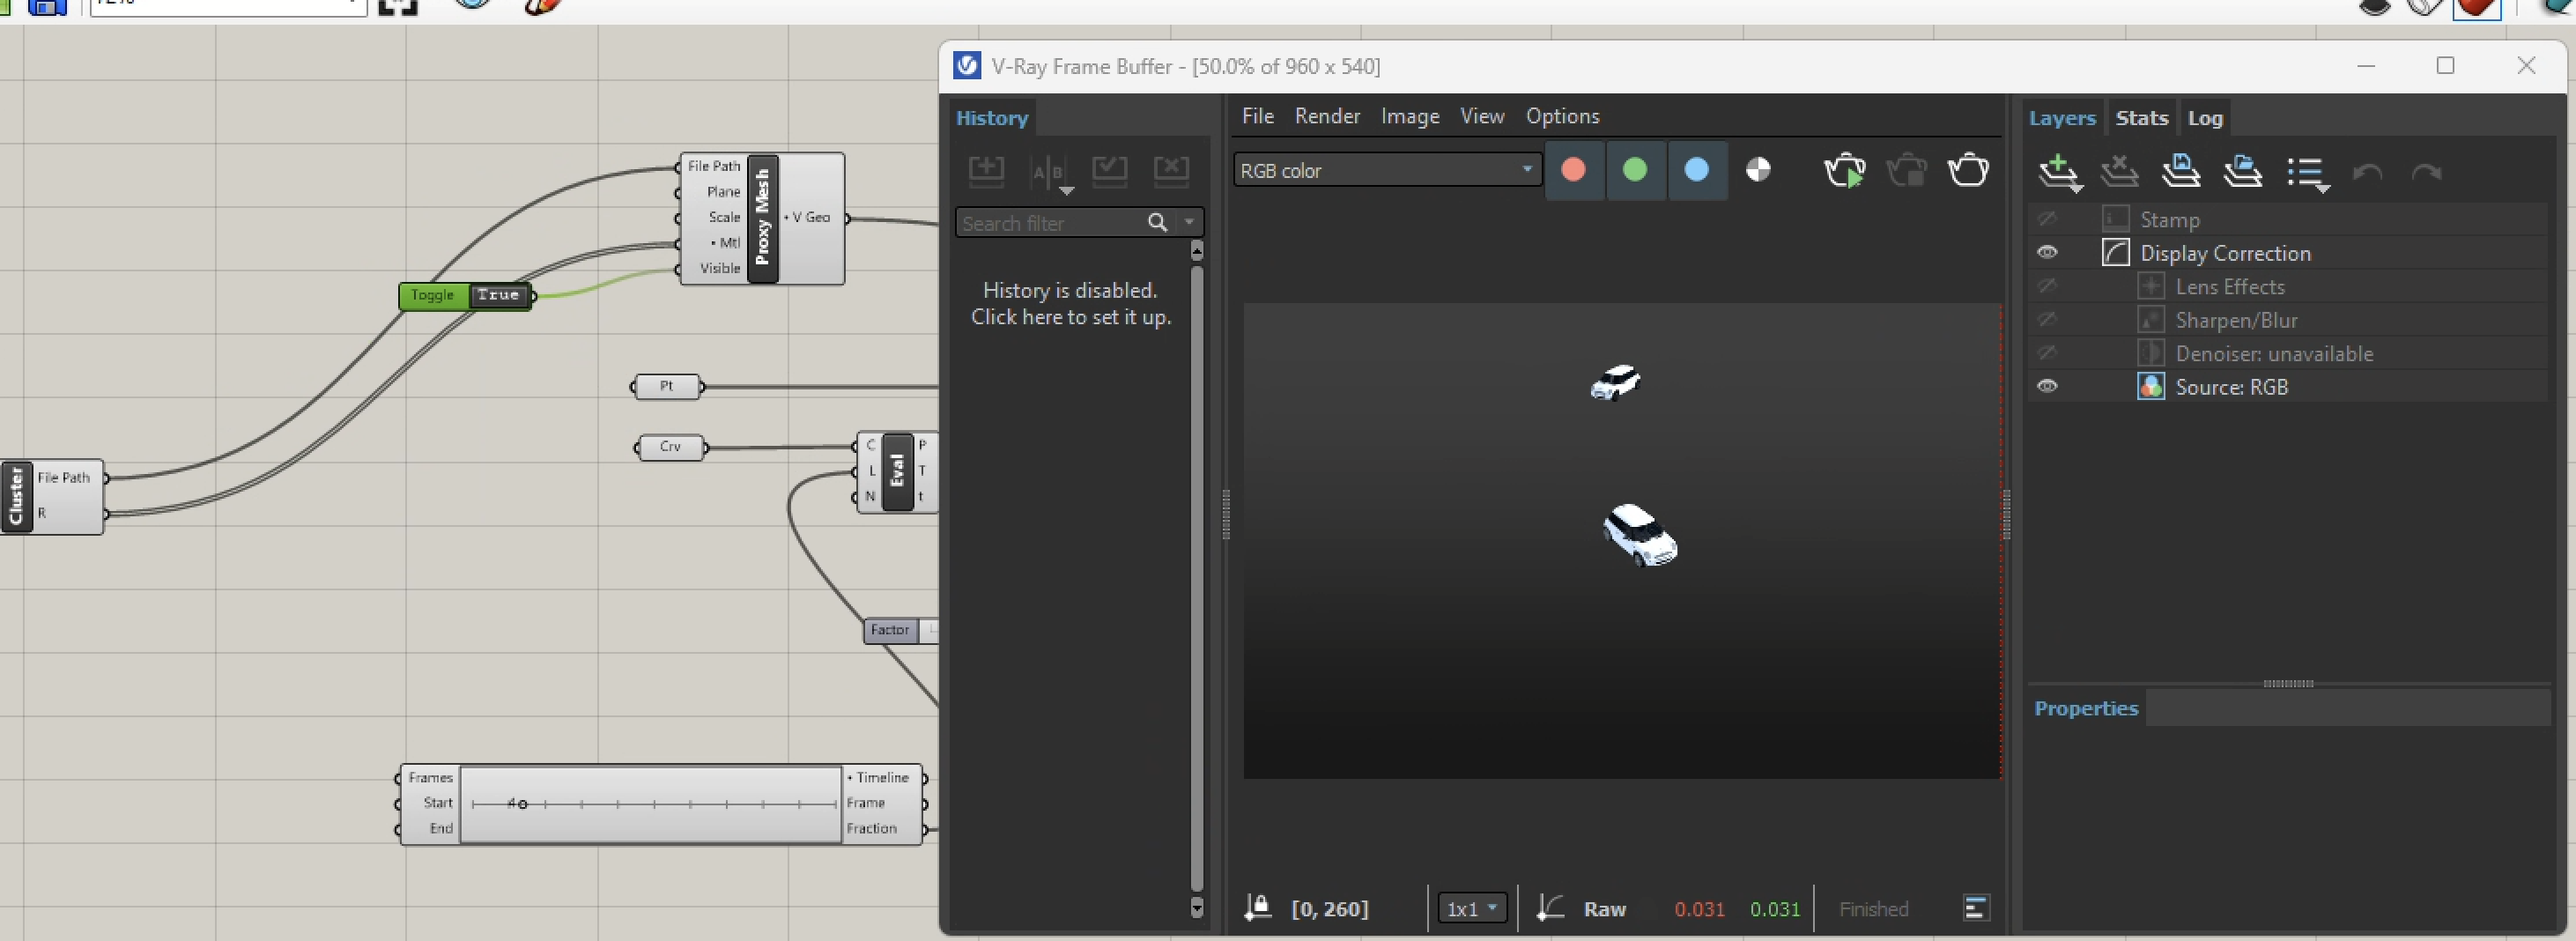
3. A preview rendering through the use of the Render component catches two versions of the Mini Cooper car. The first in the upper left corner is it's location prior to the move and rotate transformation and the second version is its location after these transformation.
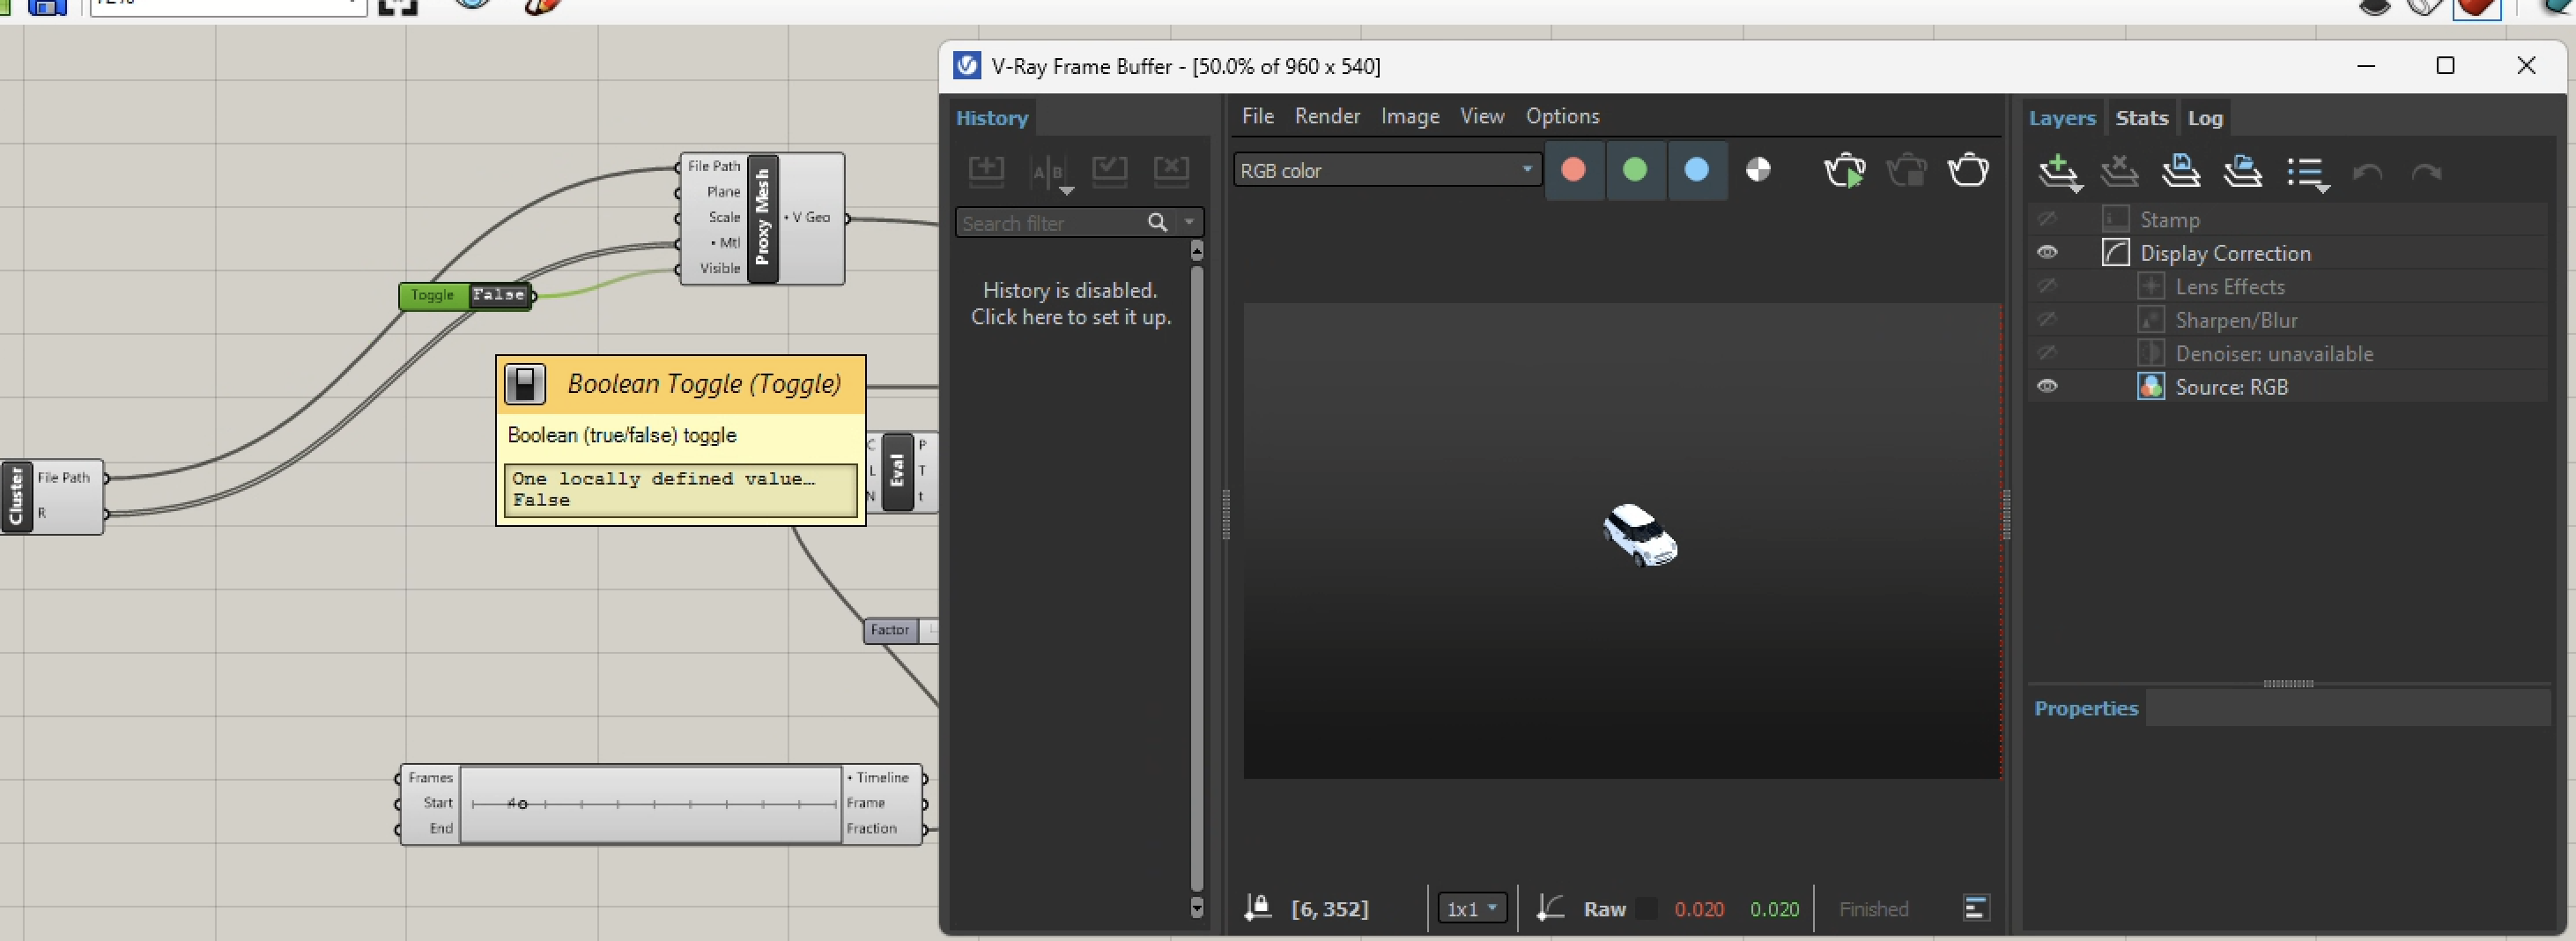
4. We can remove the first version by selecting the boolean toggle that is connected to the V-Ray "Proxy Mesh" component to "False".
G. Adding Sunlight
In order to add sunlight animation, it's necessary to have a start and end time, and to determine the number of times inbetween during which the sunlight postion will change. In addition, the vector angle of the sunlight, latitude , longitude, and GMT offset times also need to be taken into account. In this section, some standard Grasshopper components are used. In addition, some addition componeents are used that required some coding in a programming language that is beyond the scope of this tutorial to cover in depth.
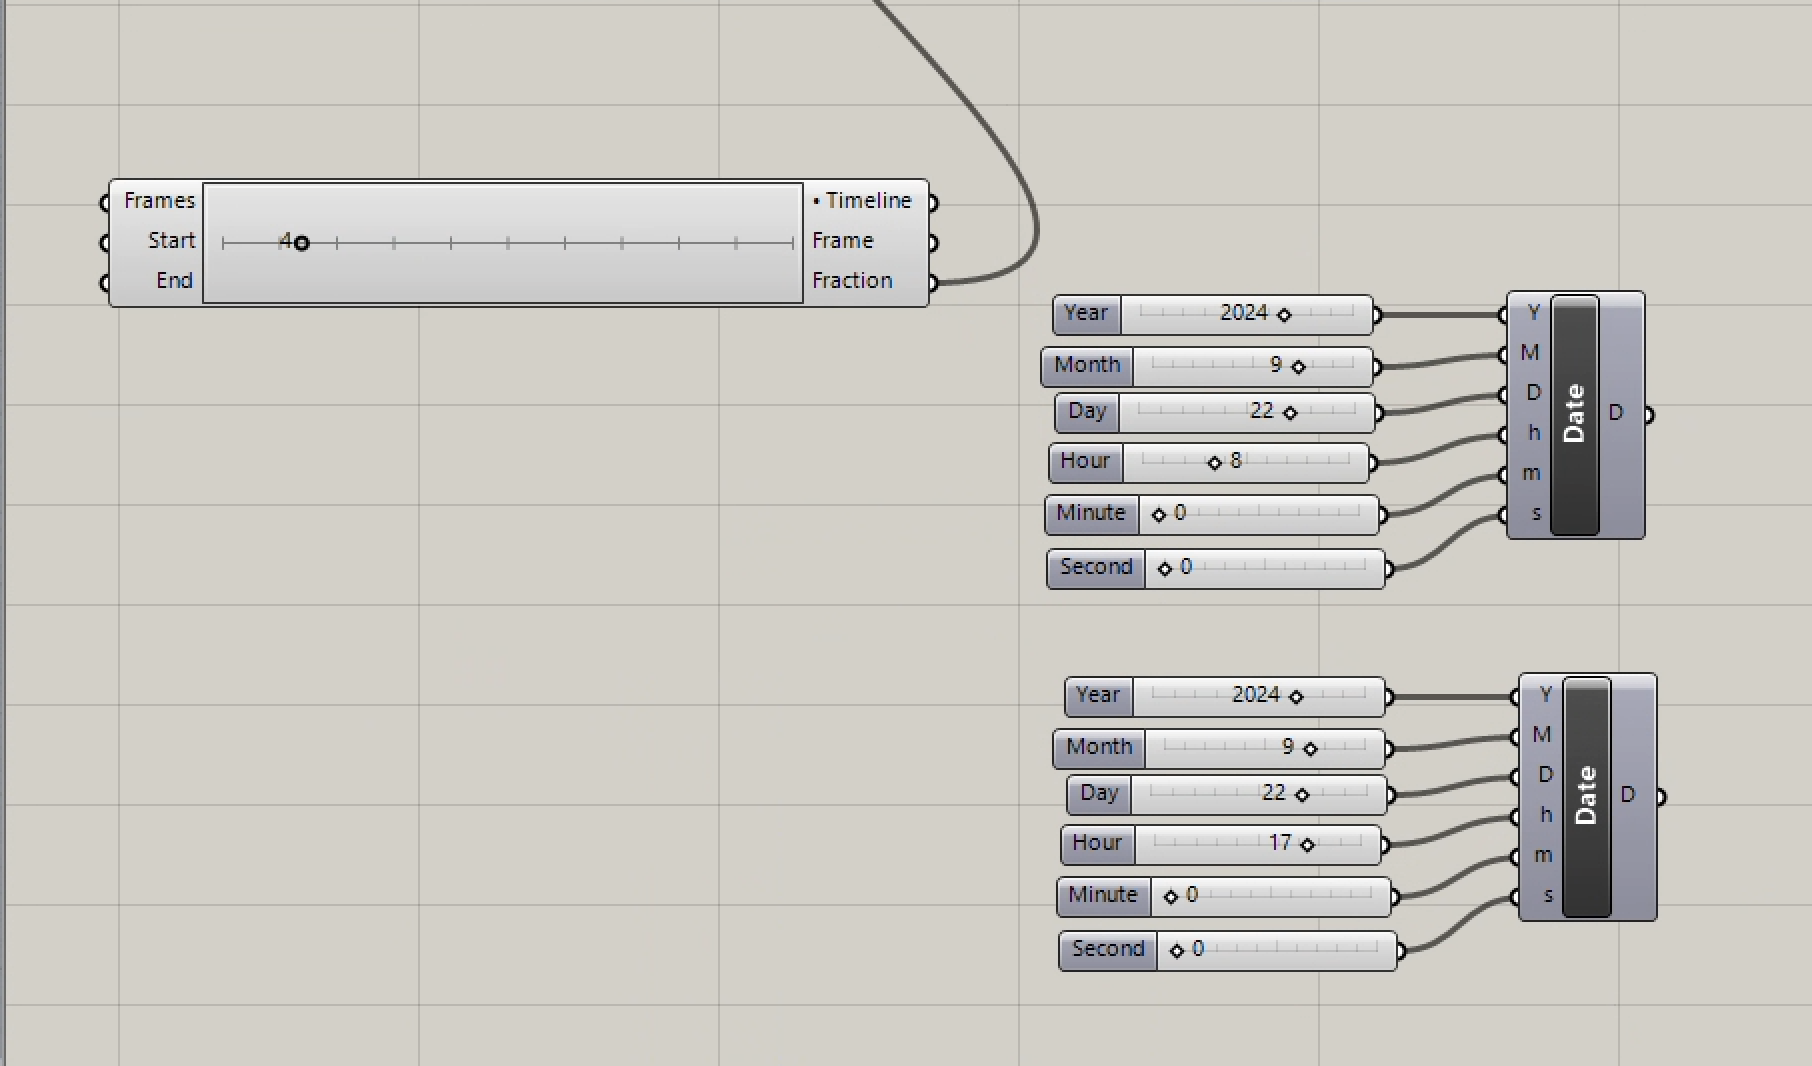
1. We begin by adding two Grasshopper Time components to indicate start and end times.
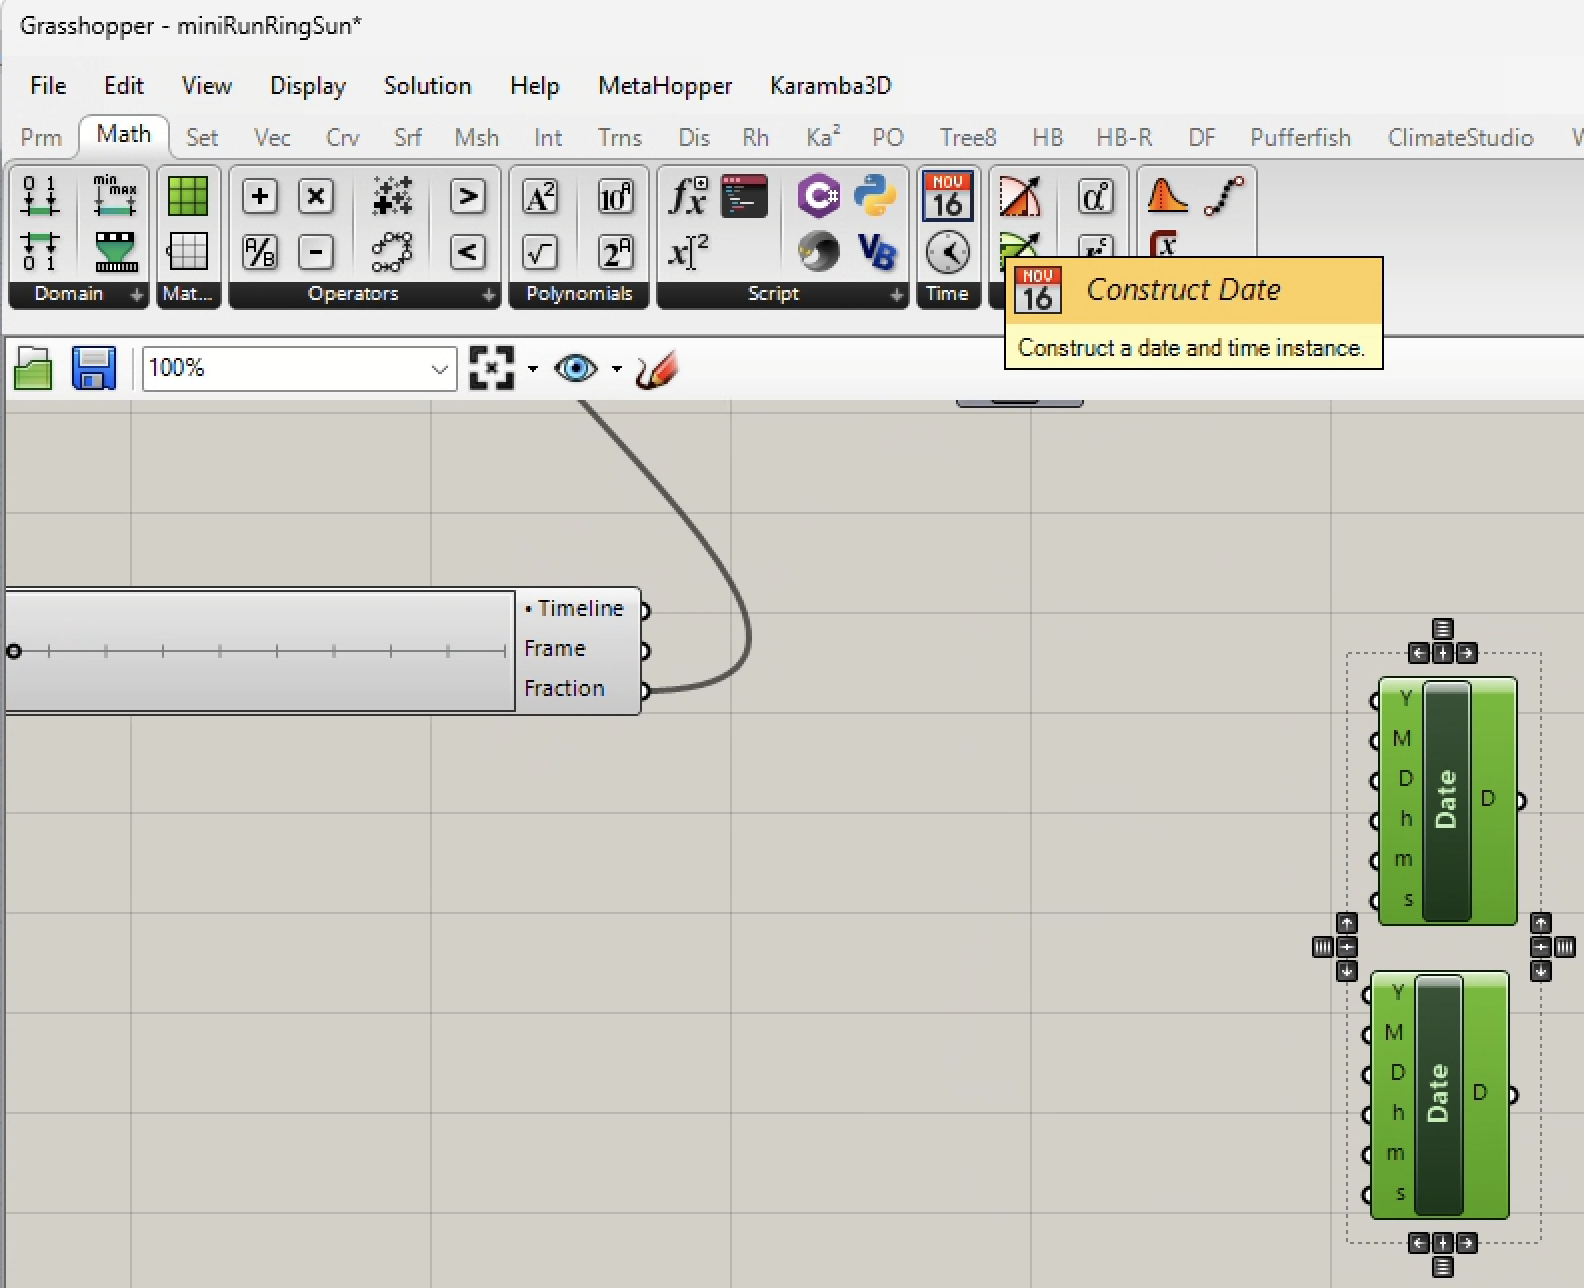
2. Add numerical sliders for "Y" (year, 0000 to 3000), "M" (month, 1 to 12), "D" (day, 1 to 32), "h" (hour, 0 to 23), "m" (minute, 0 to 59), and "s" (second, 0 to 59).
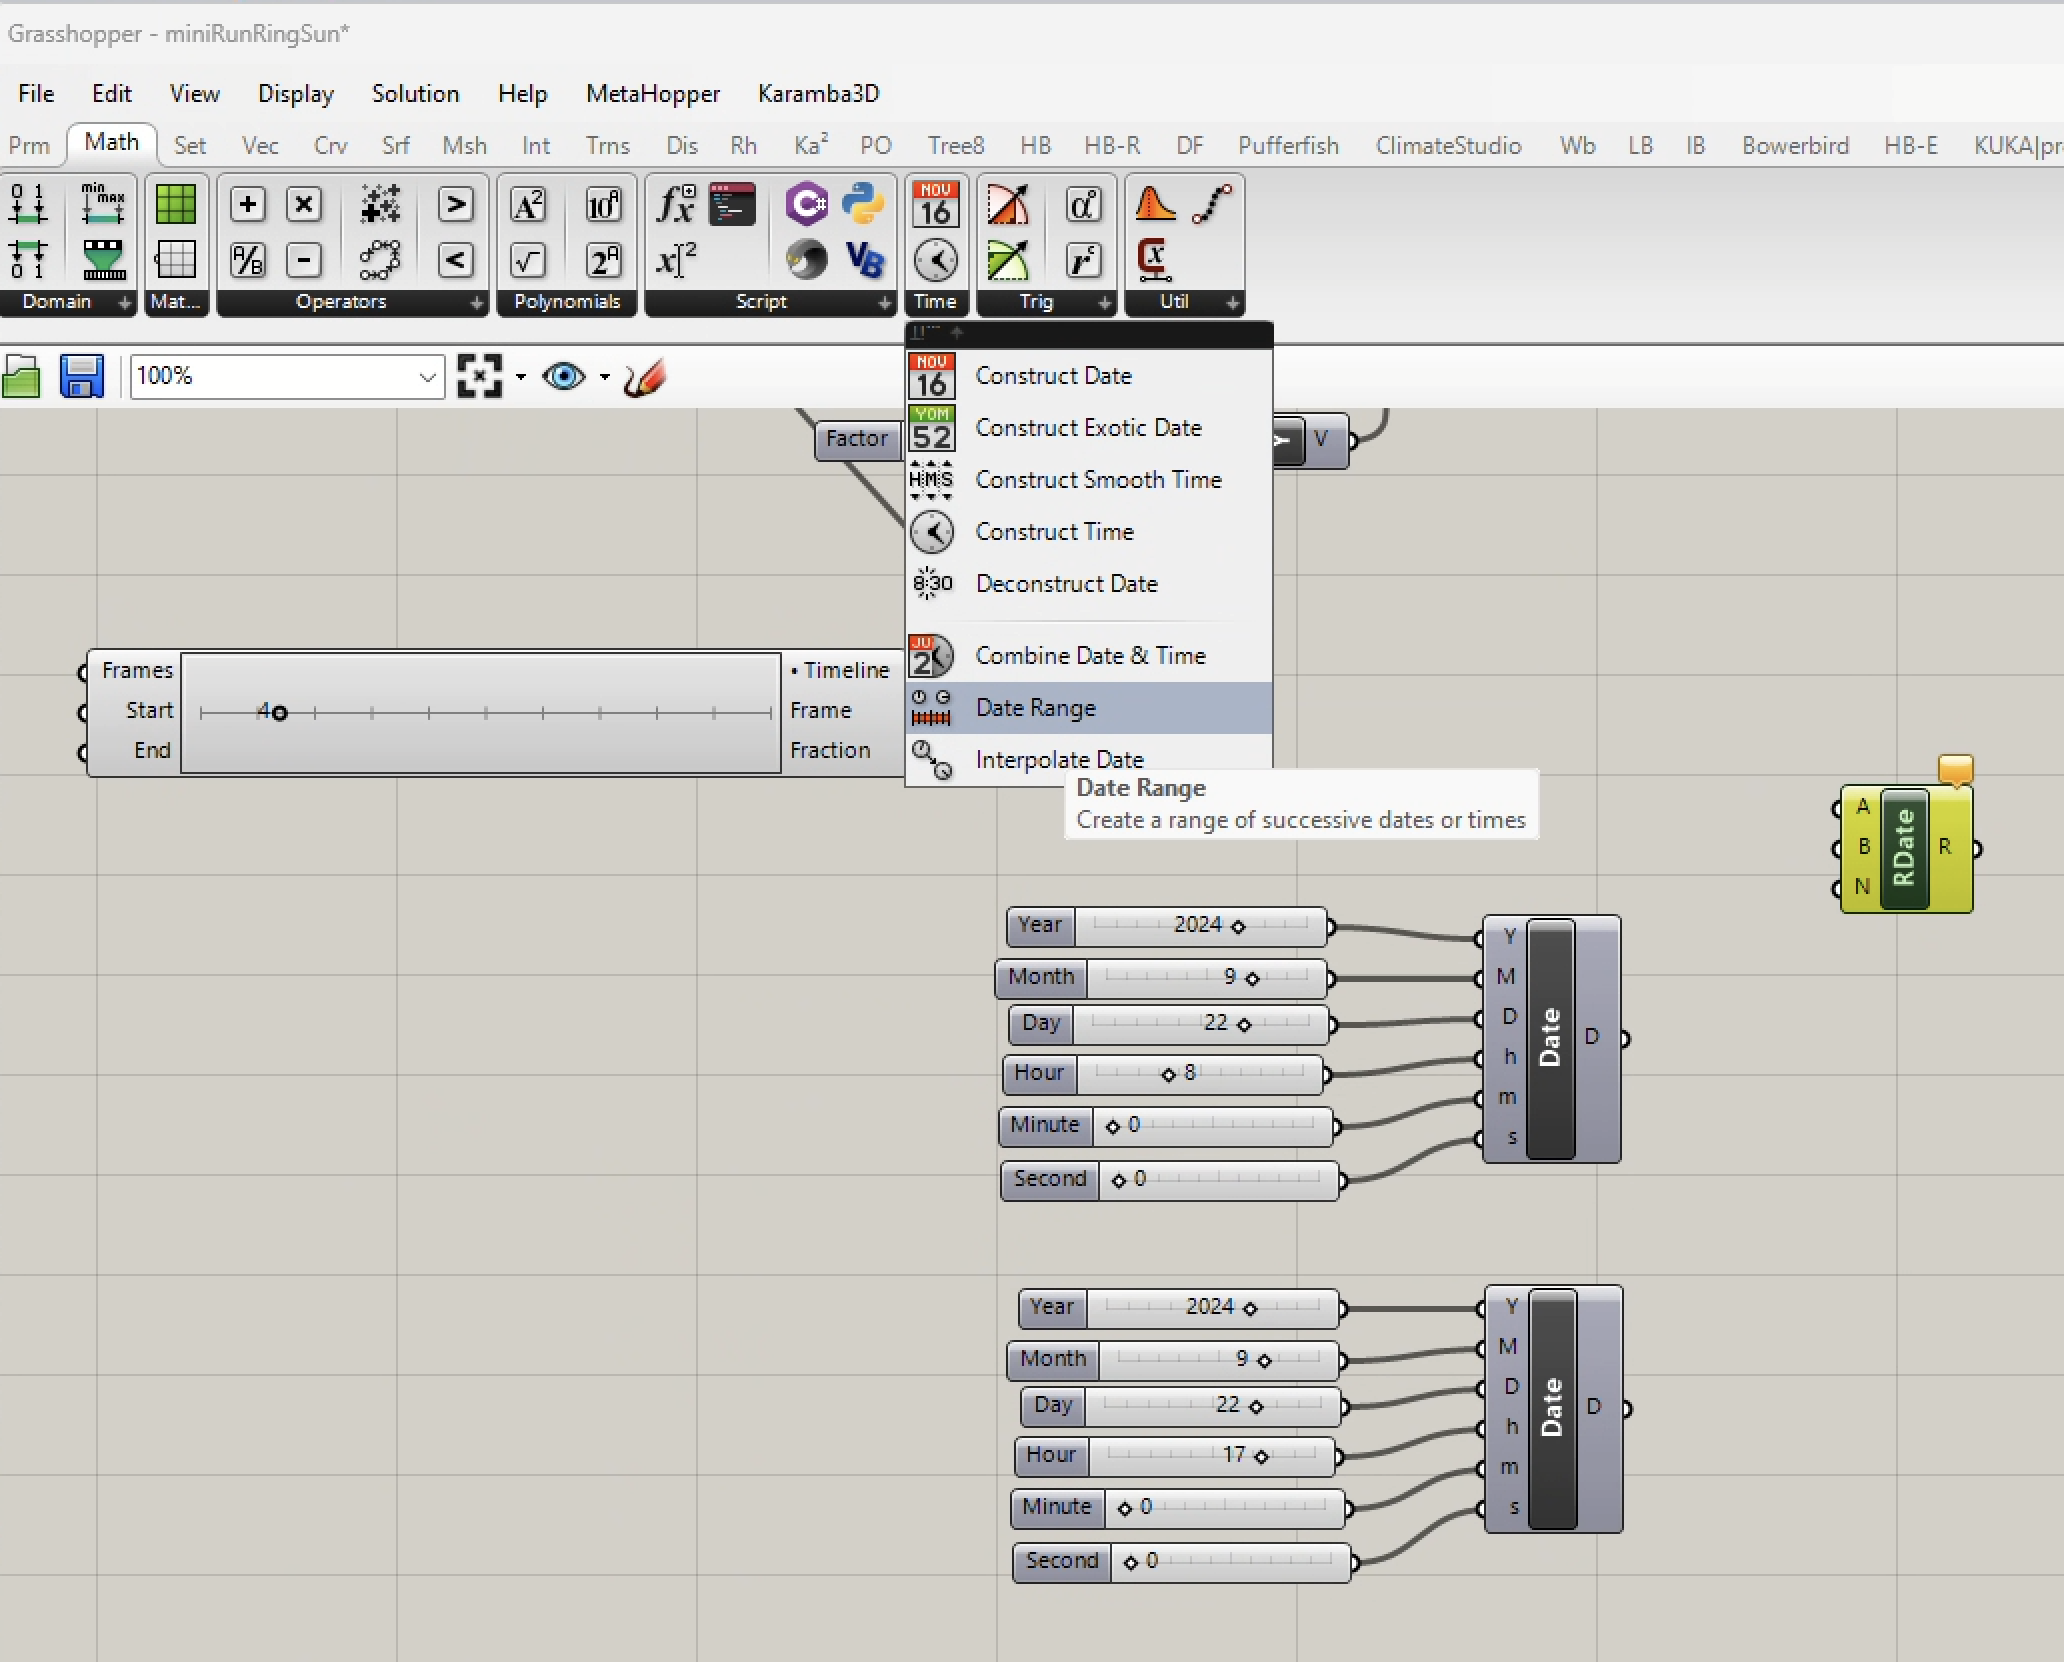
3. Add a "Date Range" component for generating a set of successive dates and times.
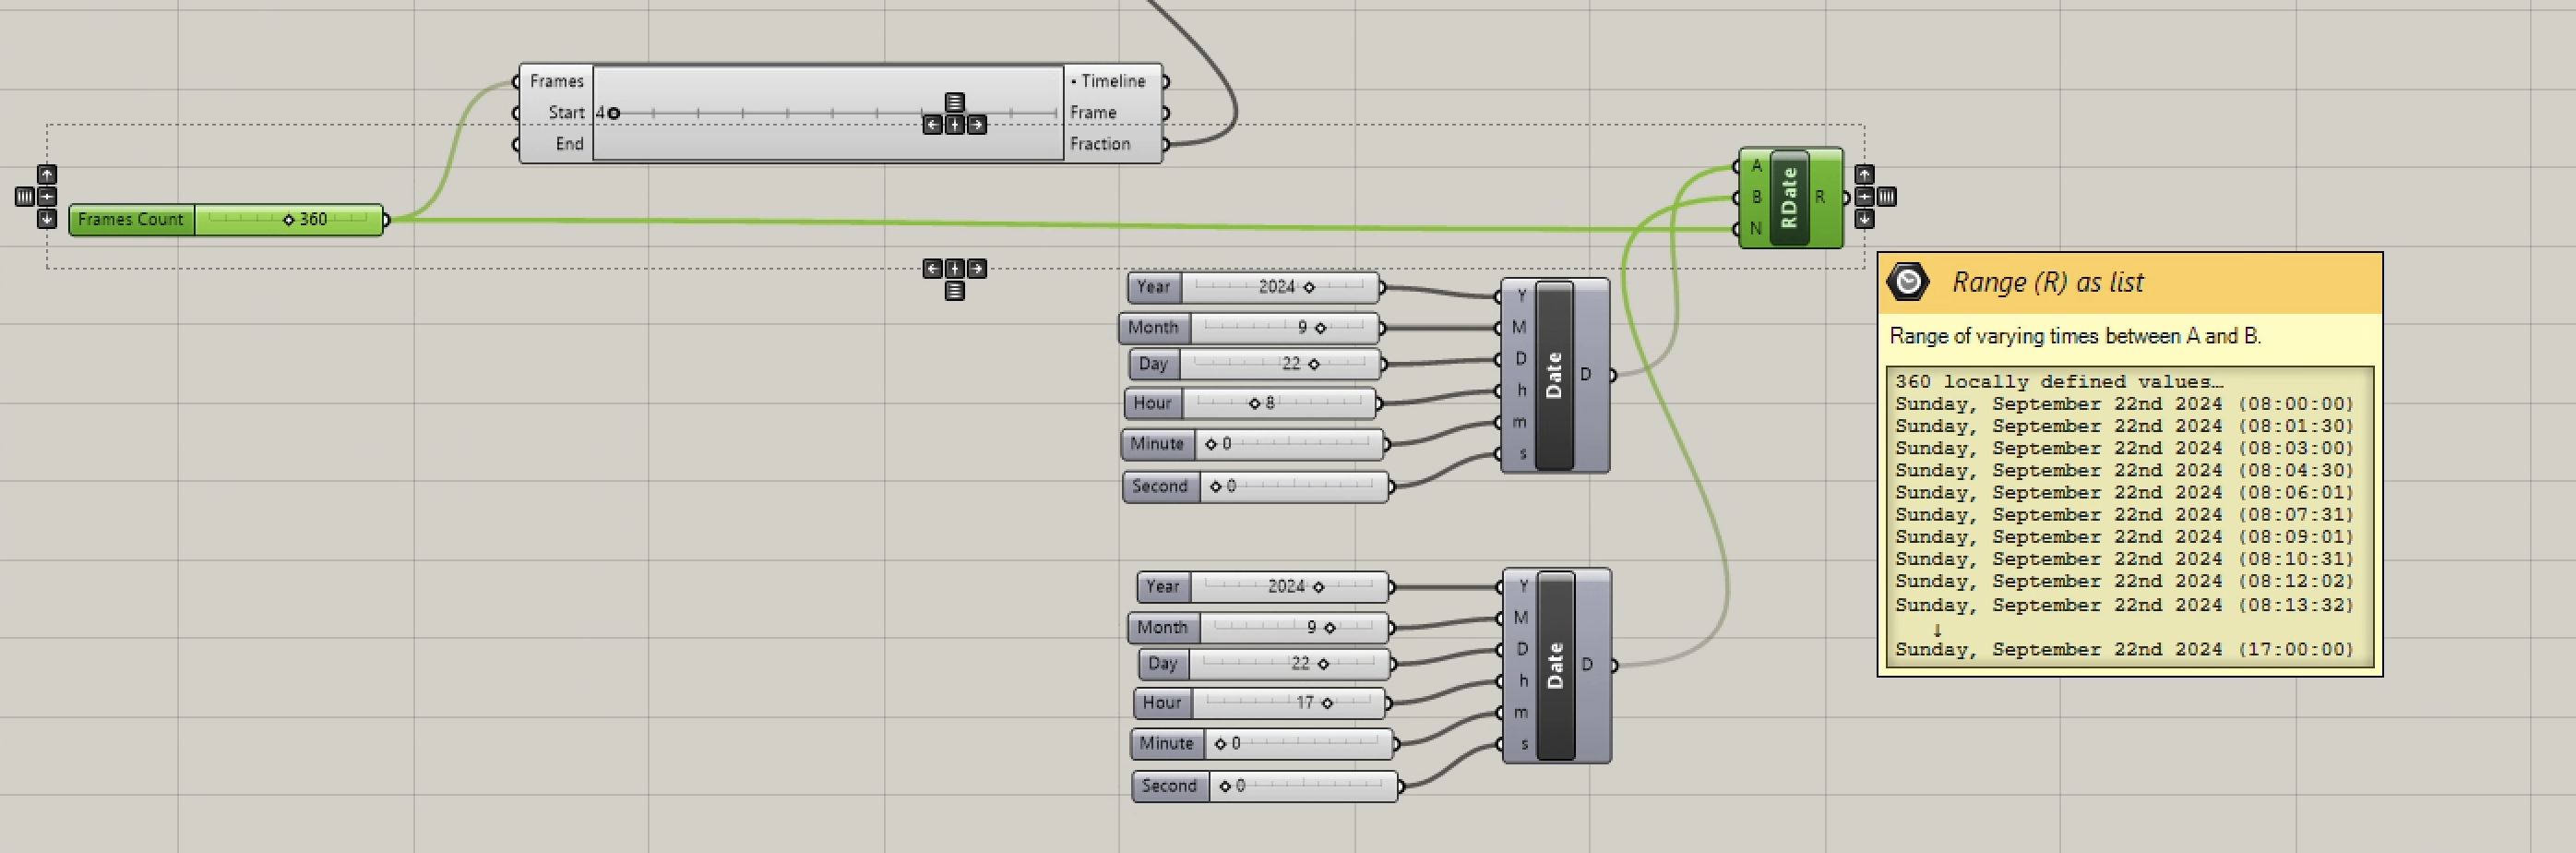
4. Set the frame count for the animation as a whole. It also concurrently determines the number of successive dates and times to be rendered. Thus, 360 frames yields 360 dates and times between the start and end times (select the image for a magnified view).
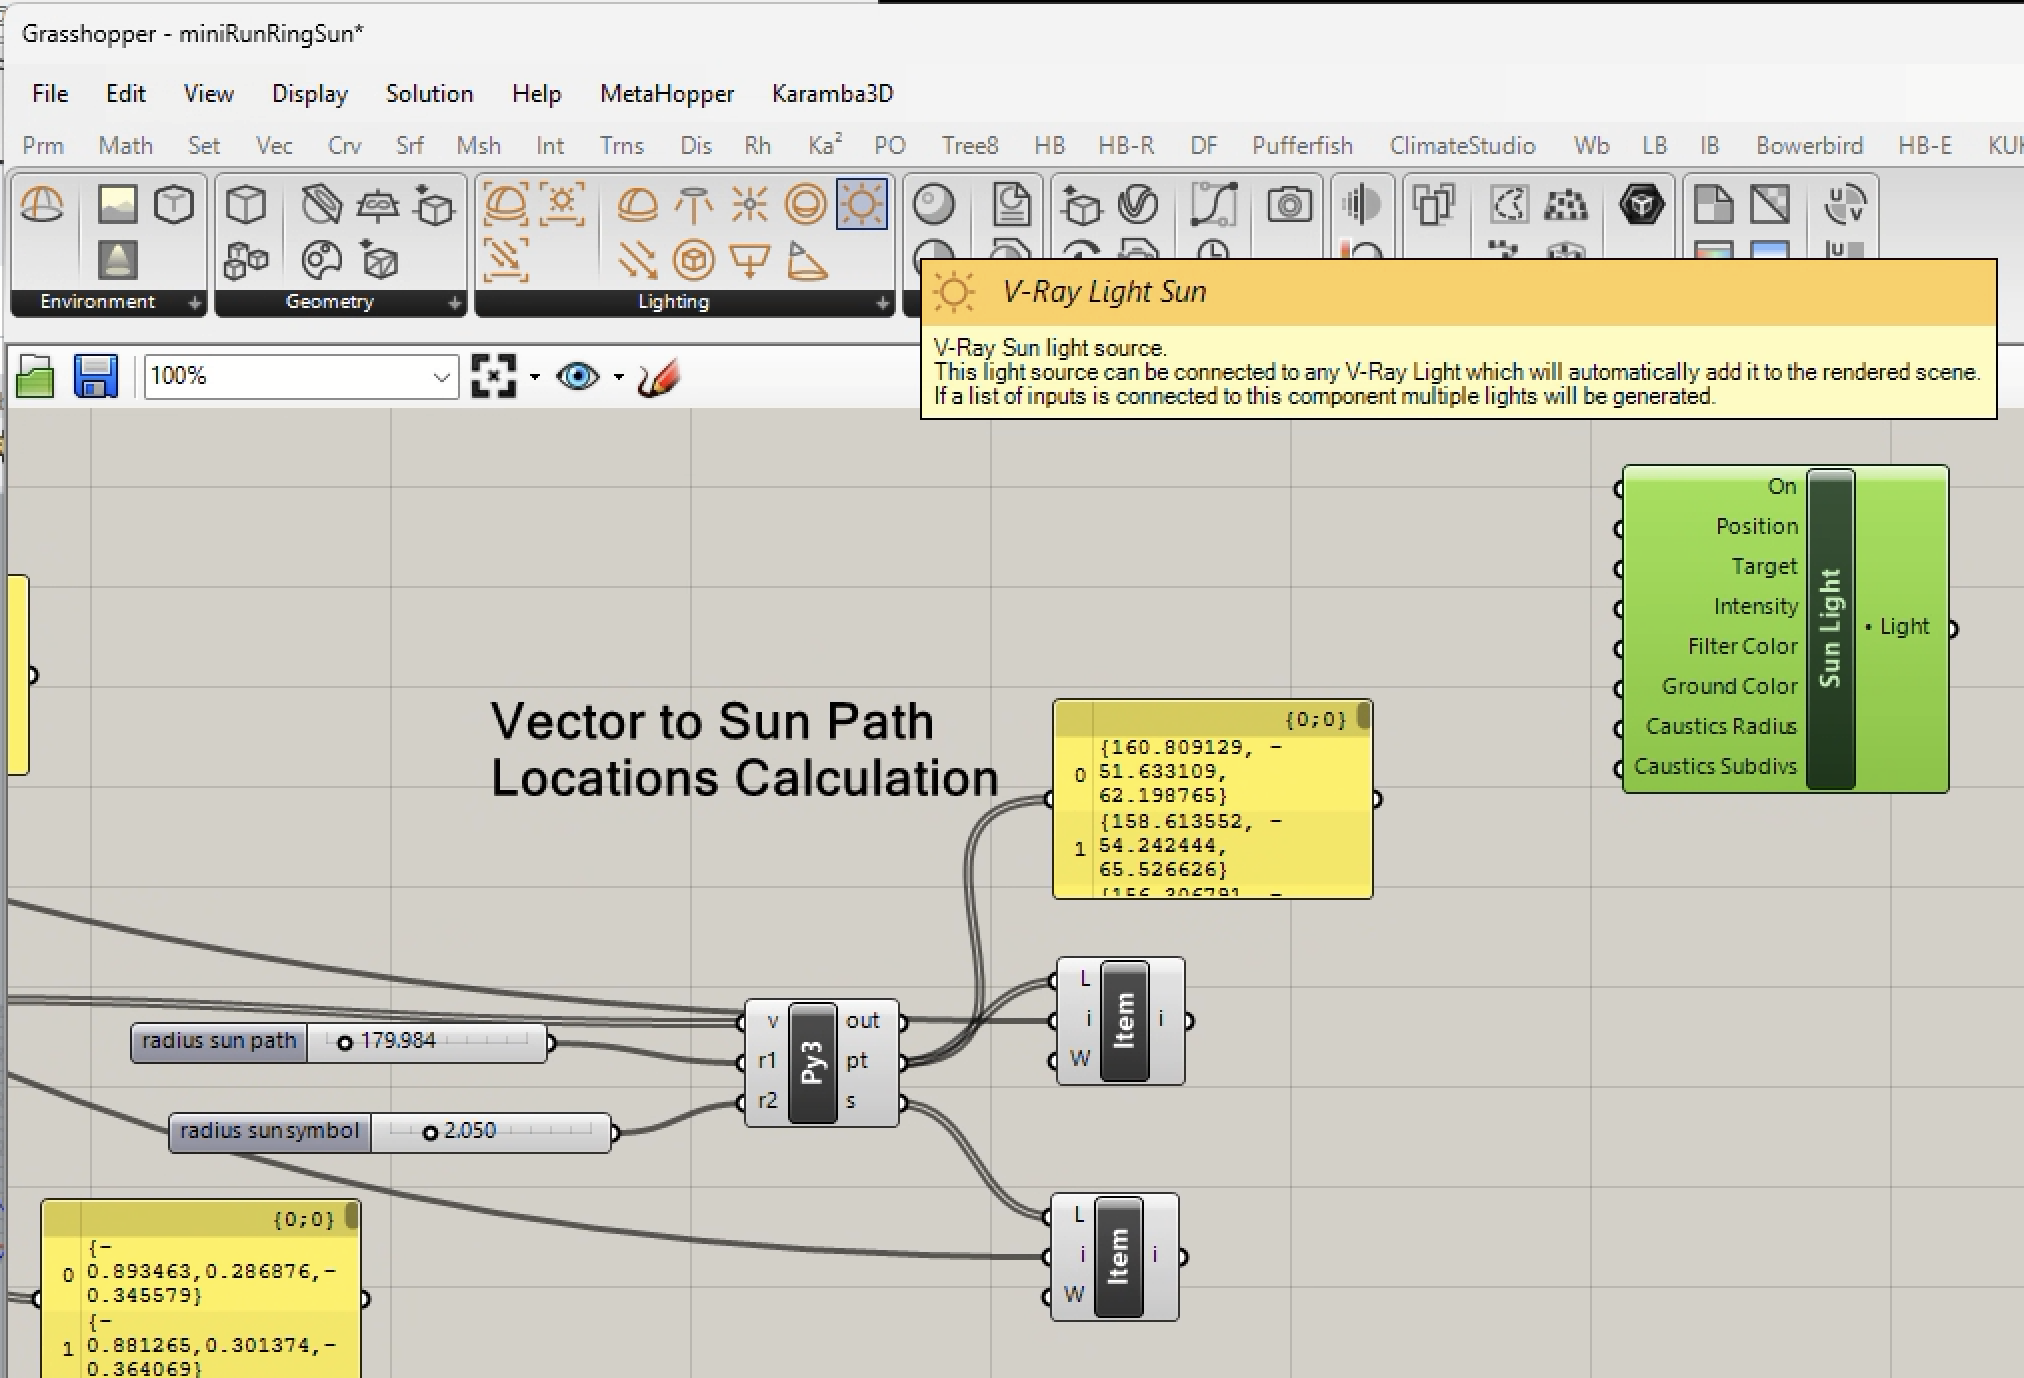
5. These next modules are available for copy and paste from the example file on the Classes server. The incorporate geograpical location, daylight savings time, and calcuation of the sun vector for each of the times evaluated. On the right-hand side of the Grasshopper canvas page the sun vector calculations are converted to locations in the sky where 3D point is generated to represent the position of the Sun relative to the 3D model and also diagram of the sun path, shown as the green arc of points in the image to the left (select the image for a magnified view).
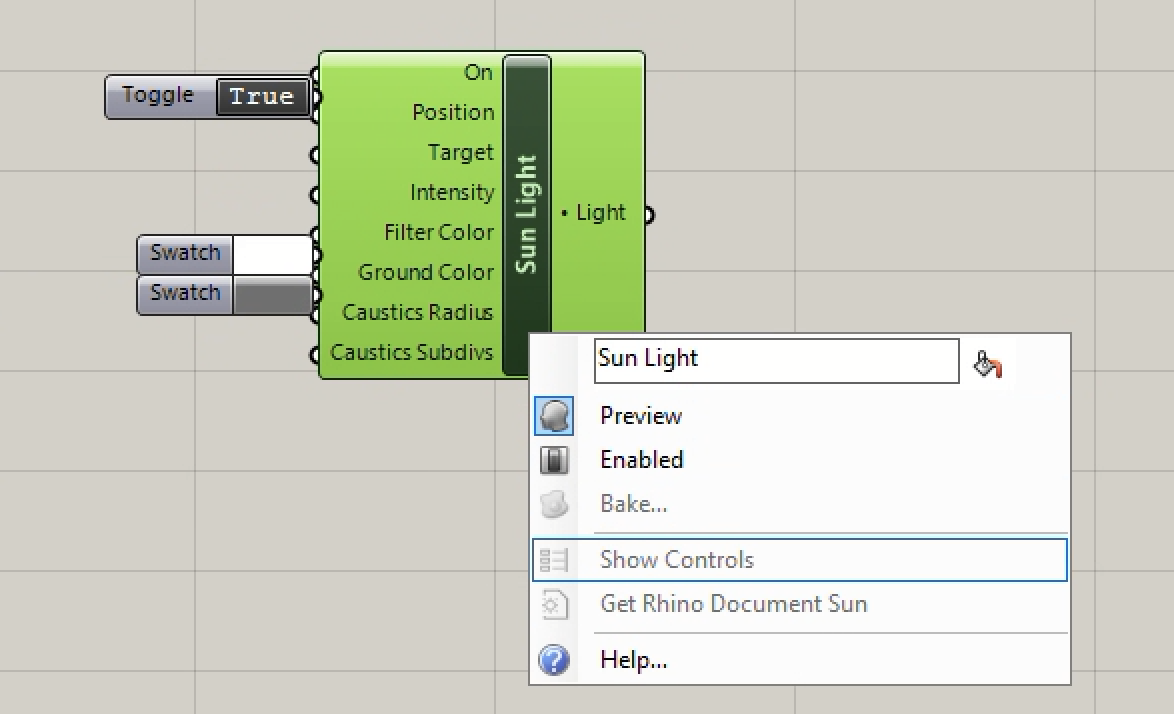
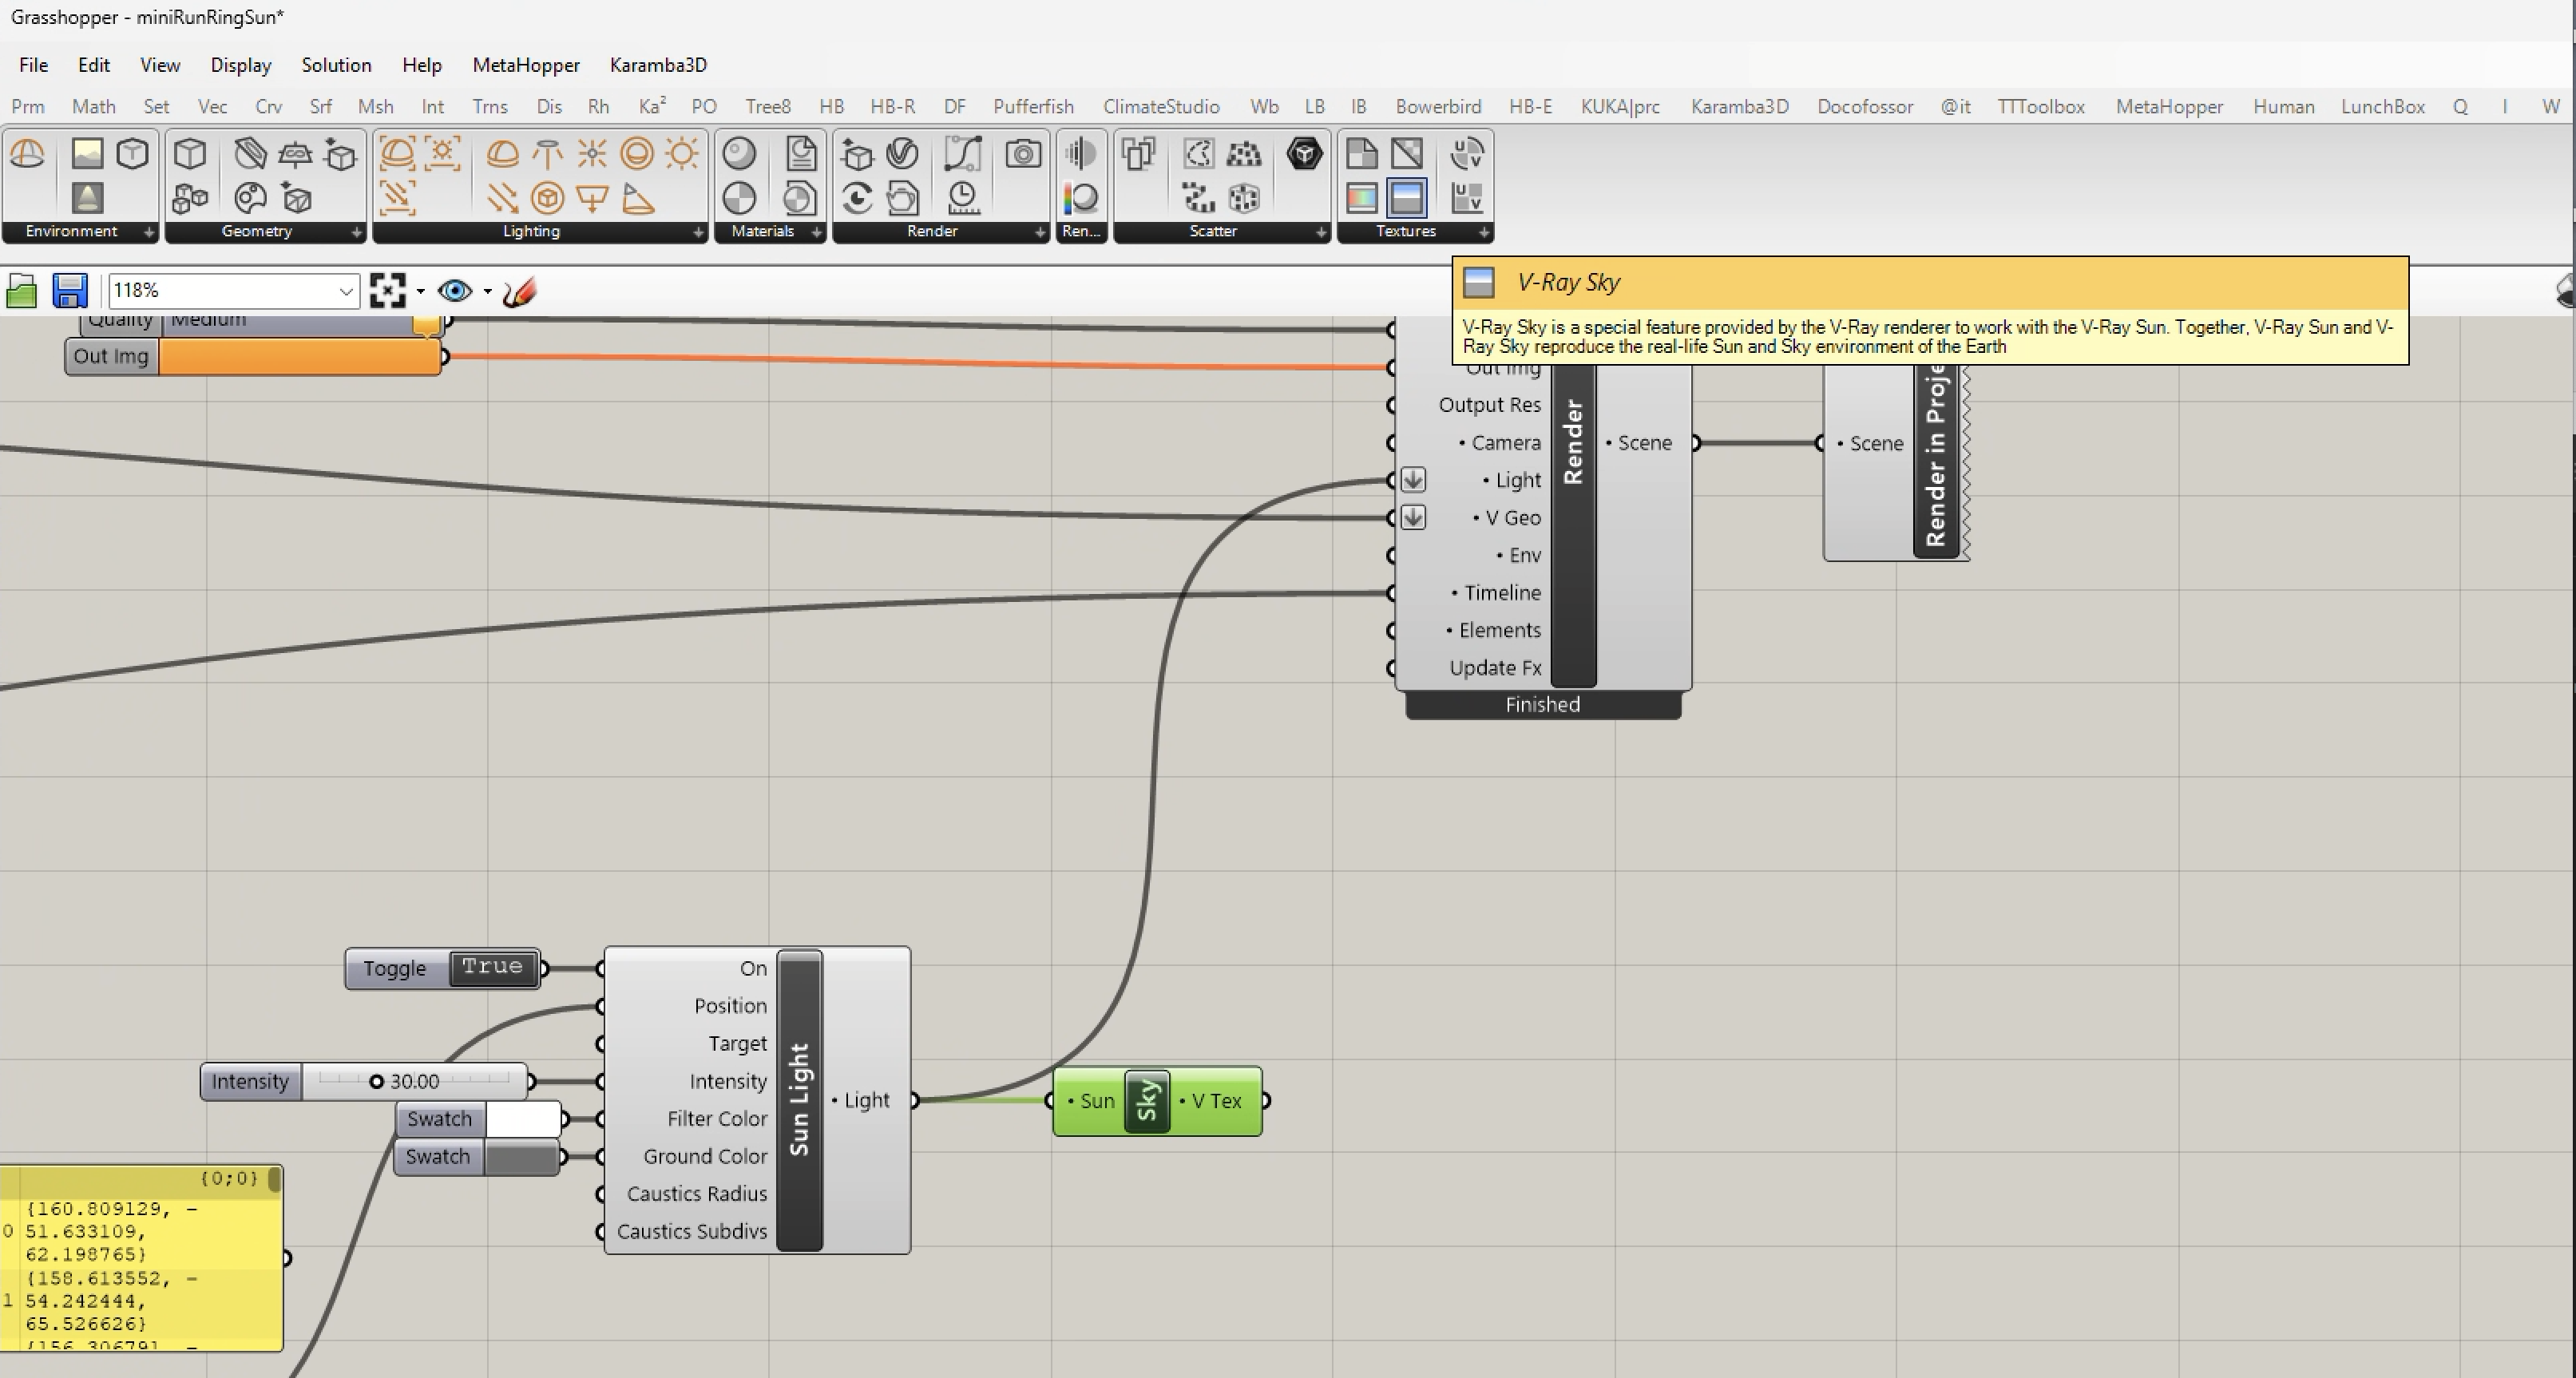
6. A V-Ray "Sun Light" component is now added to the Grasshopper Canvas, and a right-mouse-button click on the component is used to show it's input controls. The "Sun Light" default setting is to "On". The filter color is set to a default value of White and the ground color is set to a default value of Grey.
7. The calculated Sun Position is connected to the "Position" port, and the "Intensity" of the sun is initially set to to 0.3.
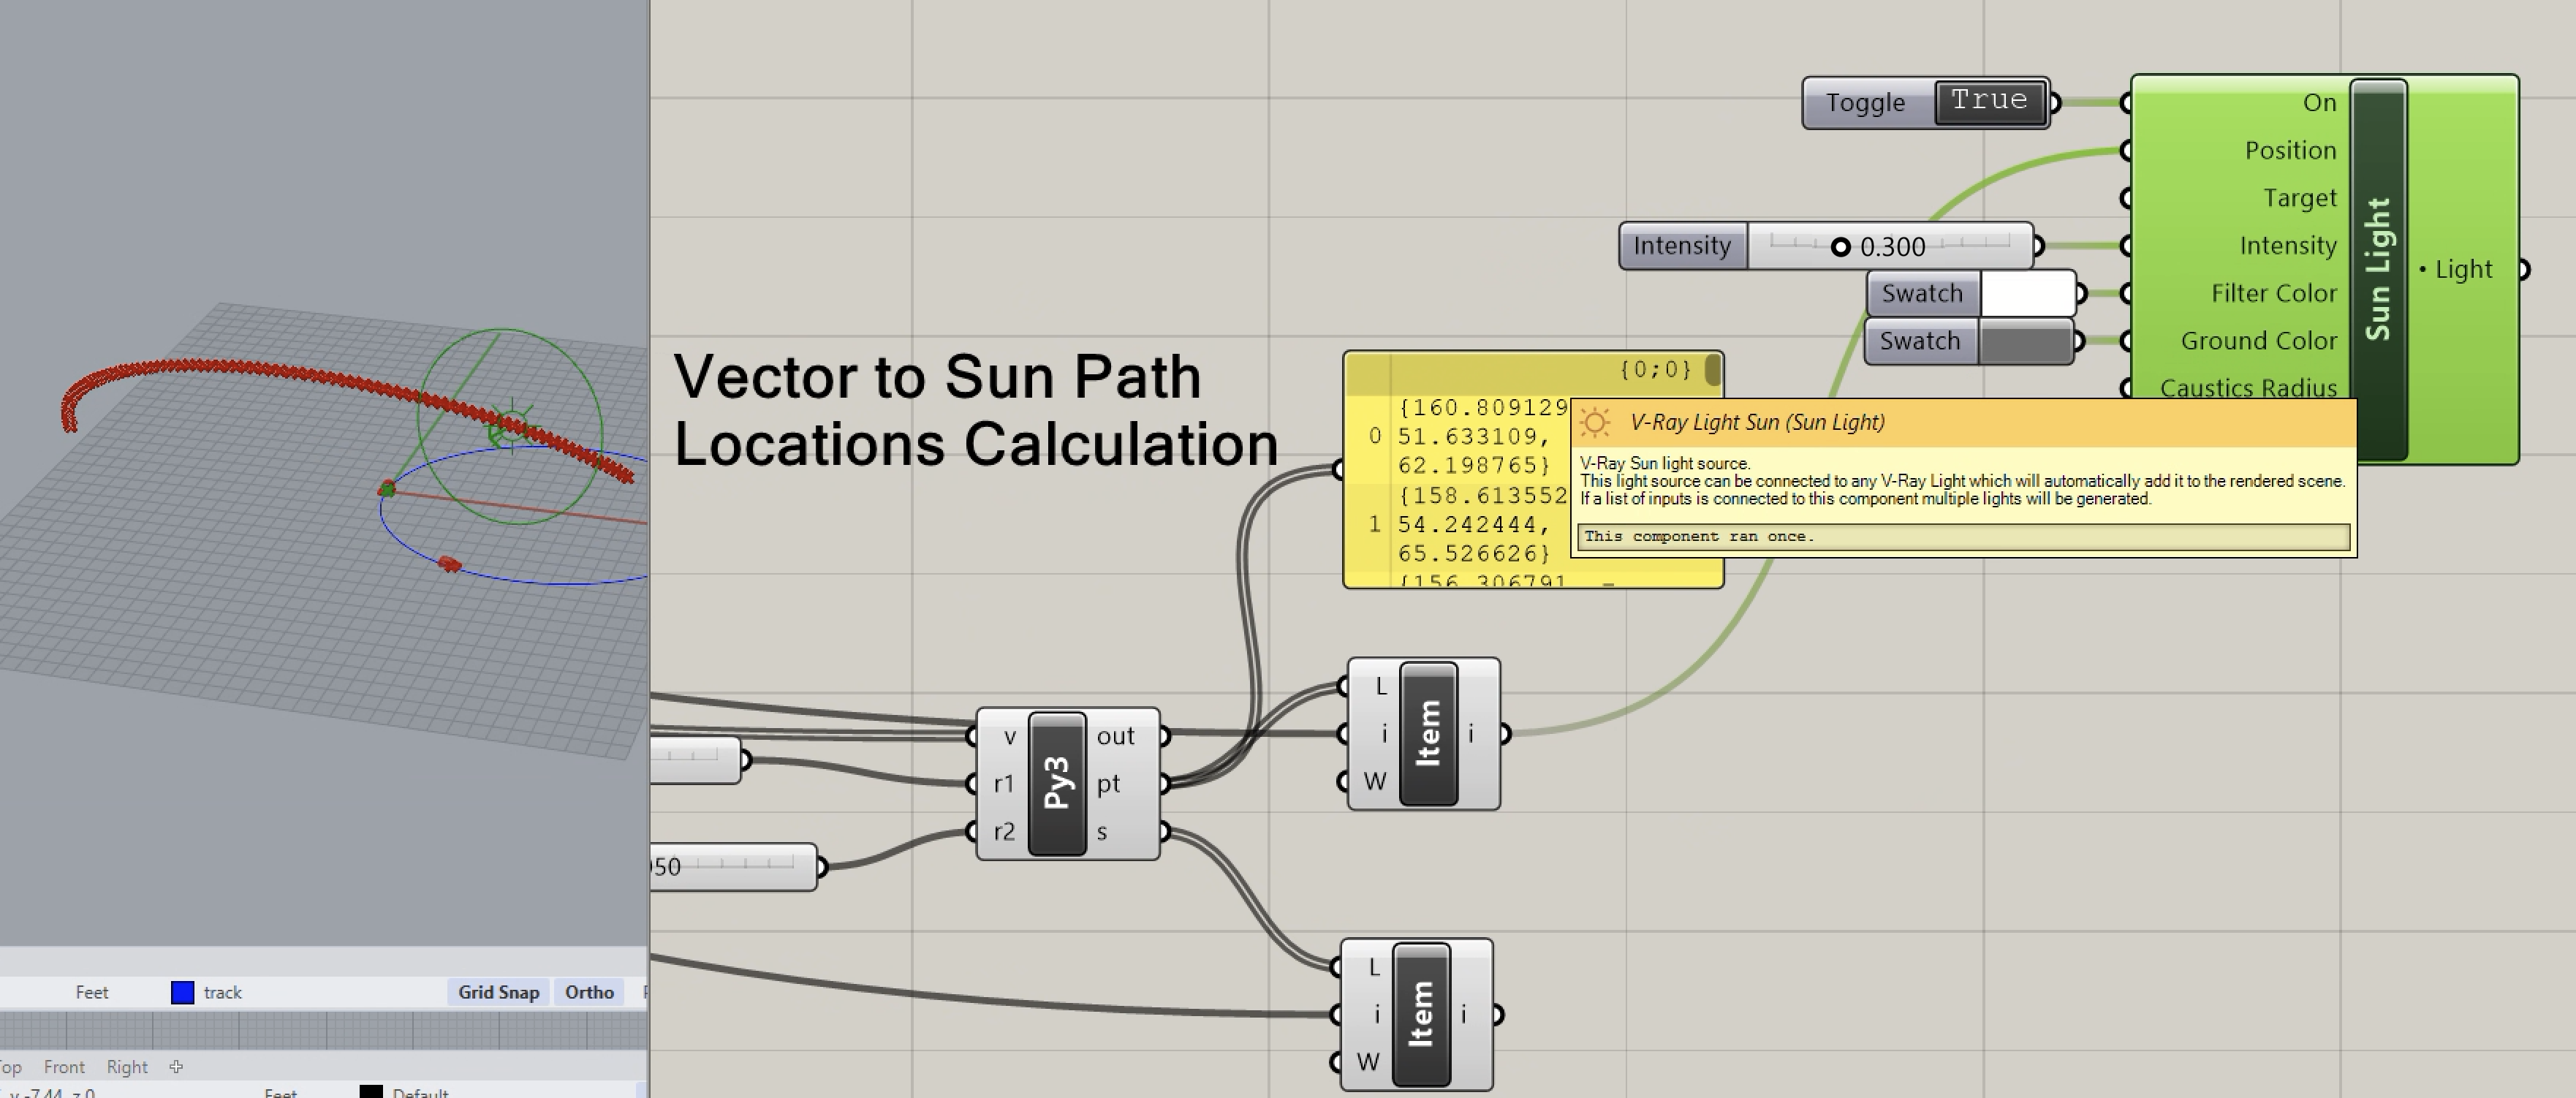
8. The "Sun Light" component is in turn connected to the "Light" input port of the V-Ray "Render" component.
9. A new test rendering is created by right-mouse-button clicking on the word "Render" of the V-Ray "Render" component, and selecting the word "Render".

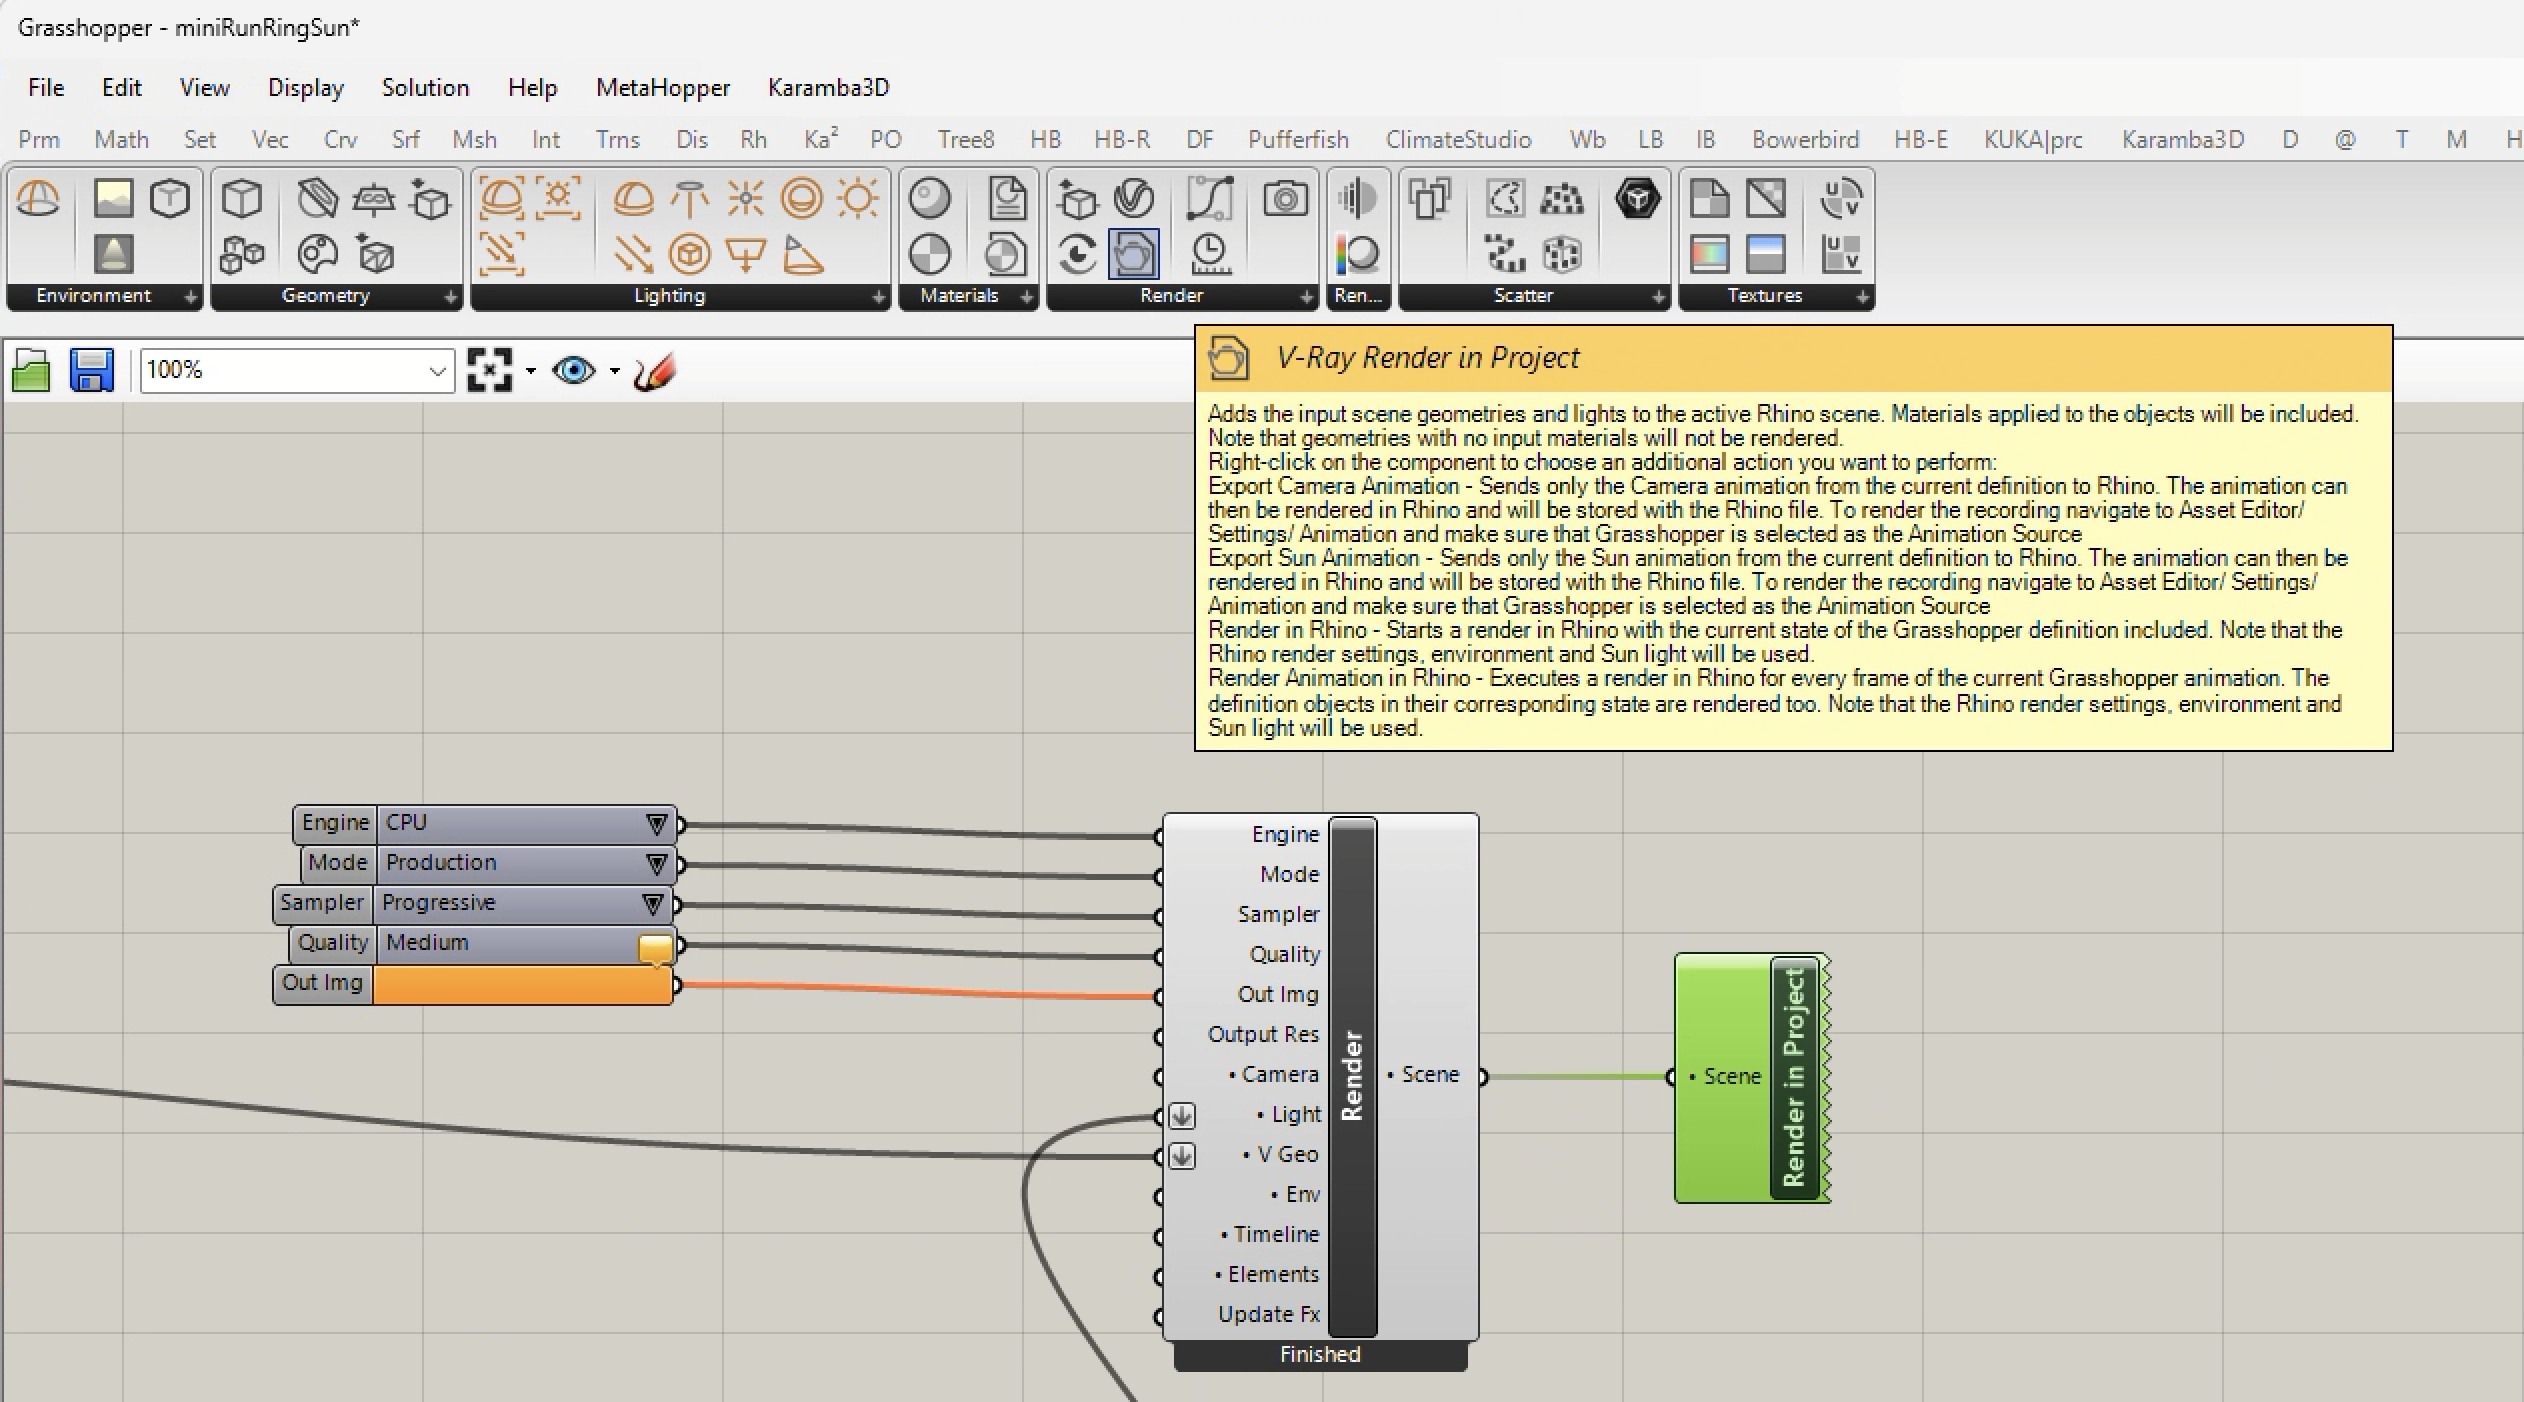
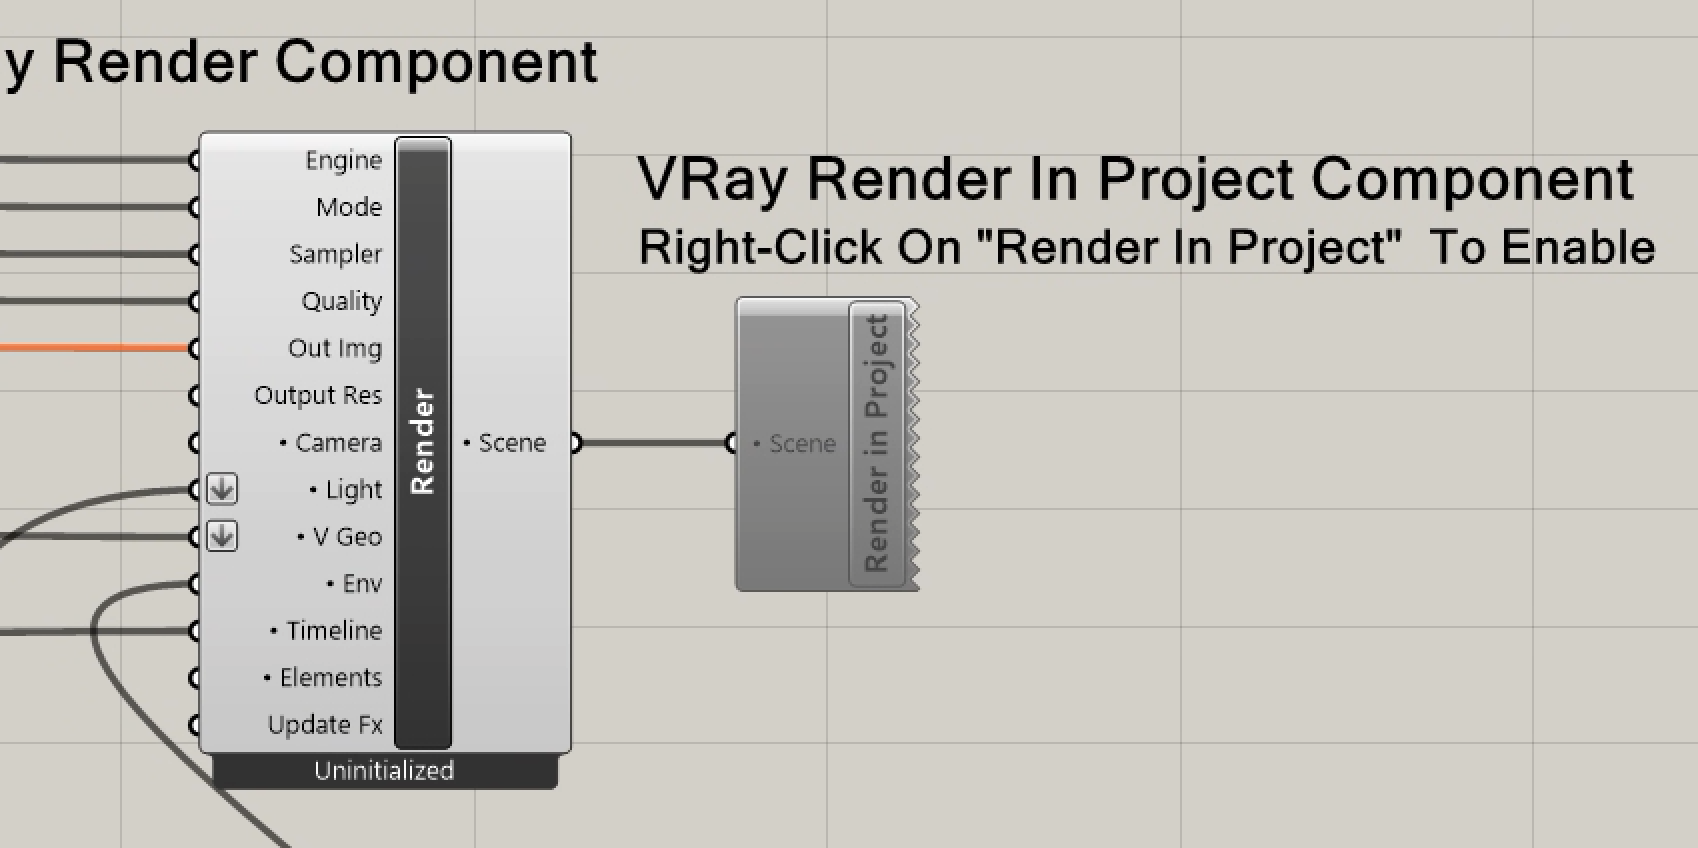
H. Adding A "Render In Project" V-Ray Component.
This component allows for steamlined rendering through Grasshopper within the full context of all the objects that have been placed in Rhino, their materials and environmental conditions. Unless the objects thenselves are moving, they typically do not need to be imported directly in Grasshopper. Note the the Rhino Sun setting should be "Off" for this sequence.
1. Begin by adding a V-Ray " Render In Project" to the Grasshopper script.
2. Connect the Timeline output of the V-Ray "Timeline" component "Timeline" output port to the V-Ray "Render" component "Timeline" input port
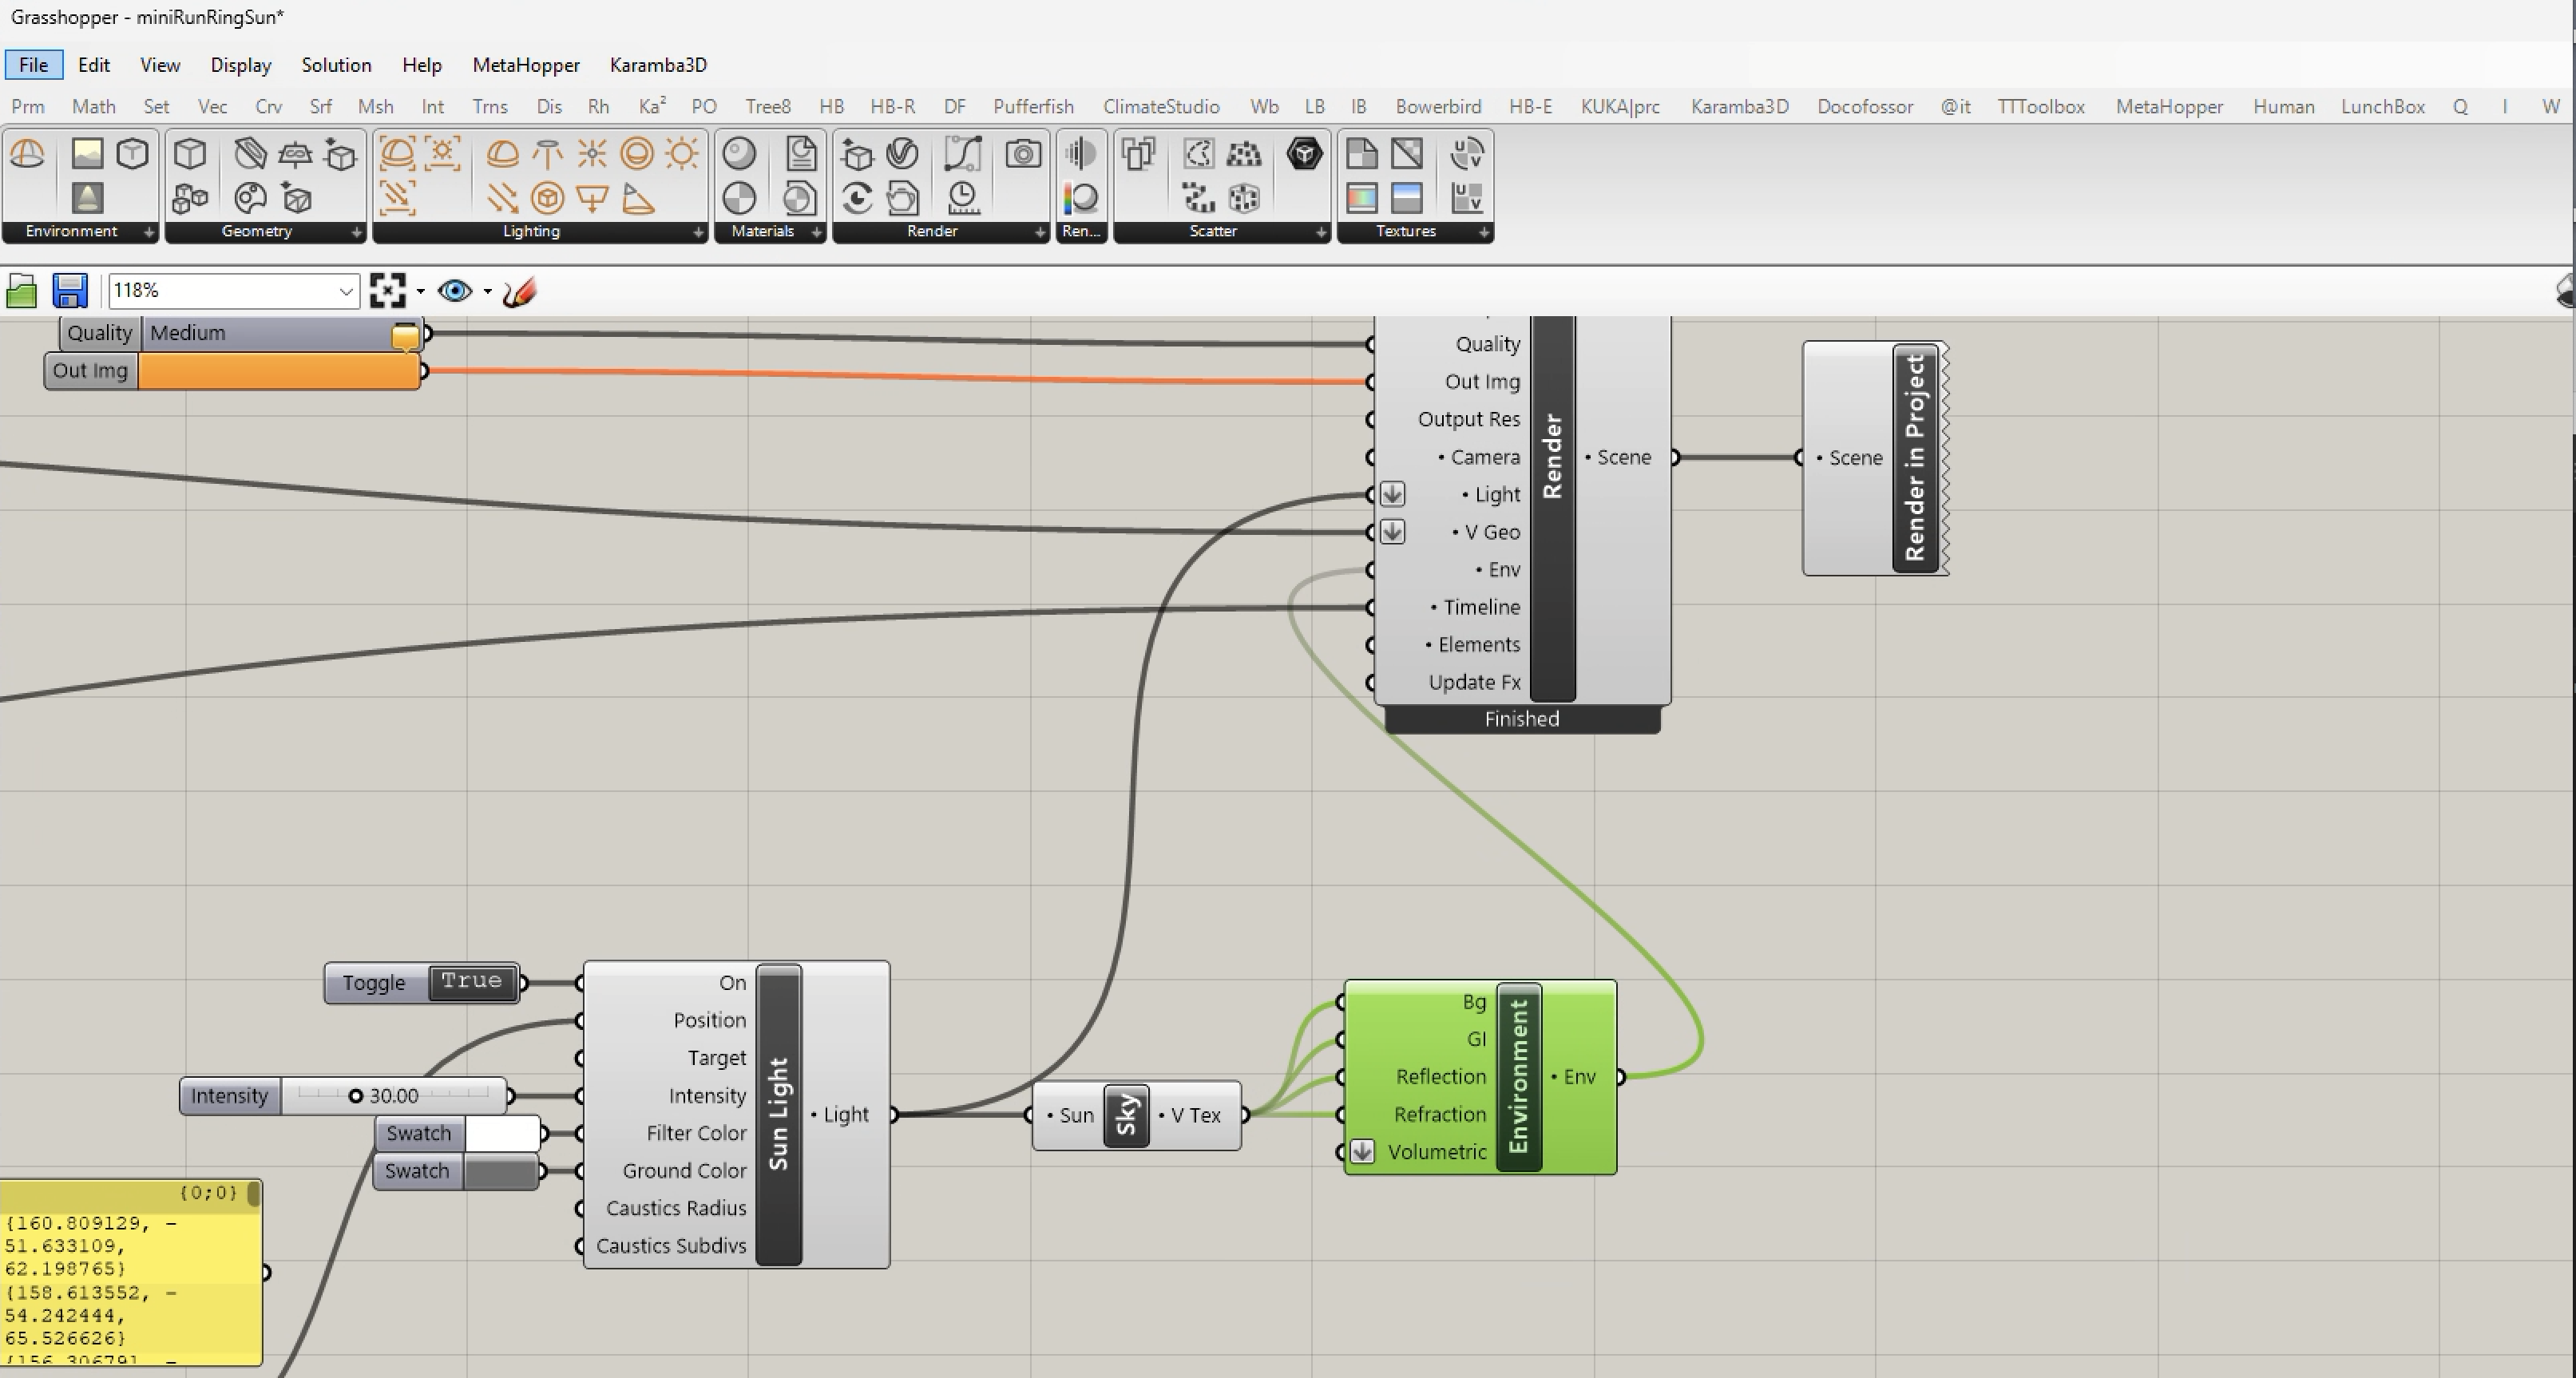
3. Connect a "V-Ray Sky" component the output port of the VRay "Sun" component.
4. Add a "V-Ray Environment" component to the output port of the "V-Ray Sky" component.
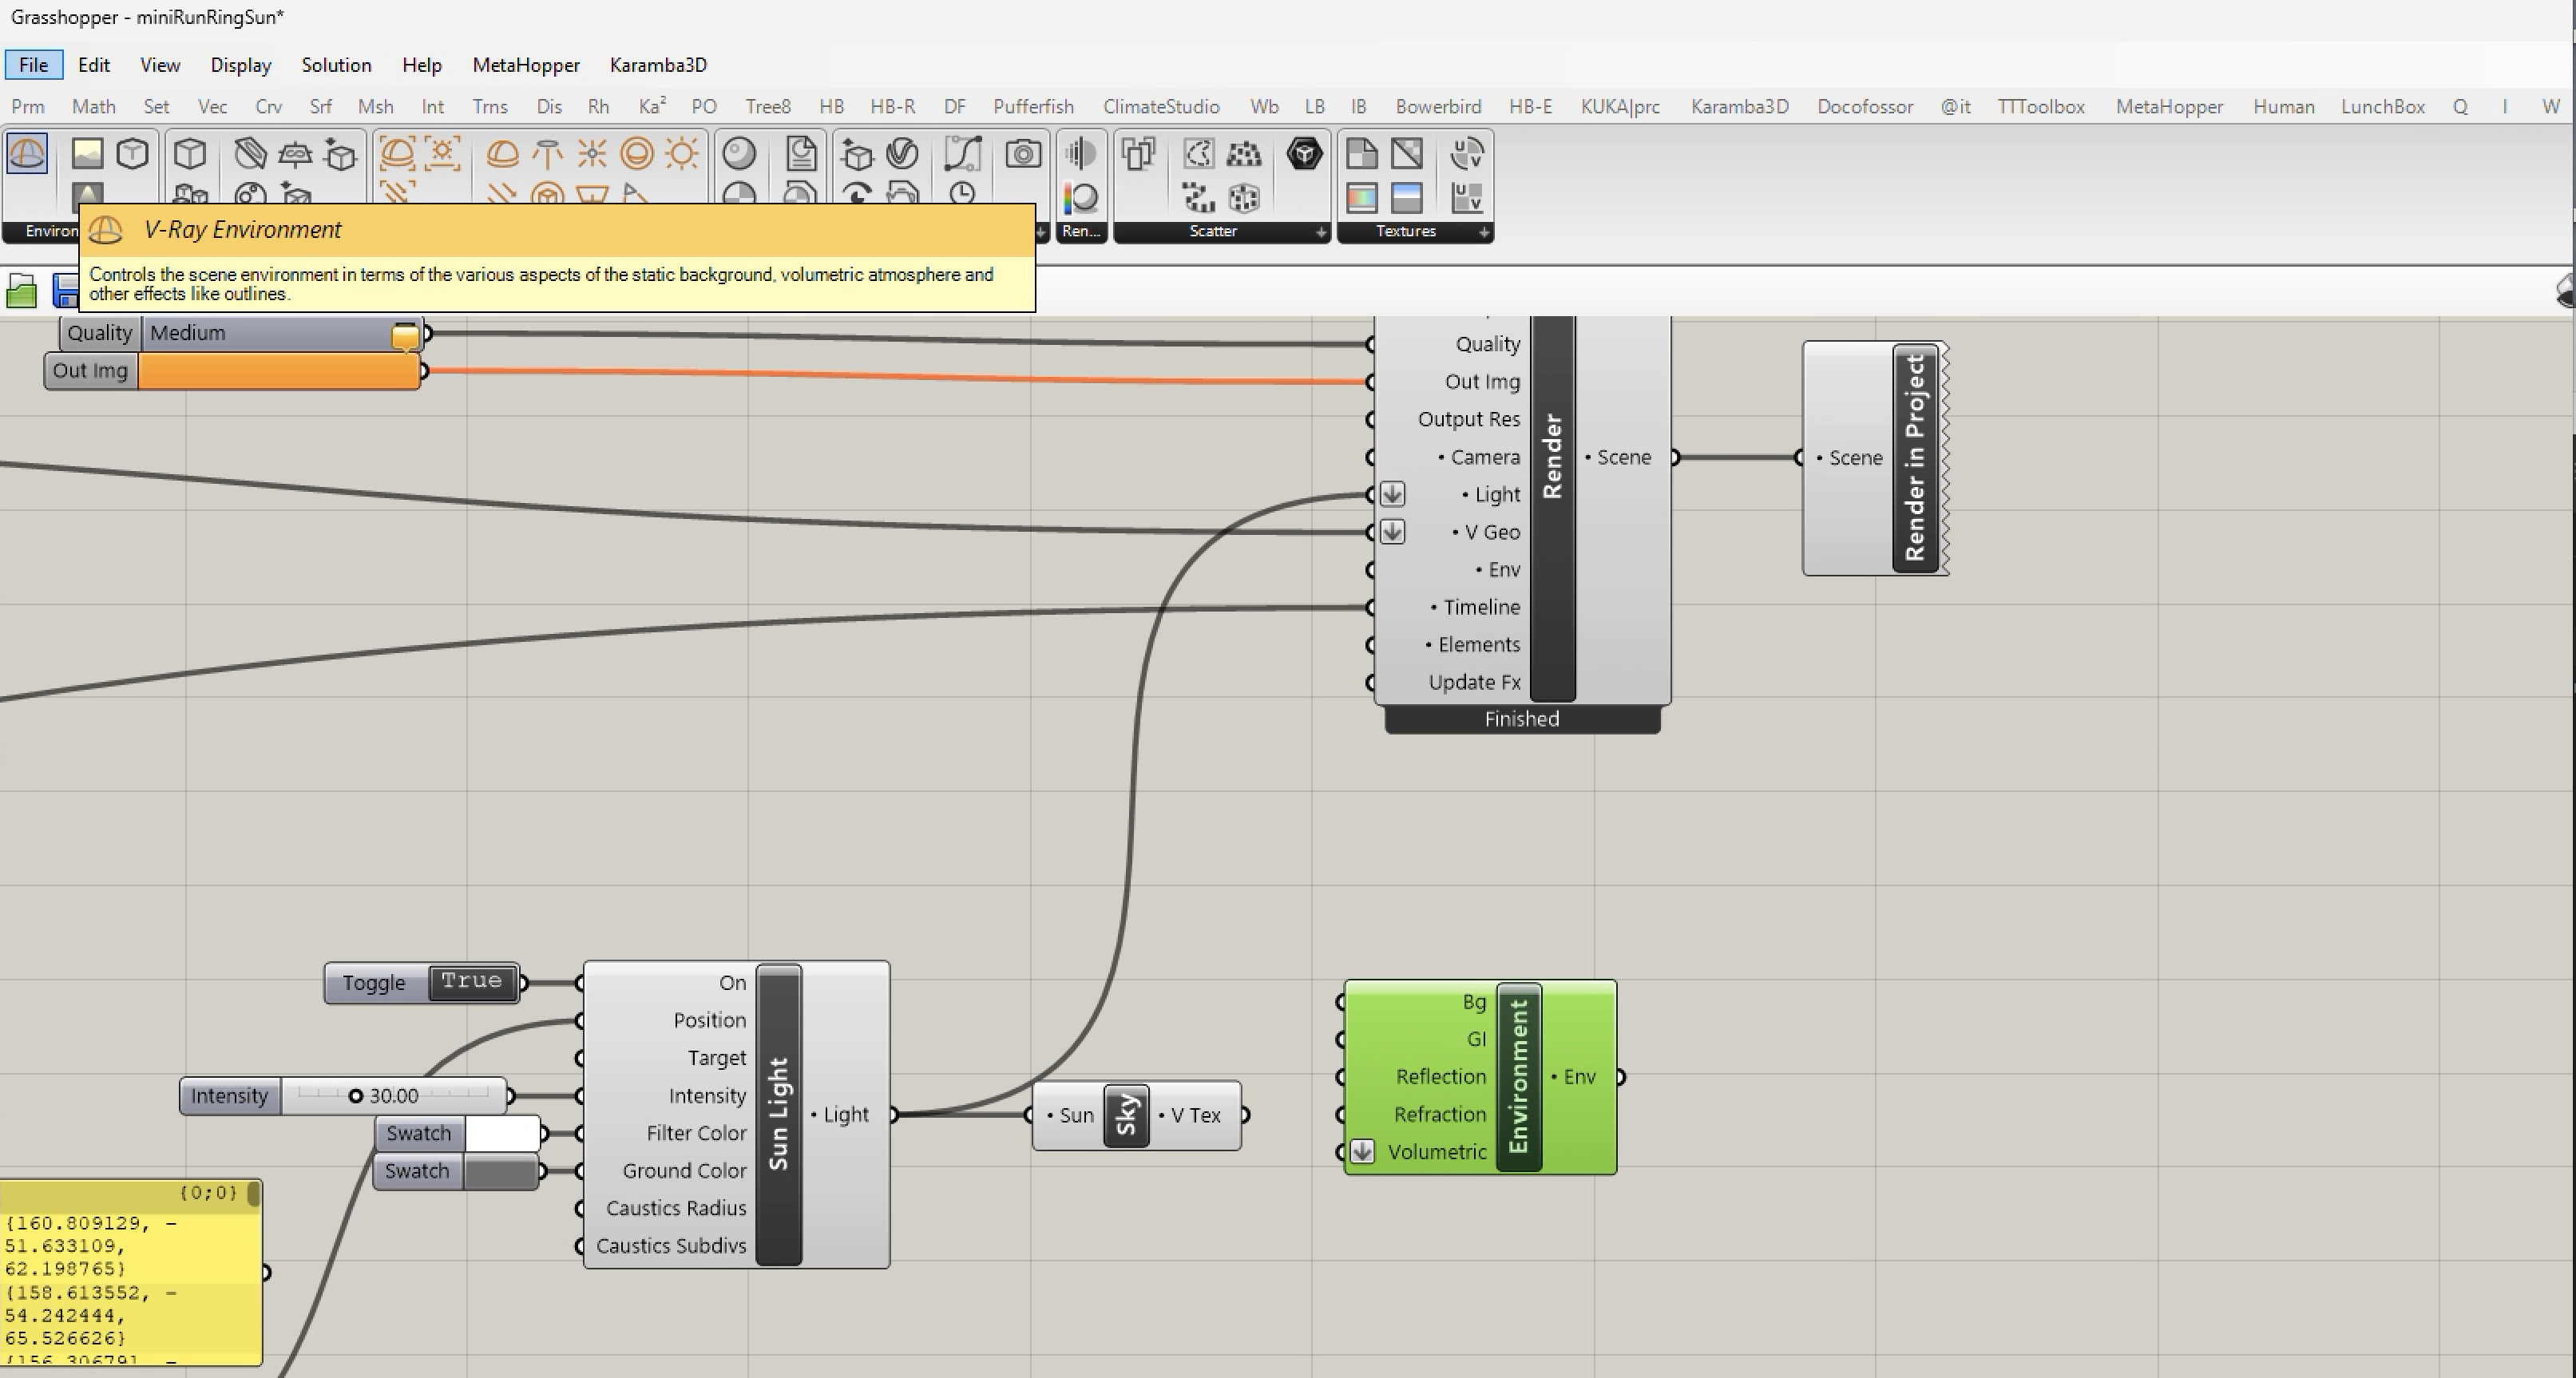
5. Connect the "Sky" component to the "Environment" component at the four input ports of "Bg", "GI", "Reflection" and "Refraction". (Note this is similar how we handled the "Enviroment" tab within the V-Ray "Asset Editor / Settings" tab in previous workshop tutorials.) Then, connect the "Environment" component "Env" output port to the "Render" component "Env" port.
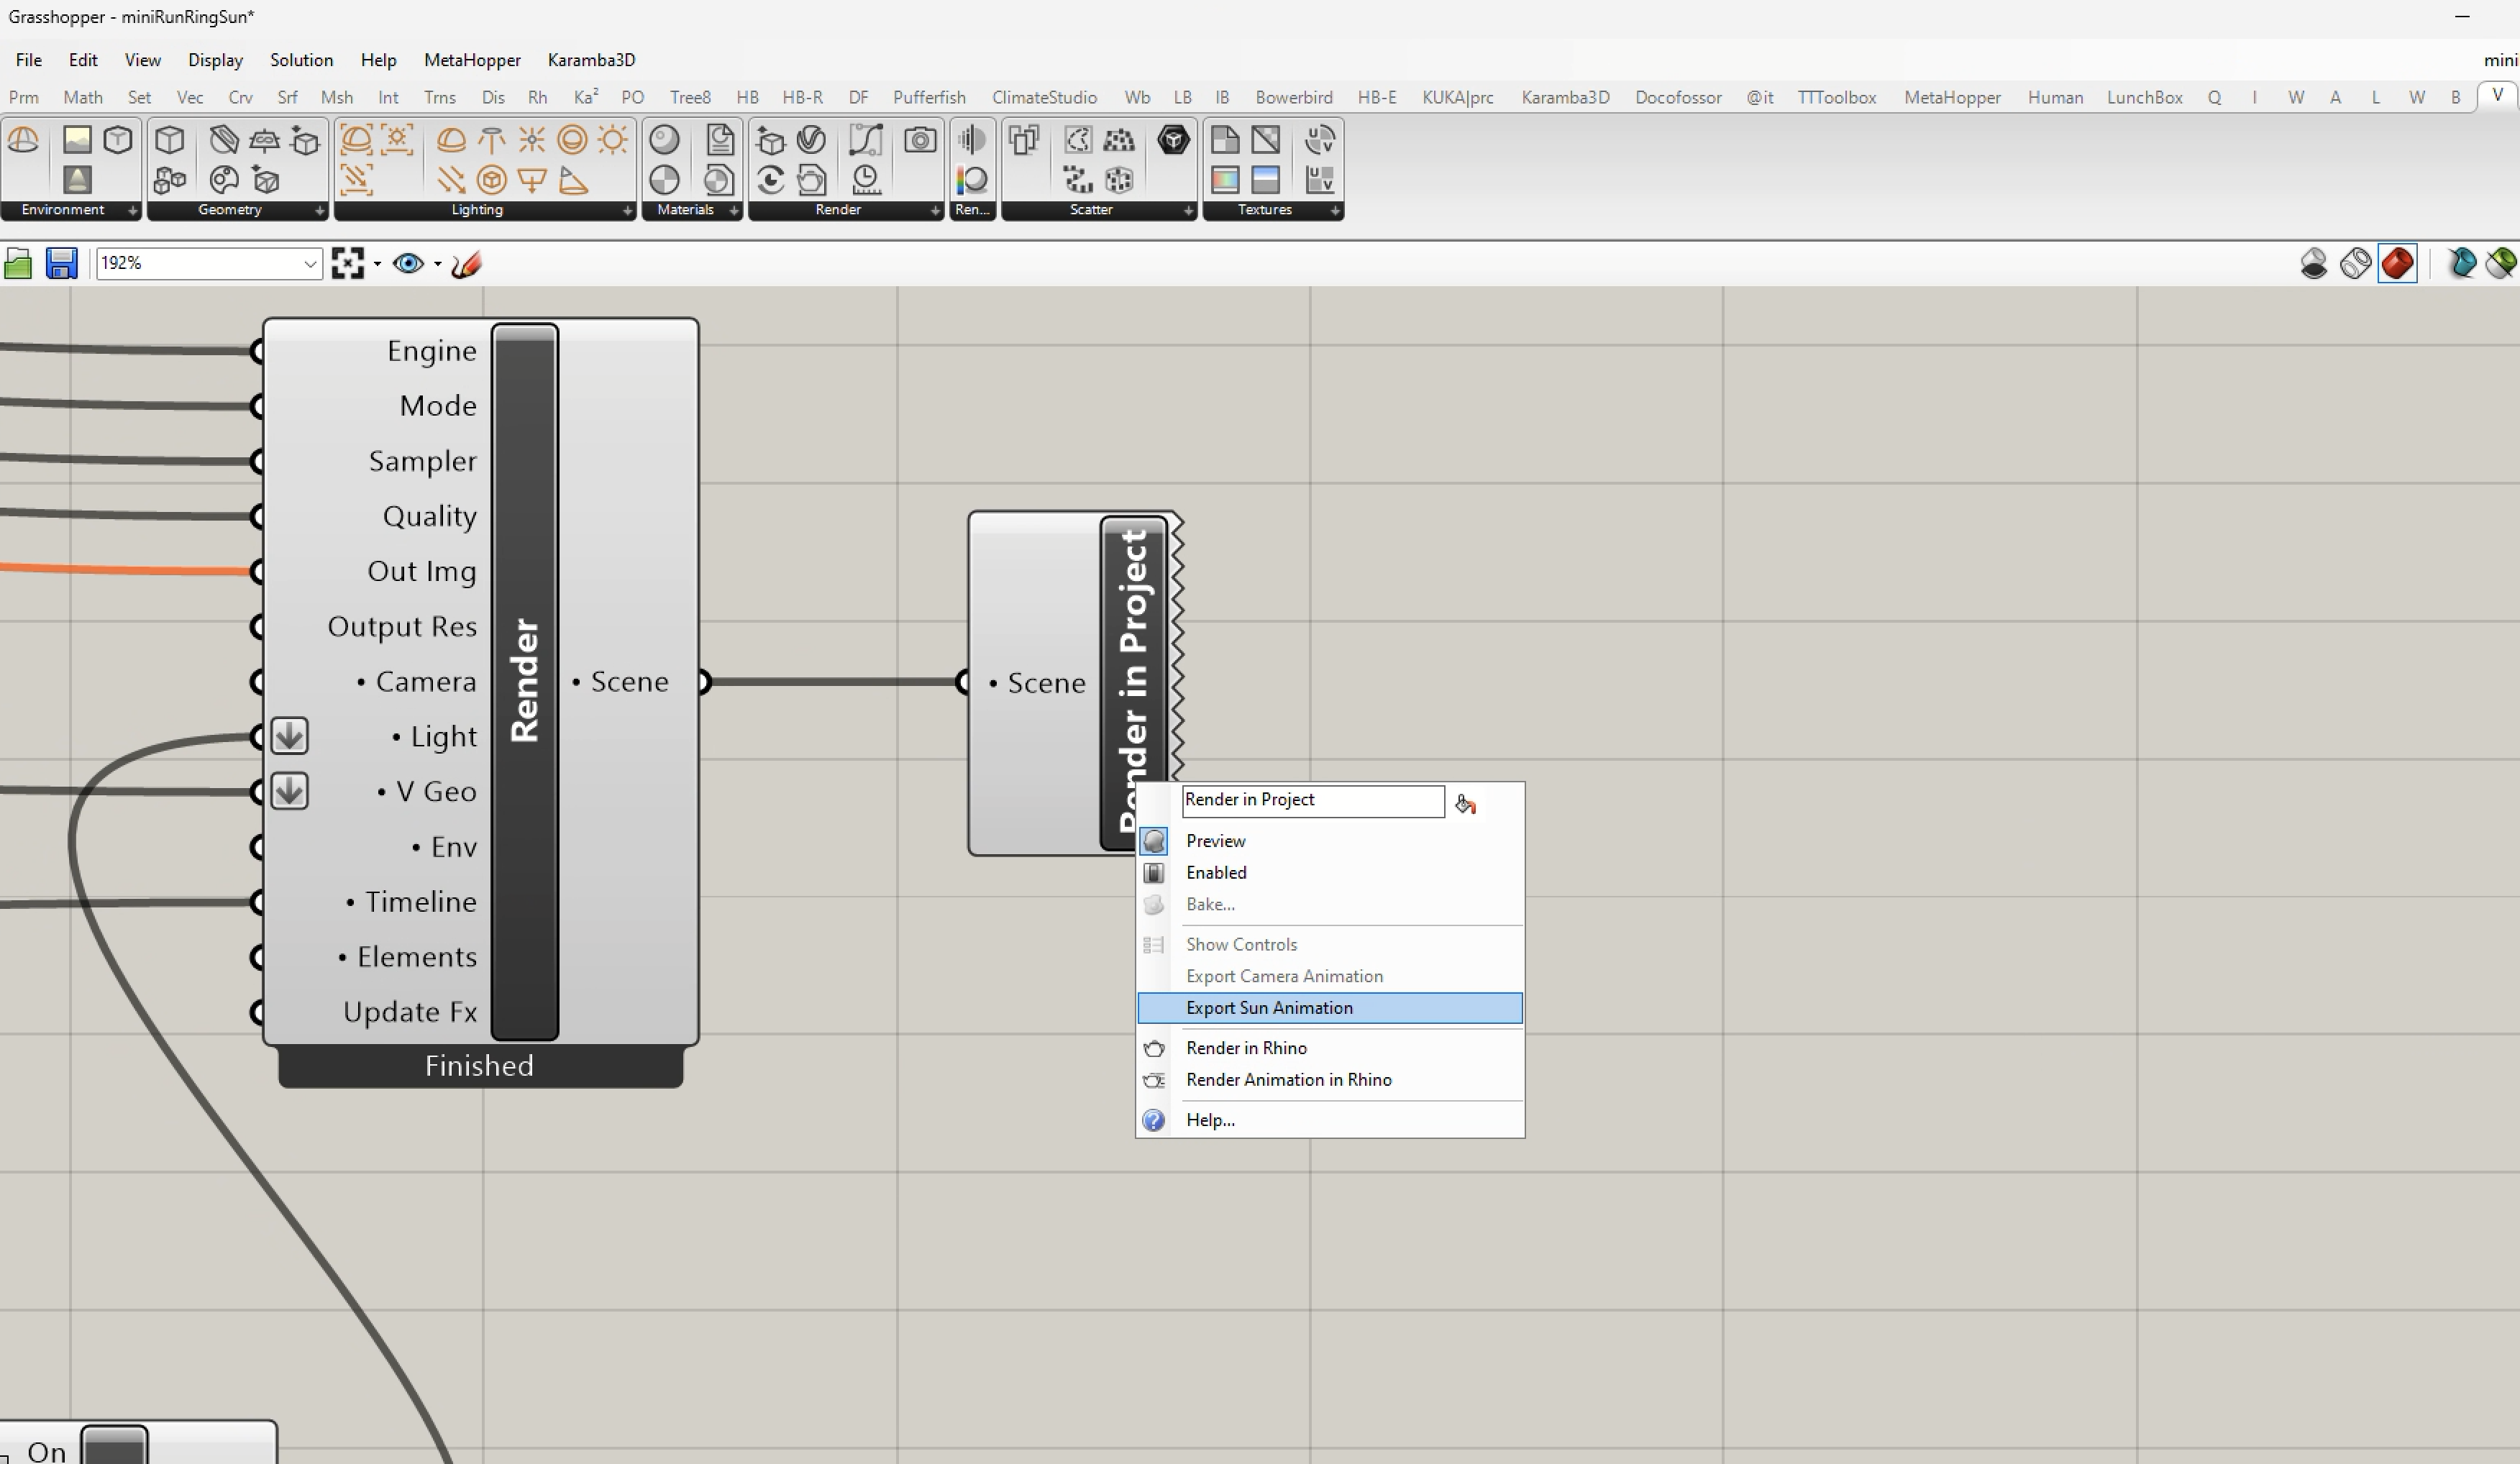
6. Right-mousebutton-click on the words "Render In Project" and select the option to "Export Sun Animation" to Rhino. Alternatively, you can "Export Camera Animation" if you have a moving camera. Take note that at present you can ony export one or the other, but not both the moving Camara and Sun positions within a given animation. The Sun or the Camea, and any moving objects, such as the Mini Cooper car, will be concurrently animated and rendered.
7. To generate the rendering of the animation itself, select the option "Render Animation in Rhino" from the above menu. The rendering method depends upon the standard Rhino Sun element, and not a separate VRay Sun object. Prior to doing the animation, every V-Ray or Rhino Sun object should be turned off. The Grasshopper script will handle it being turned on for the animation itself.
8. In the V-Ray Asset editor, there are three settings which are needed:
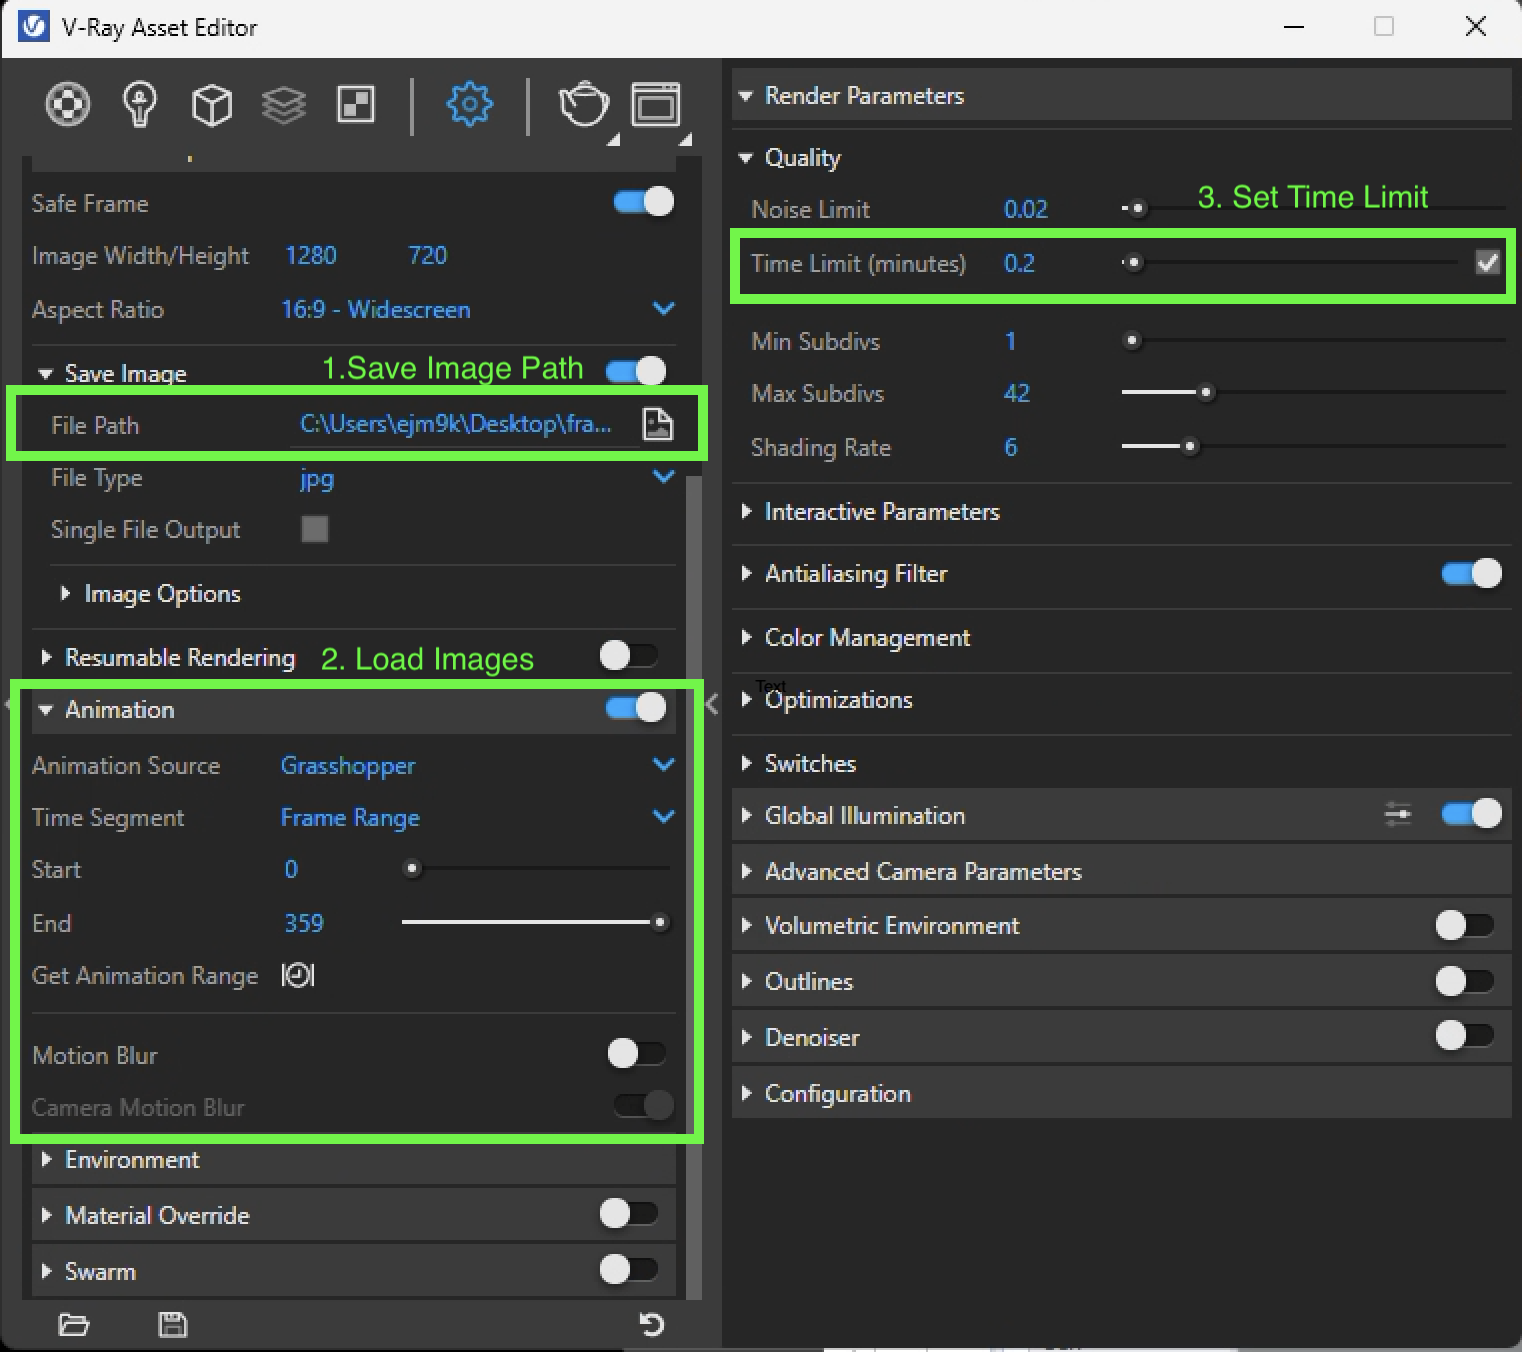
9. Note, if you had shut down Rhino and re-opened the Grasshopper file, you may notice that the "Render in Project" component is greyed out and disabled. To re-activate it, righ-mouse-button click on component and select the "Enabled" option. You should then have activated and be able to re-use the "Render In Rhino" component as in step 6 above.
Here is the result of the Grasshopper script and running the animation, compiled with Chaos Player into an mp4 file.
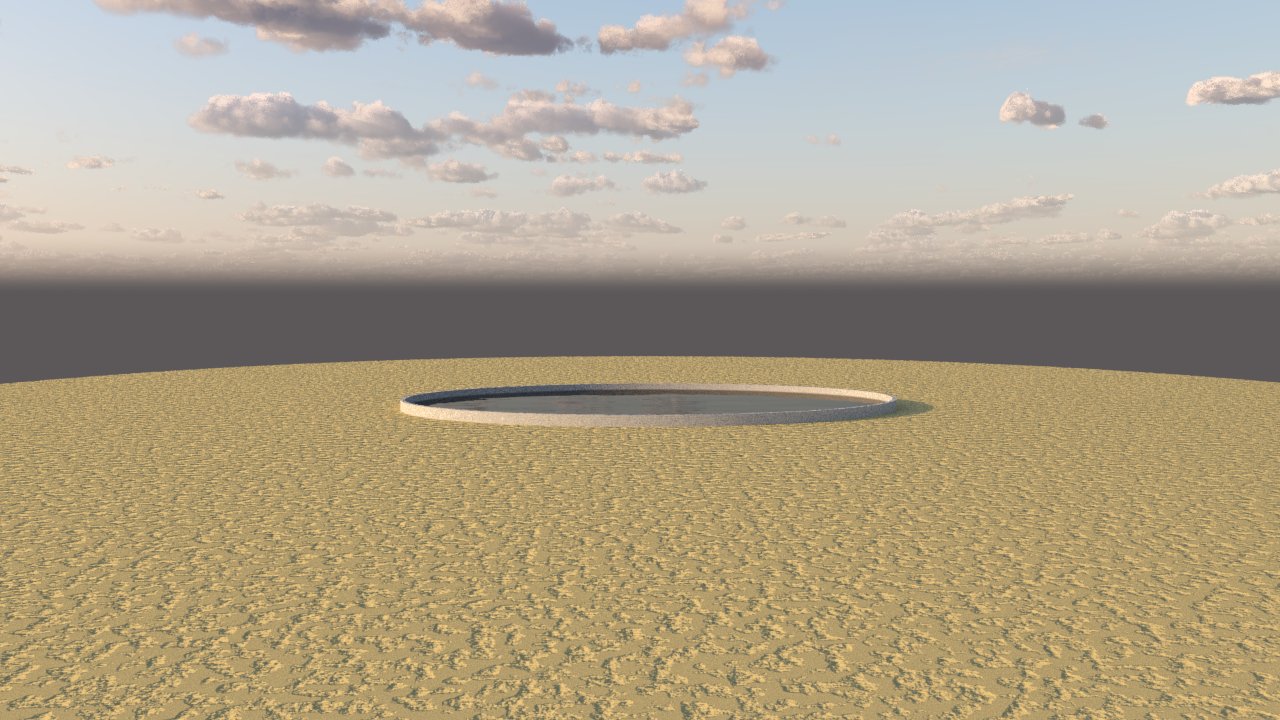
1. The context of the Rhino file includes the elements rendered in the following still image rendered for a mid-afternoon Sun. The Mini Cooper car Proxy File is not presently visible as it is on a layer that is turned off.
2. The animation itself yields the following mp4 file recorded in low resolution. The clouds are static when the Grasshopper "Render in Project" component is used. However, Grasshopper animation of the car and sunlight are evident.