September 23, 2014 Workshop 5 Notes

IMPORTING SOUND FILES INTO MAYA AND CURVES, TESSELATION, BOOLEANS AND SURFACES


PART 1: IMPORTING SOUND FILES INTO MAYA
    1. Adding sound is possible on both the Windows and Apple operating system platforms by dragging a file from an open window into the timeline. Aif sound files are the prefered format for this.


      e

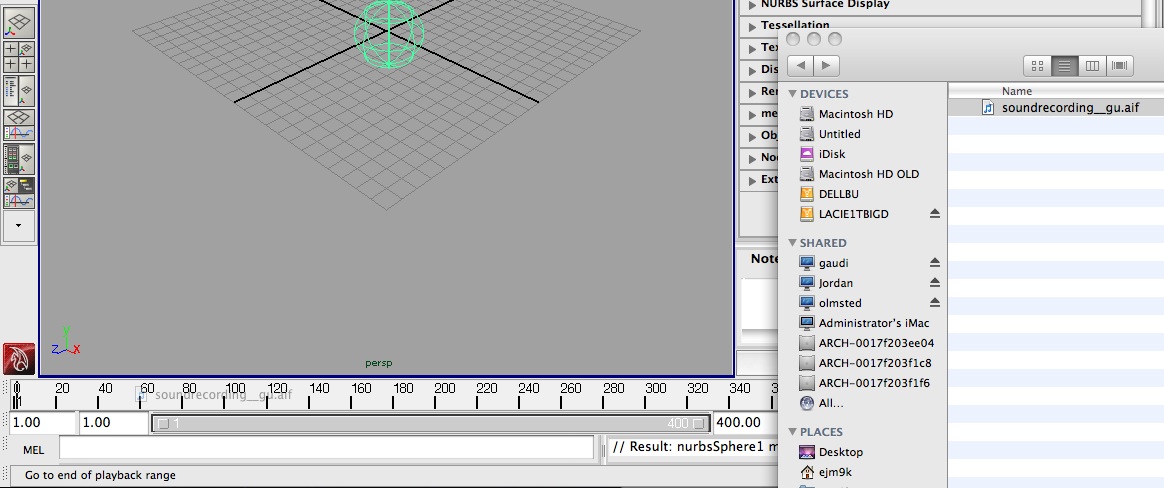
      Drag sound source (aif file) from Open Window to timeline.

      f

      Time-line is changed to indicate sound wave.


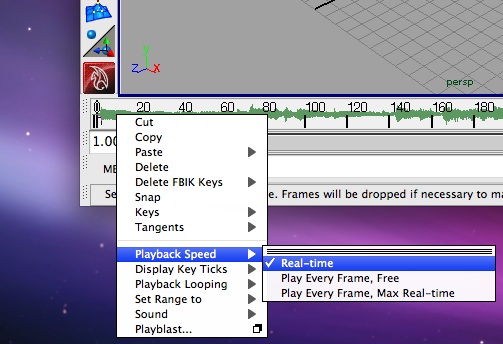
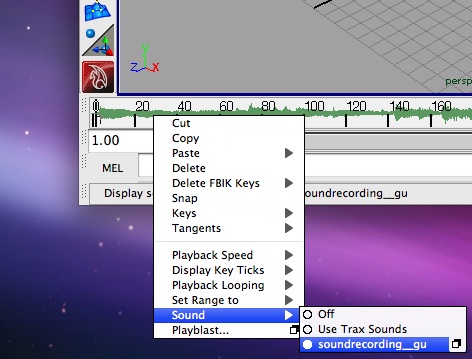
    To hear the sound, right-click on the time line to set the playback to real time and also to set the sound selection to the specific aif file.

    b

    right-click on time-line and set Playback Speed to Real-Time.


    d

    right-click on time-line and set Sound to specific aif file.

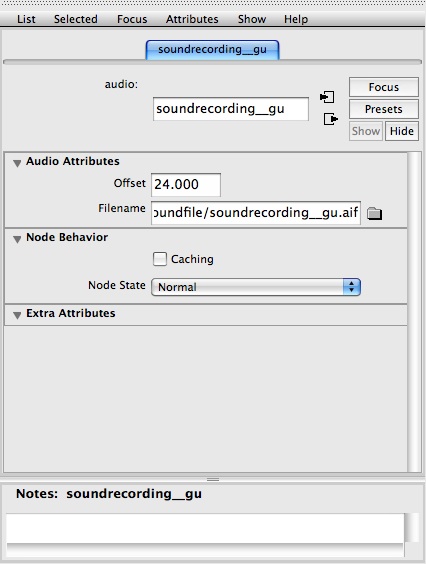
    To change the start time of a sound recording, select the check-box at the end of the dialog above.

      1. an attribute editor dialog box opens and you can then adjust Start Time to the new frame number at 24 frames per second (i.e., 1 second = frame 24, 2 seconds = frame 48, etc.).


        c

      2. In the case above you will now see the sound waves representing the sound appear in the Time Slider at the new starting point, frame 24, 1 second.

        a


PART 2: CURVES, TESSELATION, BOOLEANS AND SURFACES

  1. CV curve tool Create > CV curve tool  creates curve form CV points (try one)

    cvc
  2. EP curve tool Create > EP curvet ool creates curve from edit points (try one)


  3. Pencil Curve tool  Create > Pencil Curve Tool click and drag to draw a line, inefficient, requires many points.


  4. Editing NURBS curves
    1. Right click on a curve and select its control vertex


    2. Click on the curve you wish to insert a new EP
    3. Right click on a curve and select its curve point
    4. Choose Edit Curves > Insert Knot and a new EP is created and CVs are automatically created to adjust to new point

    5. Result is new EP point that can be directly edited

  1. Curve direction: Edit Curves > Reverse Curve (reverses direction)

  2. Opening , Closing Curves & Detaching Curves
    1. Edit curves > Open / Close Curves (to open or close a curve)
    2. Edit curves > Attach Curves attaches two curves together, order impacts connection


      Before

      After (with keep original option on)

    3. Detach curve  - select curve, right click on curve and select curve point, and select the edit point “x” that you want to use to detach the curve or click the curve to denote a curve point and then choose Edit Curves > Detach Curves

  1. Altering Whole Curves: straightening and smoothing
    1. Select a curve to rebuild
    2. Edit Curves Menu > Rebuild Curve with dialog box

    3. Change number of spans and rebuild
    4. Locking curve preserves length for animation; Edit Curves > Modify Curves > Lock Length; Switch to components mode by pressing f8, select the first CV and press “W” and move the CV, and the curve follows the CV like a piece of string.
    5. To straighten a curve: Edit Curves > Modify Curves and click on option box next to straighten, deselect the lock curve option and adjust straightness slider to 1 (less values only partially straighten the curve; try 0.2).


    6. To smooth a curve: Edit Curves > Modify Curves and click option box next to smooth, set the smooth factor to 10 and hit apply.
    7. To curl a curve: Edit Curves > Rebuild Curves & Checkbox, set the number of spans to 25 (increasing them) and select “Rebuild” OR
      To curl a curve: Edit Curves > Modify Curves and checkbox next to Curl; set curl amount to 2 and Curl Frequency to 1
    8. To bend a curve: Edit Curves > Modify Curves and check option box next to Bend; set bend amount to 0.15, curve become like a circle. (bend impacts each segment on cuve)
    9. To scale a curve: Edit Curves > Modify Curves and check option box next to Scale Curvature; set the scale factor to 0.5 and  max curvature to 1 click Apply. This tools determines how much each segment of the selected curves will be straightened or have their existing curvature exaggerated (from Maya documentation) .
  1.    Interactions Between Curves

    1. Offset: select a curve and select Edit Curves > Offset and check the option box next to Offset Curve; set Offset Distance to 1 and Click Offset (or use channel box to do this interactively)


  2.      Circular 2D Fillets (concave junction between two curves)

    1. Create two curves to fillet between, right click on first curve and select “curve point” from the marking menu, click on the first curve and drag the point to where you want the fillet to arc; right-click the second curve and select “curve point” from the marking menu; shift-click the second curve and drag the point to where you want the fillet to arc; choose  “Edit Curve > Curve Fillet” to create the fillet. (use crossing curves). Note radius size of fillet and tangency of curves at their respective "curve points" must be relatively compatible for this to work. If this operation is done with the history option on, try moving one of the original curves and the fillet may disappear.


      Before

      After

  3.  Creating Surfaces from curves (revisited)


    left to right: planar surface, surface of revolution, lofted surface, bi-rail surfrace, boundary surface and extrude surface
    1. Planar surface from closed curve with all CVs on same Plane; Surfaces > planar; to make a plane with holes in it, select multiple closed curves.
    2. Revolve curve: draw curve in front view with thickness; select curve in object mode, under surfaces menu go to box next to Revolve; select axis (y axis) and click “revolve”, press “3” key to increase the smoothness to see the full surface; change shape by changing axis of revolution with show manipulator tool
    3. Loft surface from curves with ideally equal # of edit points; create two or more curves; select and shift-select curves in order to be lofted; Surfaces > loft; press “3” key to see full surface  geometry
    4. Birail curve: draw two rail curves, draw profile curve that extends from one rail to the other rail using the curve snap “c” key down or with the curve-snap icon selected. Next choose surfaces > birail > Birail 1 tool; (use Birail 2 tool if you have two profile curves and the Birail 3+ tool if you have 3 or more profile curves)
    5. Boundary surface; draw three or four curves with intersecting ends (using curve snapping and toggle point snapping); select all the curves that complete the boundary; choose surfaces > boundary.
    6. Extrude curve from profile curve: create a profile curve (e.g., circle); create a path curve (e.g., an arc); select the circle and shift select the arc; Surfaces> extrude. Use "path direction" option for simpler extrusion.
  1. Surface Curves and Trims
    1. Drawing on a surface: Select a surface; select Modify  > Make Live or select the magnet icon; choose create > CV or EP Curve > Click points on the surface; press enter; choose Modify > Make Not Live


    2. Projecting a curve on a surface revisited: Create a surface (sphere or wineglass); from the front view draw a curve or circle to project onto the surface; Select a surface; Make the front view active; select Edit NURBS > Project Curve on Surface


    3. To cut a hole from the curve: Edit NURBS > Trim Tool; Select surface (of previous example); Select part of surface you wish to keep; click “enter”

      Before After

  1. Seeing Tesselation:

    1. With NURBS object selected hit ctrl-a to see attributes; select the second tab (shape tab); click the arrow next to Tesselation; select “Display Render Tesselation” box (shows object geometry to see how it will appear at render time).


    2. Advanced option allows you to adjust Tesselation (accuracy). To try the later, turn on "Enable Advanced Tesselation". Reset attributes in the Primary Tessellation Dialog box

  2. Modifying and Matching Nurbs Surfaces
    1. Booleans: Difference Operation; create two overlapping NURBS surfaces; choose Edit NURBS > Booleans > Difference tool; Click the object to remain; press “enter”; click object to remove; press “enter” (note history records and allows you to reposition original shapes)

      Before After

    2. Rebuilding surface for stitching: select NURBS surface; Edit NURBS > Rebuild; enter 5 in u spans and 5 in v spans (note: spans evenly distributed).

      Before
      After


    3. Attach two surfaces (try on two adjacent NURBS planes): select two NURBS surfaces to attach to each other; Edit NURBS > Attach Surfaces; From menu deselect “Keep Originals”; click Attach (two surfaces become one);


  1. Duplicating Surface Curves

    Create a planar surface and distort it as depicted in the image below by moving its control verticles. Next, use Edit Curves > Duplicate Surface Curves and select dialog box; Select the U direction and click “Duplicate”; curves are duplicated and can form basis of new curve. Or, select both. Example below from "both", initiated with flat 5 x5 planar surface modified at vertices to form a non-planar shape to which the Duplicate Surface tools was applied. The duplicated curves were then moved above the original suface to help see the result. Note: try duplicating curves in the U or V direction only, and then lofting a new surface from the curves that result.