September 8, 2020 Workshop 4 Notes
TEMPLATES, SELECTION MASKS, GROUPS AND
PARENTED OBJECTS
*Note images and sequence excerpted from Maya
Help Documentation
- Selection Modes and templates
Select by hierarchy : gets whole assembly of objects or object
Select by object: gets objects within hierarchical association
Select by component type: gets vertices, faces and other components
Each template has active pick masks to further determine what is
selectable.
2. Create nurbs sphere and cylinder and group
together via edit>group:
select by hierarchy grabs both. (one of three modes:
root { top mode in hierarchy
leaf { descendent node in hierarchy
template {selects a templated object
- Select by object grabs either object.
- Turn off surface pick mask and selection disabled.
- Select by components allows for selection of individual
vertices, turn on other pick masks, such as for faces (or grab
indirectly by right clicking on object).
- Try hierarchical selection mode and use select by hierarchy
pick mask again to select both objects.
- Try hierarchical selection mode and use select by leaf node to
pick individual objects.
- Add to object selection
- Hold shift key to continue selection
- Hold shift key to subtract selection
- Edit/invert selection to invert entire selection
- Select blank space to unselect all objects.
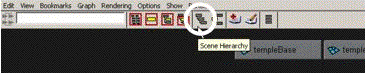
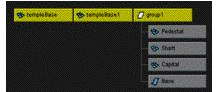
3. Outliner (window/outliner)
- Select object by name
- Note select of two objects in a group (hierarchy and how they
are indicated in the outliner under both group and separately under
object names within the group.
4. Select object using the
Hypergraph: directed graph permits you to select by hierarchy or
constituent objects (see window/hypergraph)
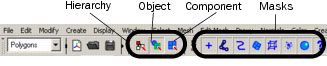
5. Object mode selection masks:
determines what types of objects are selectable within the object mode:

handles (selection
handles and IK handles, the "+" symbol obove)
joints (will see later)
curves
surfaces
deformers surfaces (will review later)
dynamics (particles)
rendering objects (lights, cameras)
locators and dimensions (may see later)
Arrow tool selects all
selection objects on/off:
Choose objects off and turn on surfaces
 objects
on/objects off.
objects
on/objects off.
6. Component mode also has
selection masks
 \
\
points (NURBS CVs, poly vertices, etc))
parameter points (NURBS edit points, etc.)
lines (isoparms, polygon edges,etc.)
faces (nurbs patches, polygon faces)
hulls (nurbs hulls)
pivots (pivot points and joint points which we will see later)
handles (selection handles)
? (local rotation axes and image planes)
example
: draw curve
select
points submask
move one of the points to reshape the curve
7. Short-cuts (if time allows)
F8 toggles between object and component modes
F9 sets pick mask to pick vertices (windows
F10 sets pick mask to pick edges (windows
F11 sets pick mask to pick faces (windows
F12 sets pick mask to pick Uvs (windows
8. Selection sets:
- select entities you wish to use
- create menu>sets>quick select sets
- note that the set appears in the outliner
- right click on set name in ouliner and choose “select
set” option.
9. Hiding an object
- Select object to hide
- Display Menu/Hide Selection (ctrl h)
- Display Menu/Show All or Last Hidden (ctrl/ctrl shift
h)(reveals object again)
10. Templating (Greying out an
object)
- To Template: select the object and then Display/Obect
Display/Template
- To Untemplate: use “template icon” in hierarchy
mode”/select template
- Select the objectDisplay/Object Display/Untemplate.
11. Layers
- Layers can be initiated from the channel box and invoking the
layer editor
- From layer menu – create a layer
- Double click on the layer to edit name and color
- Display type can be normal or as a template (greyed and
objecdts do not render) or as a reference (render but not modifiable)
- Click save to save layer
PART II: Grouping, Parenting and Aligning
- Grouping: objects are manipulated as one object when hierarchy
mode is selected and as individual objects otherwise.
- select two objects
- edit>group or ctrl-g
- view objects in hypergraph (window>hypergraph)
- press “f” to zoom hypergraph to selection
- to ungroup use edit>ungroup
- Using outliner and group; create three polygon cubes, group, grab
as group in outliner or using plus symbol from outliner grab individual
elements
- In outliner grab box with middle mouse button and move it above
and out of the group or place it back in the group (note; outliner
displays a single grey line to indicate repositioning of the object.
- Arrow keys (up and down arrow) also allow you to move up
and down the hierarchy within a group, or to move among elements at a
particular level within a group (right arrow)
- Transforming a group:
- group transforms as an object with pivot point at origin
of model space
- test move, rotate and scale tool
- use “insert/home” key to reposition pivot point.
- use modify>pivot center to place pivot point at geometrical
center of objects
- Parenting refers to objects situated in a hierarchy
- Select a “child” object and then shift-select a
parent object.
- Use menu “Edit>Parent” or hit “p” or
parent.
- Note that pivot point is that of the parent.
- In the case of selecting more than two objects, the last one
selected is the parent.
- Use middle mouse button in outliner to move object to parent.
- Differences between parented and grouped objects.
- Child object uses parent as basis of new world space
(parent’s pivot point).
- Scaling a parent will scale a child, but you can control this
better in a group relationships.
- Lamp building exercise: Parenting Method
1. Make two polygon cones and two cylinders as below.
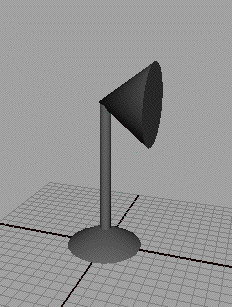
2. In window outiner tool drag pCone2 onto Pcylinder2, Pcylinder2
onto Pcyliner1, and Pcylinder1 onto Pcone1, parenting these objects to
one anoher wih Pcone1 (the base of the lap) at the top of the heirarchy.
4. Create an ambient light for the model. Create a point light inside
pCone2 for the lamp. Make pCone2 the parent of the point light.
3. Rotate pCone1 and the whole lamp moves
4. Rotate pCylinder1 and rotate it and the lamp becomes distorted
(didn’t in my case
5. Alternatively, before doing the rotations, use the menu item
"Modify/Freeze Transformation" to set transformation values of object
to zero and avoid distortion.
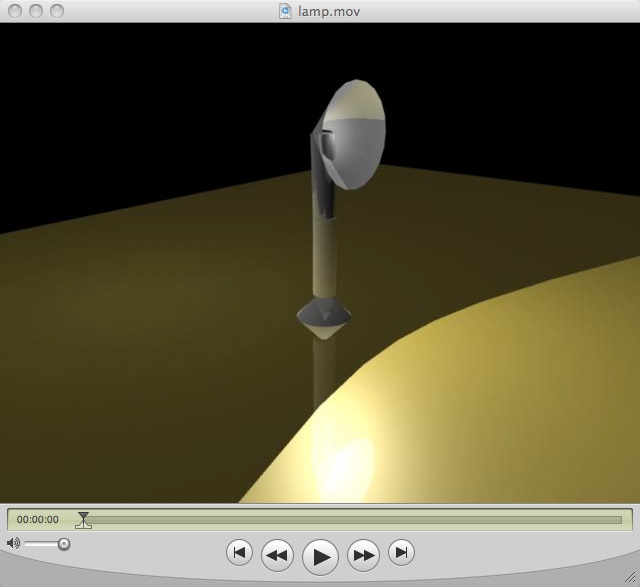
select image to load animation
- Lamp building exercise: Grouping Method
- Group objects in same order as above parenting helps to
locate origins in appropriate ways, with, in each step, resetting the
pivot point to the base of the lamp.
- select pCone2 and Pcylinder2 and group, then relate pivot
point to base Pcylinder2 of lamp.
- select new group1 and Pcylinder1 and group, then
relate pivot point to base of lamp, creates a hierarchy of groups.
- Snap Align Tools – quickly aligns objects or overlaps
curves and surfaces (WE SKIPPED THIS PART)
four snaps: (grid, curve, point or face center, view plane)

- snap a CV, pivot point, object or poygon vertex to grid
“x”
- snap a CV, pivot point or poygon vertex to a curve,
“c”
- snap a CV, pivot point, object or poygon vertex to another
point or face center “v”
- snap a CV, pivot point, object or poygon vertex to a curve,
“c”
- draw two surface cones and a curve: select an object and the
move tool and snape the ob ject to the grid, to a curve
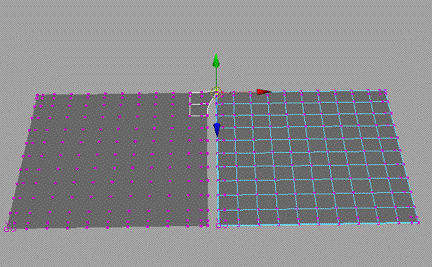
9. Realignment of a plane surface (we skipped this
during the workshop on 9/10)
- draw two nurbs planes and select both, and hit the F8 key;
- select a corner CV and one of the planes,
- hold down the “v” key and and drag with the middle
mouse buttonon a second plane near the CV you wish to snape to
PART III: PLAYBLAST
Use Playblast to quickly assemble rendered movie in
raw quality.
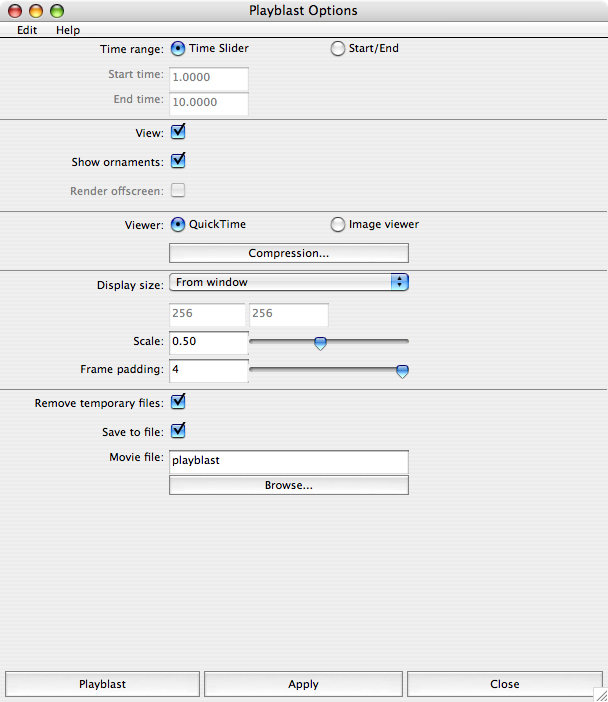
- Go to Window/Playblast and select the menu box.
- In the dialog box that pops up on the screen, select compression
format shown in the image below (QuickTime is only available on the
Apple OS).
- Determine the number of frames to render with "Start/End" or
choose "Timeline" if you wish to render all the frames in the scene.
- Choose an image resolution from the "Display size" menu, and be
careful to match it with any other movie clips you may be joining the
current rendered movie with, or use the custom size as appropriate.
- Open the "Browse" button to establish a lcoation for the rendered
movie file.
- Hit the "Apply" button. Movie is saved in format selected
(typically Quicktime or AVI).