August 26, 2021 Workshop 2 Notes
Lighting and NURBS Surfaces
PART I: LIGHTING
Create a simple Nurbs sphere from the "Surfaces" shelf tool.
Add spot light
Go into lighting mode by hitting #7 key
With the spot light selected, to the top of the screen menu item "Modify/Transformation Tools/Show Manipulator Tool"
Move the source of the spot light above and to the right of the sphere, and move the target of the spot light to an area just below the sphere.
With the spot light selected, open the attributes editor (third icon from upper right-hand corner of Maya window) and resize the "cone angle" until it visibly impacts sphere
Within the attributes editor, turn on ray-trace shadows for the spot light.
Add two point source lights without shadows for fill and back-fill light
Use Show manipulator tool to reposition the point lights (target and source)
PART II: NURBS SURFACES
1. SURFACE OF REVOLUTION
Goto Front View
Create/CP Curve tool
Goto Perspective View
Surfaces/Revolve – select control box, pick “Y” axis, and # degrees.
CV Curve-Tool (control vertex NURBS curve) – perhaps more replicable due to less idiosyncratic control points. (higher degree is smoother --- largest exponent in polynomial equation used to represent the curve)
EP Curve Tool (free-hand pencil NURBS curve – 1 degree creates polygon straight lines)
2. LOFTING A SURFACE
Go to elevation view
Create two CV Curves in elelvation
Goto Perspective view
Move one curve along Y axis.
Pre-select both curves
Surfaces/loft – select control box – increase section spans to 5 – apply to curves
De-select geometry
Select curve
Move curve (transforms surface associated with it)
Right-click on curve and select control vertex
Isolate control vertex with selection tool [note gravitational pull on curves]
Move curve vertex with mouse and surface automatically updates.
3. MODIFYING A PLANAR SURFACE
Create/Nurbs Primitives/Plane
Stretch the plane.
Change the number of divisions in the channels box (30 x 30)
Right-click on plan and select control-vertex
Use selection tool to select a control-vertex or several of them.
Use the move tool to move them thereby reshaping surface
[Optional: Key frame Control Vertices directly in two locations at two frame numbers for animation]
4. PROJECTING CURVE ON A SURFACE
Create a surface of revolution (or use one from part 1 above)
Goto Front View Create a straight edge (EP Curve from two points)
Edit Nurbs/Project Curve on Surface (- select control box, use View direction –
Edit Nurbs/Trim Tool - select surface, select part to delete
5. SCULPTING A FLAT SURFACE [SKIPPED THIS EXAMPLE IN WORKSHOP]
Create/NURBS PRIMITIVES/Plane
Select Edit NURBS Sculpt tools with box.
Hit “reset” button to set all parameters to standard default values.
Draw on Surface
Hold “b” key to reset size
Change maximum displacement option
6. SETUP FOR SCULPTING A NURBS SPHERE
Create/NURBS PRIMITIVES/Sphere
Select #3 to increase density of mesh
INCREASE DENSITY OF SURFACE
Technique 1.
Select channels box for sphere.
Increase “sections” and “spans” to increase number of CVs (under MakeNurbSphere1)
Technique 2
Select Edit NURBS – Rebuild Surfaces []
Set number of spans u – 30
Set number of spans v – 30
Click rebuild
From left side of application window, open hypershade/perspective view of model (creates two view windows side by side).
Select blinn1 shader, change color to pink
Apply pink color to sphere
Set eccentricity to 0 to create strong highlight
Space-bar on perspective window to revert back to single perspective view.
7. BEGIN SCULPTING NURBS SPHERE
Select Edit NURBS Sculpt tools with box.
Hit “reset” button.
Under stamp profile: Set Radius(U) to 0.3
Under Sculpt variables: Set Max Displacement to 0.8
Mouse over surface, arrow indicates magnitude of displacement
Click and drag mouse on surface to begin sculpting it.
CHANGE DISPLAY TO SHADER (#5 KEY)
Do a second sculpting stroke and note simplicity of seeing result.
SCULPTING TOOLS
Select pull tool: pull on other side of ball
Select smooth tool; chance Radius (U) to 0.6 : smooth areas of ball
Select erase tool; erase some areas on ball
Hit flood button: erases all changes
Under stamp profile: Set Radius(U) to 0.5
Under Sculpt variables: Set Max Displacement to 0.5
Make two strokes over one another: each enhances effect until Maximum displacement is reached.
PART III: MOVIE EXPORT OPTIONS
Go to Setup in Render Globals
In Common Tab
Establish file type and extension (name#.jpg)
Determine numerical frame sequence to render.
Image Size (default is 640 x 480 pixels).
In Maya Software Tab
Control Quality.
Turn on Raytracing
Edit project folder and note name of Image Folder (render)
PART IV_A: COMPILE IMAGES TO MOVIE FILE WITH OPENSHOT VIDEO EDITOR
There are a number of altermatives for compiling the frames into a single movie sequence. The first of these options is the open source program OpenShot available as a download at https://www.openshot.org.
Launch the OpenShot software.
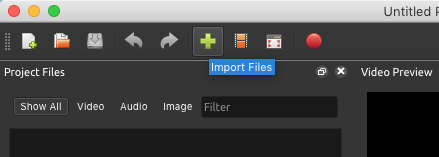
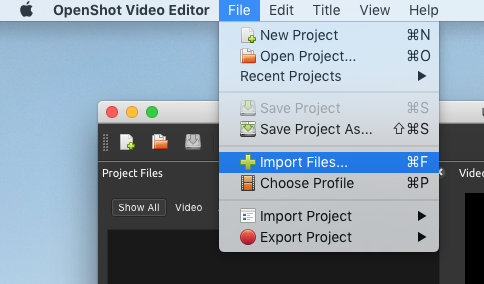
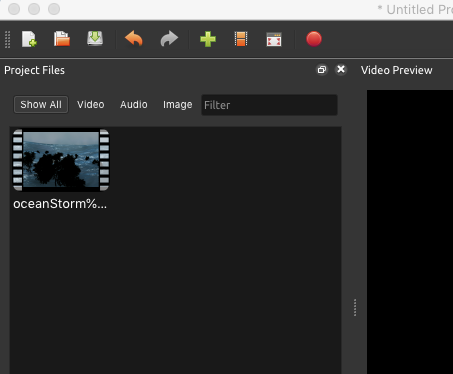
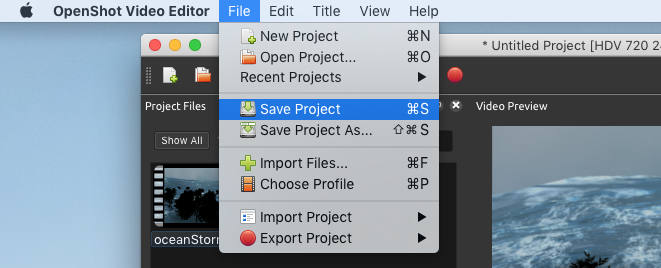
Select the import files green cross icon in the upper left-hand side of the OpenShot Window or use the menu sequence "File/Import Files"
Select the first frame of the animation sequence.
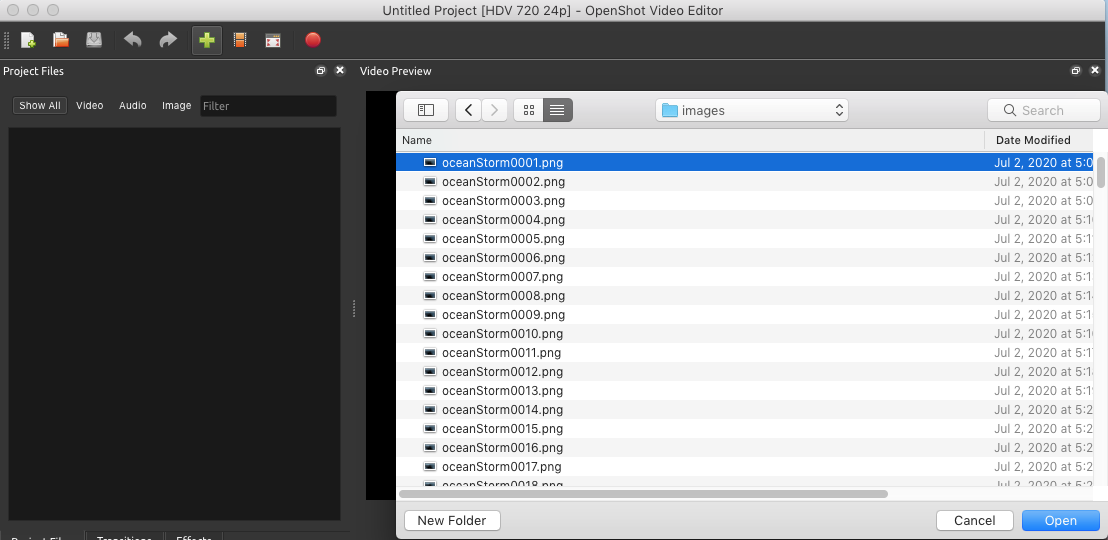
In the dialog box that follows, select the first frame and then select the button labelled "Yes" to load the full image sequence (the default is no)..

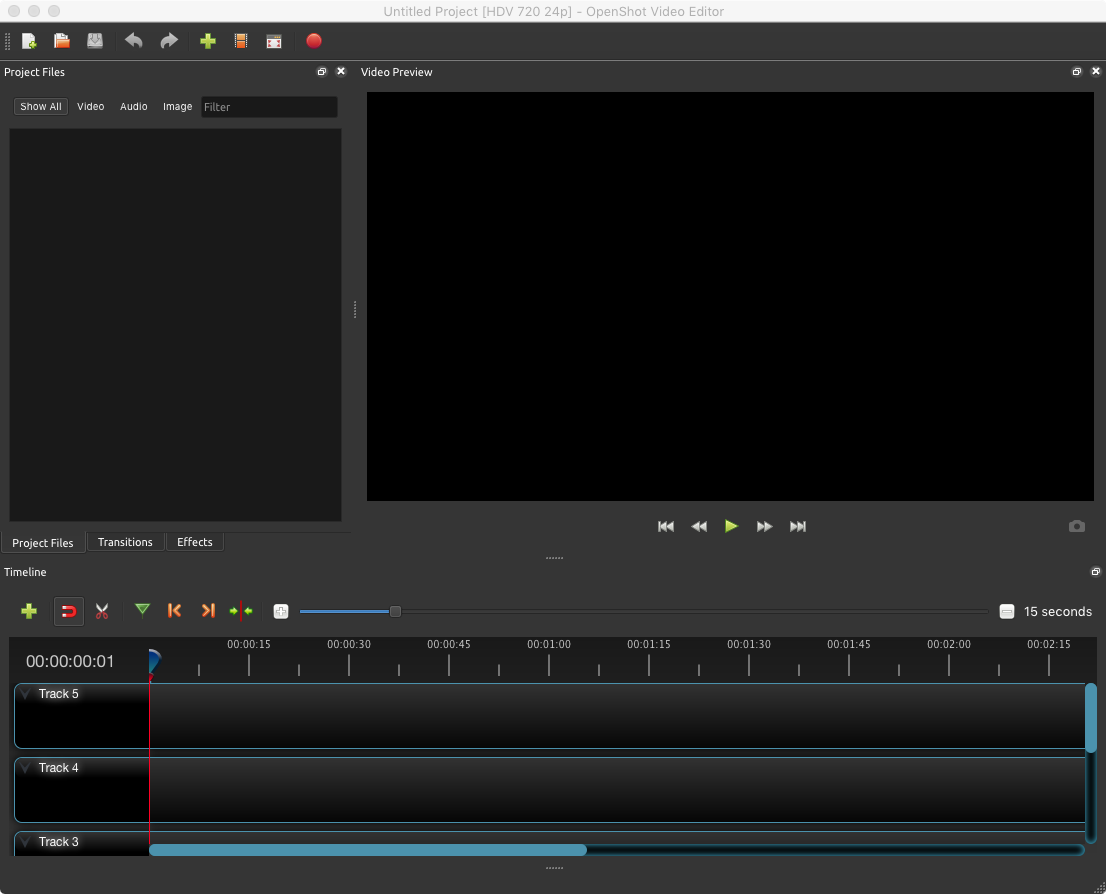
The full image sequence now appears in the "Project Files" window.
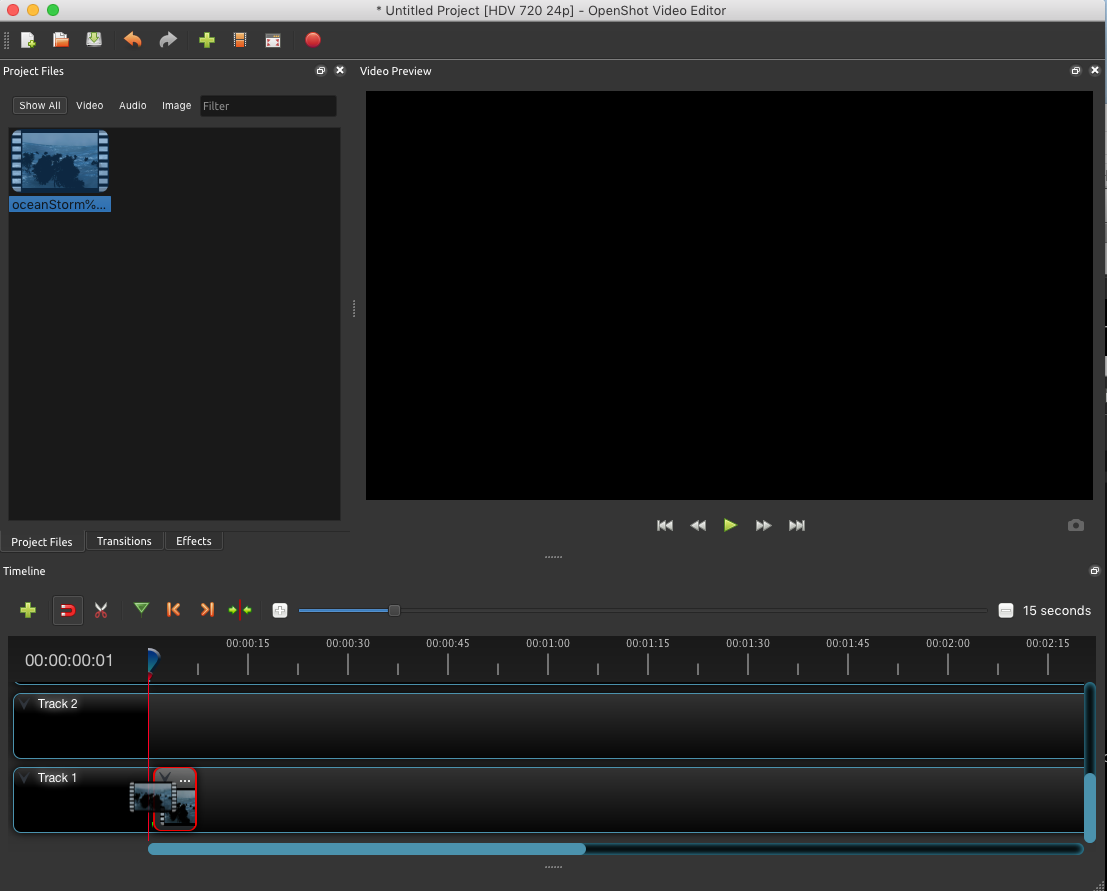
Select the image sequence from the Projects window and drag and drop to "Track1" in the TImeline window.
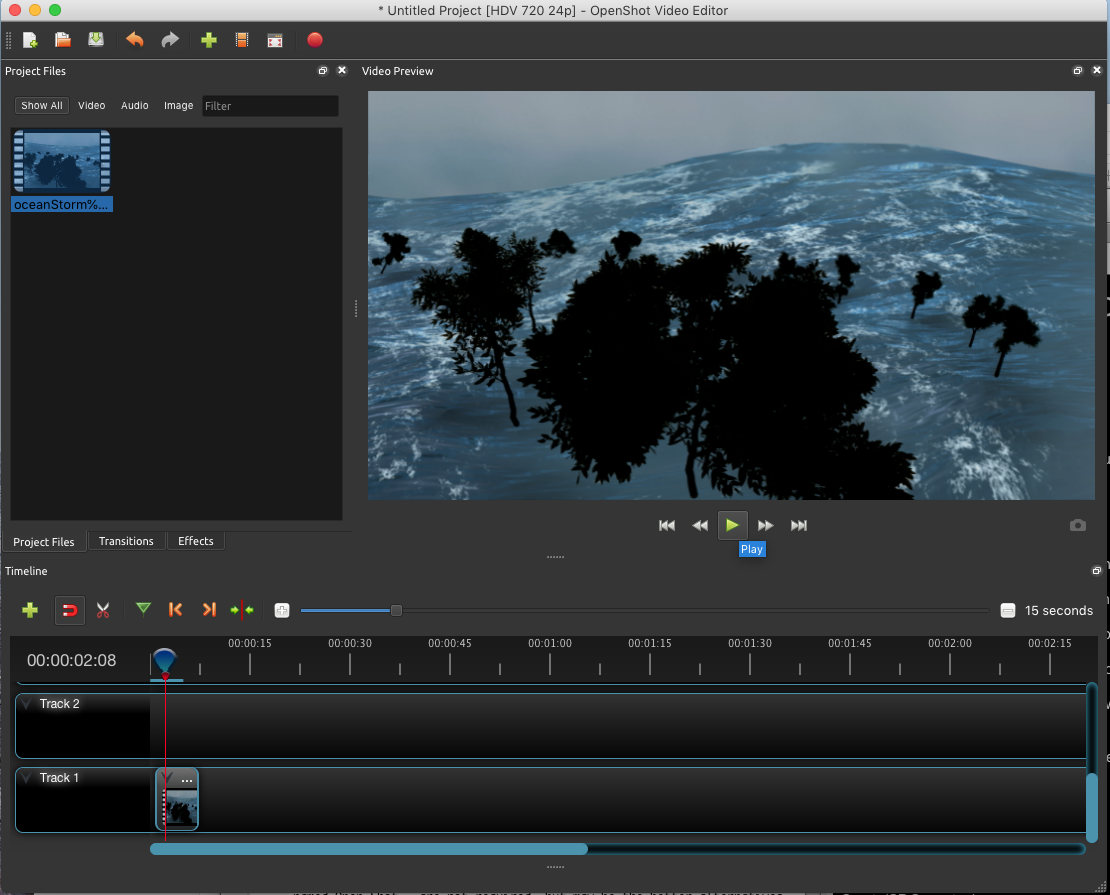
Playback the image sequence by selecting the green right triangle in the Video Preview Window.
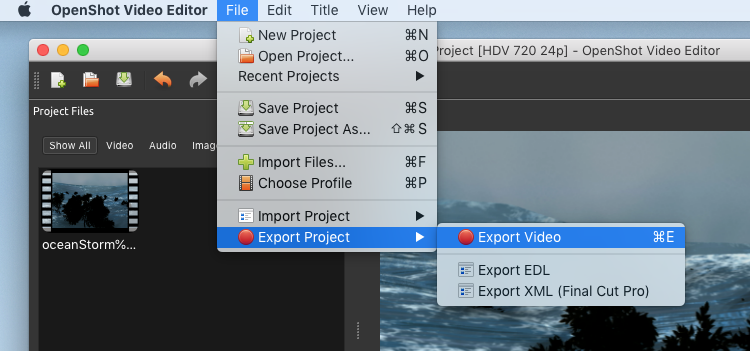
Select the export video icon.
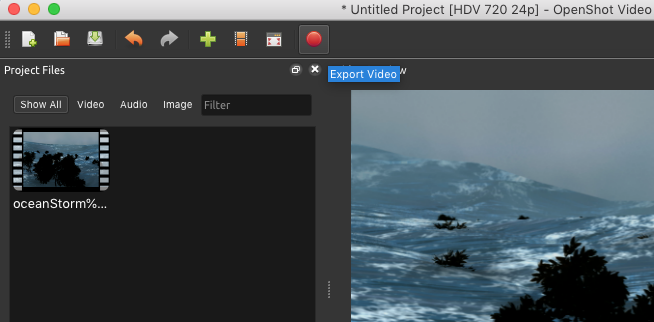
Alternatively, select the menu sequence "File/Export Project//Export" Video.
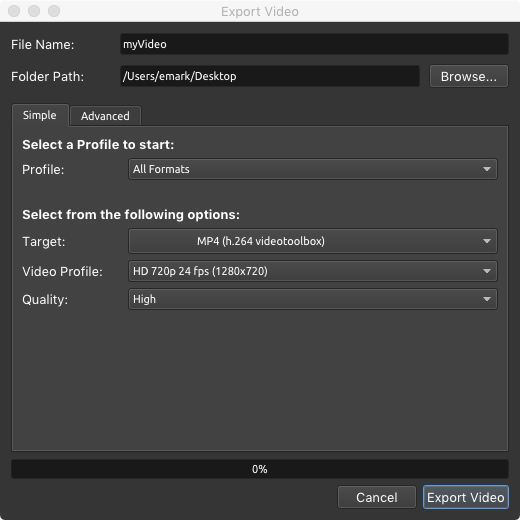
In the export video dialog box that follows, the settings are set to ensure a relatively better quality file compression format. The file is named "myVideo" and it is placed on the desktop. The format is MP4 (h264) and the resolutoin is HD 720p 24 fps (1280 x 720) where fps means frames per second and where the resolution is the same as the original source material. The compression quality is "High" which results in a larger file size at a higher quality output.
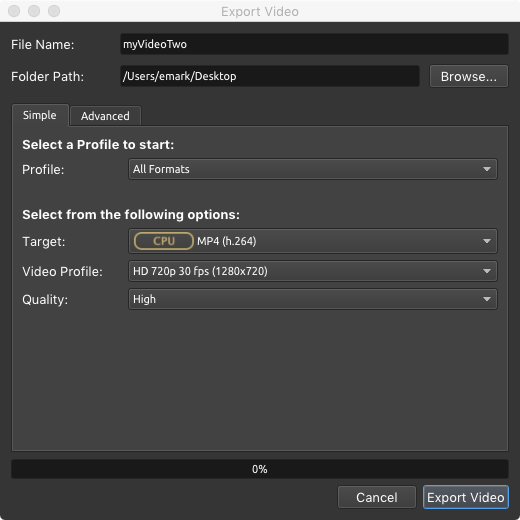
Note that the specific settings may also be varied to achieve a different playback quality and compression method used. For example, in the dialox box below the target is reset to be "CPU" MP4 (h.264) and the Video provide is reset to afaster playback speed HD 720p 30 fps (1280x720) where fps means frames per second. You may need to test differnt options based upon the playback quality you see and also the computer system you are working with.
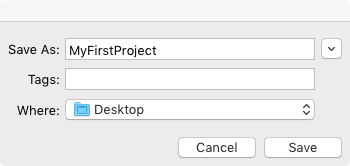
To continue to work with the video editig project at a later time, use the "Save Project" icon which is the third icon from the upper left hand corner of the OpenShot window.
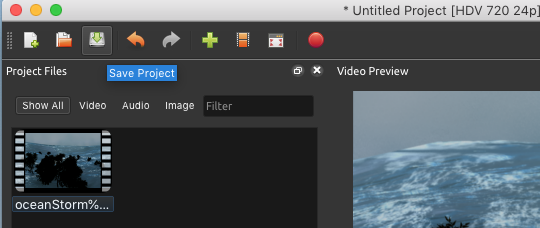
Alternatively, use the menu item "File/Save Project".
In the dialog box that files, create a project name and then select the "Save" button.
PART IV_B: ALTERNATIVELY COMPILE IMAGES TO MOVIE FILE WITH FCHECK
To compile the images as a single movie file, the Maya utility named FCheck is used here. FCheck is included in Maya installation. The method illustrated here is based on the Apple Operating System. The same methodology does not work on the Windows OS.
1. Go to the Autodesk / Maya Application Folder and select the utility FCheck.
2. Within the FCheck program, use the Menu sequence "File>Open Image Sequence".
3. With the "FCheck Info" dialog box, you may elect to set the "Playback Speed" to 0% so that that the images are not flickering on the screen.
4. Select Off "Every Frame" to reduce the apparent flicker and playback speed.
4. Use the menu sequence "File>Save As Movie" to save the image sequence as a "Quictime Movie".
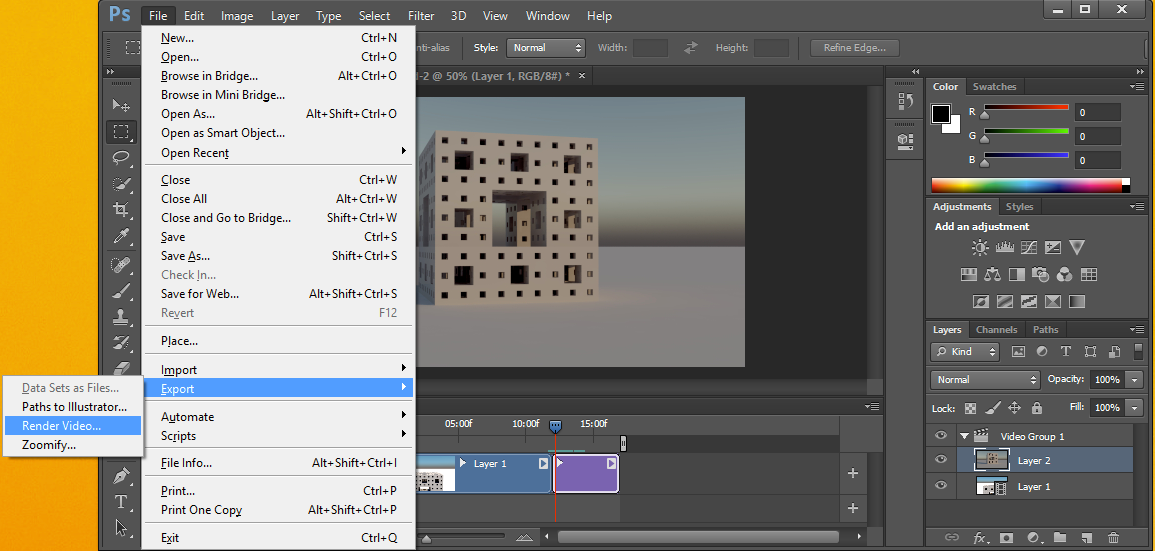
PART IV_C: COMPILE IMAGES TO MOVIE FILE WITH PHOTOSHOP
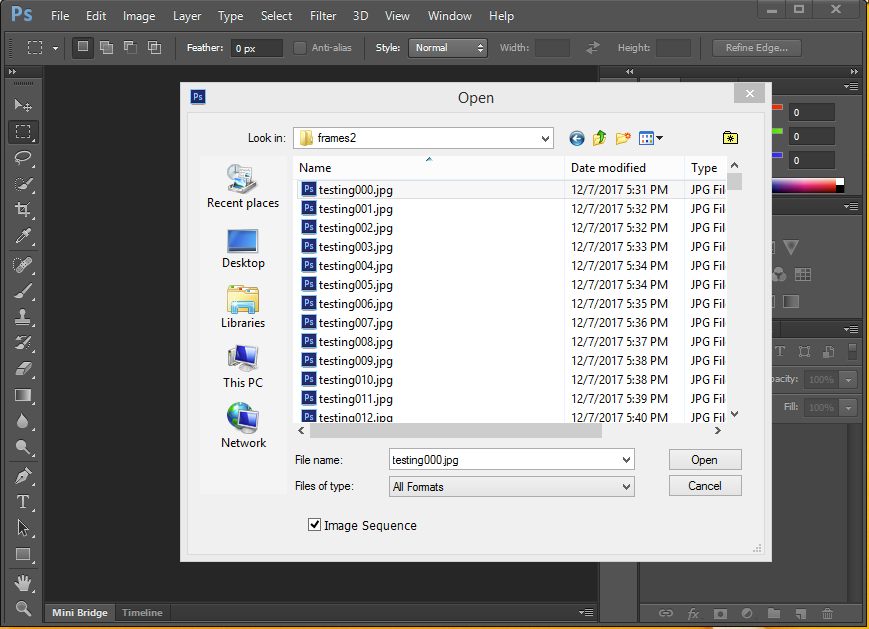
1. Launch the Photoshop software. Use the Photoshop menu to Open the first image of the image frame sequence and with the open file diagog box selected the check-box for “Image Sequence”.
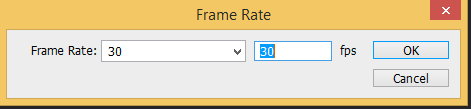
2. Set the frame rate, such as 30 frames per second in the dialog box that follows.
3. Open the timeline tab at the bottom of Photobhop and the video track will appear just below with standard play icons.
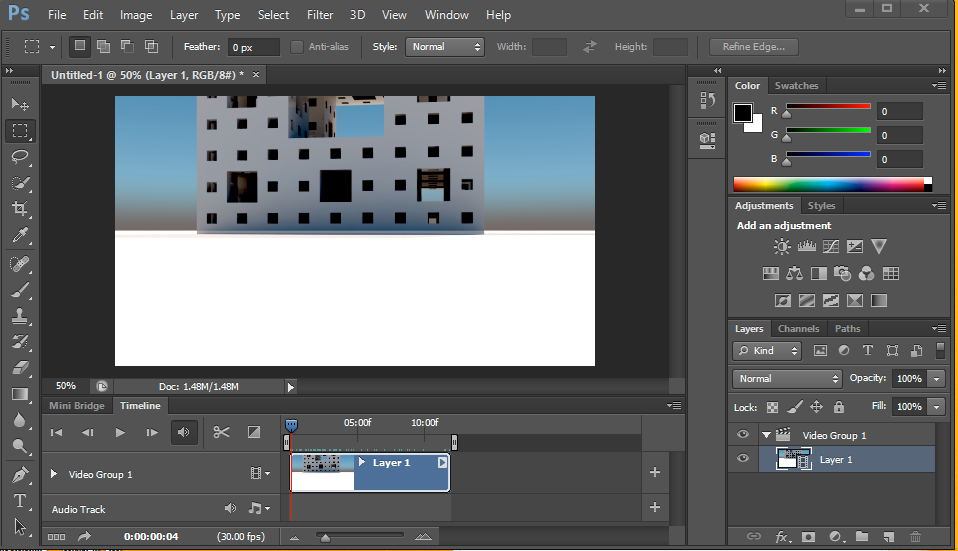
4. Optionally, continue to import frame sequences in Photoshop as separate image files
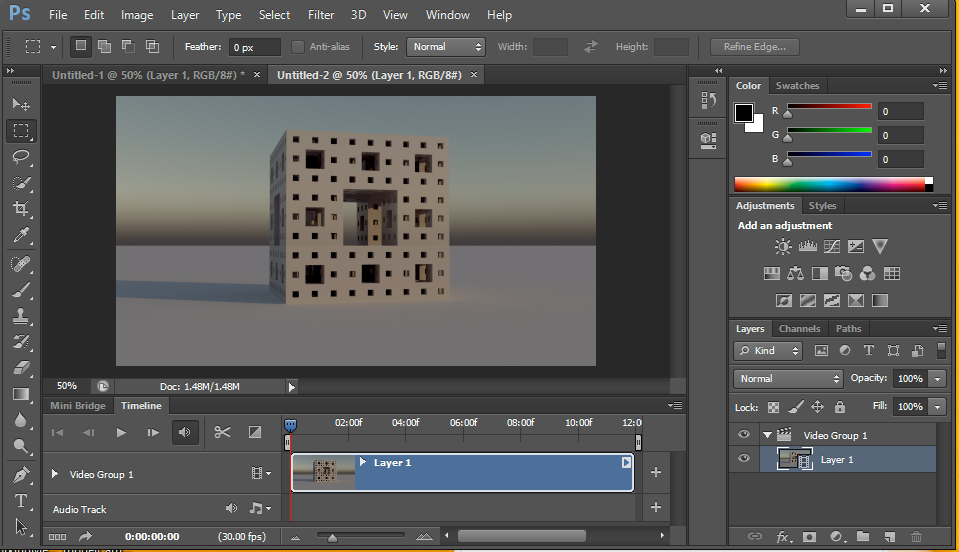
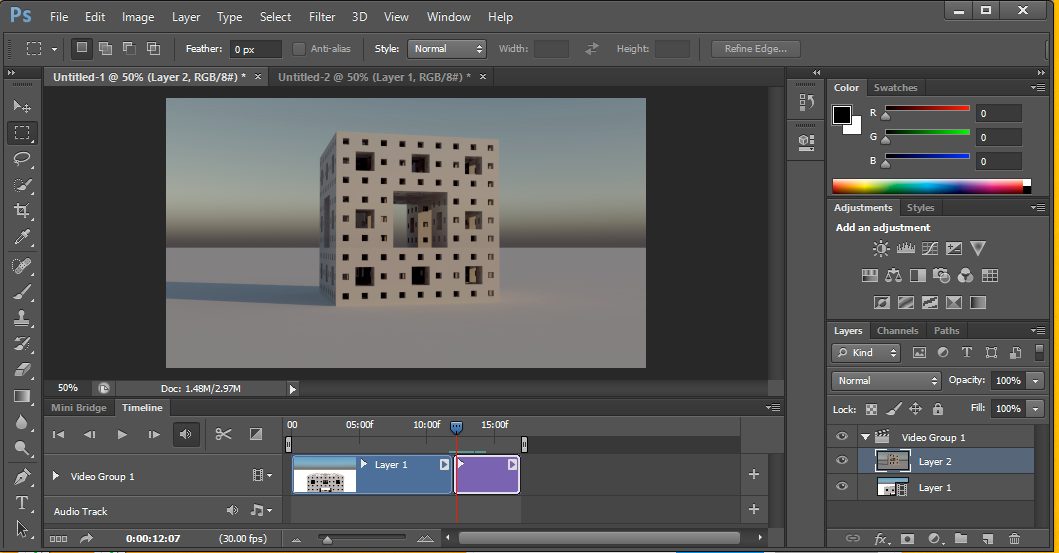
5. Chose “Video Group 1” on the left of the video track, and then the Photoshop the menu item sequence “Select/Select All”, to copy the track.
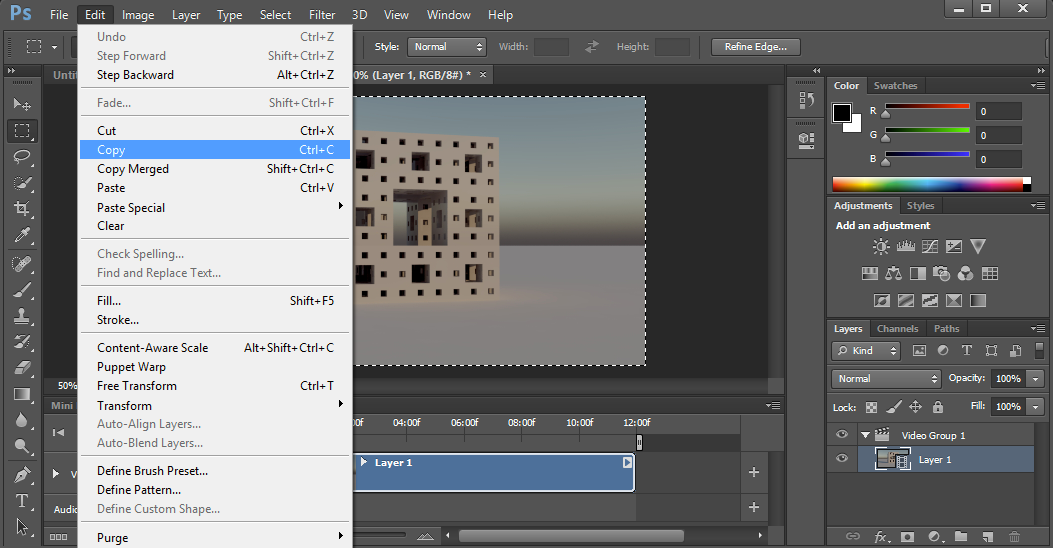
6. Use the Photoshop menu “Edit/Paste” the second video track onto the right side of the first video track used for the first import sequence in order to created the two videos in sequence. Repeat this process for any additional sequences you wish to add to the video track.
7. Use the menu item :File/Export/Rendered” to render video to a single file “mp4” video movie format (or alternative format).
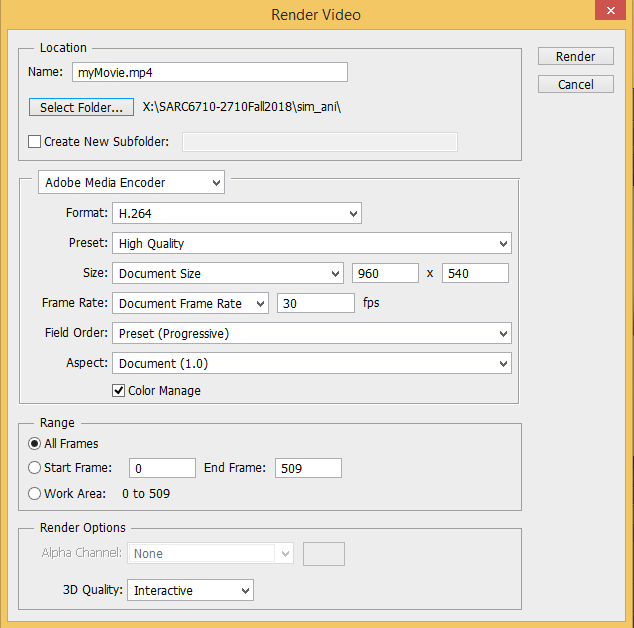
8. With the file formatting dialog box that appears, select the export location folder and choose a filename with the “mp4” format extension. The other presets in the “Render Video” below are recommended, including Format “H.264” and the Present “High Quality”. The Document Size of “960 x 540” should be the same resolution as the original renderings. Select the “Render” button in the right hand corner to compile the “mp4” video. A “Progress” window will graphically display the progress towards completing the compilation.
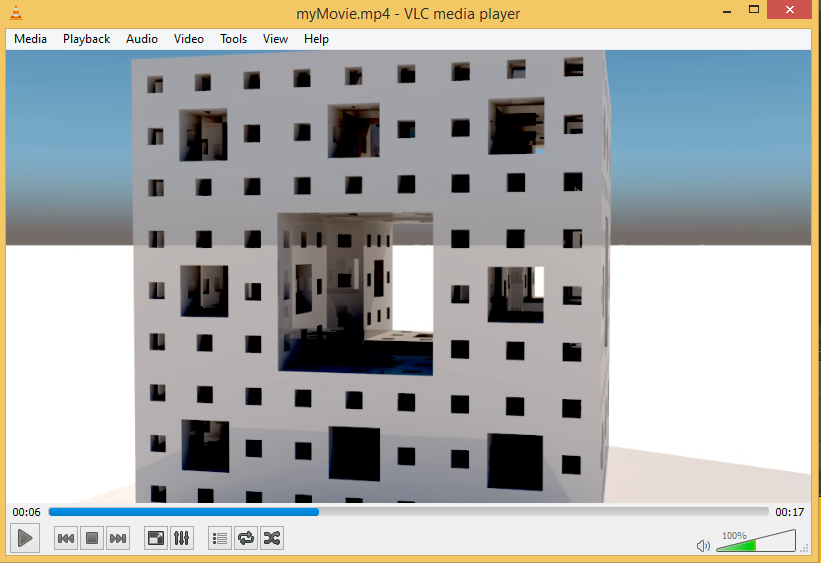
9. The video can now be viewed within any number of standard video players on Windows or Mac OS, such as the Windows VLC Player.
Note that other video editing options are available. Adobe Premiere is availalble on Adobe Creative Suite widely used within the School of Architecture. Quicktime Pro is also available is availble on Apple Computers in Campbell 105 and 107. These tools are beyond the scope of this tutorial, but may be easier to work with for those already familiar with them.
PART IV_D: QUICKTIME EDITING ON BIG SUR MAC OS
These notes provide links to Apple Documentation for Quicktime onthe Big Sur Apple OS operating system. See PART IV_B below for legacy methods with QuicKtime Pro and earlier operating systems. For a complete overview of Quicktime on Big Sur see the Quicktime Player User Guide.
Specific parts of interest include:
2. Add a Movie or Clip to an Existing movie
3. Exporting or Saving a Movie
5. Editing A Movie by Rearranging Movie Clips
PART V_E: QUICKTIME EDITING (LEGACY APPLE AND WINDOW OS), FILE FORMATS, CODECS
These notes are for legacy Apple OS systems with Quicktime Pro which is no longer compatible with Big Sur Apple OS (the most recent) . See PART IV_A for an alternative multi-platform Apple OS and WIndows OS method.
Go to Quicktime Pro, load individual frames at 30 fps and save to mov format (similar to workshop 1). (May not do this in workshop, depending upon time available.).
Quicktime Editing and Compiling. Workshop is based upon the following password protected * quicktime docs:
1. Import Image Sequence (p. 28)
2. Exporting Movie (p. 43 - 45)
3. Exporting to Mpeg 4 (p. 48)
* You can access these documents from any location on grounds or through VPN access through off grounds.