COMPUTER
AIDED
ARCHITECTURAL DESIGN
Workshop 18 Notes,
Week of December 5 , 2016
EXTRACURRICULAR: MESH SURFACES, PSEUDOCODE, PYRAMIDS, AND RECURSION
PART
1: Buiding a Polygon Mesh
As
already described in the previous set of workshop notes,a polygon mesh
can be described with respect two lists. (This
example is modified after a
rhinoscriptsyntax help example provided by McNeel Inc.).
First is the list of face vertices, and the second is an list of
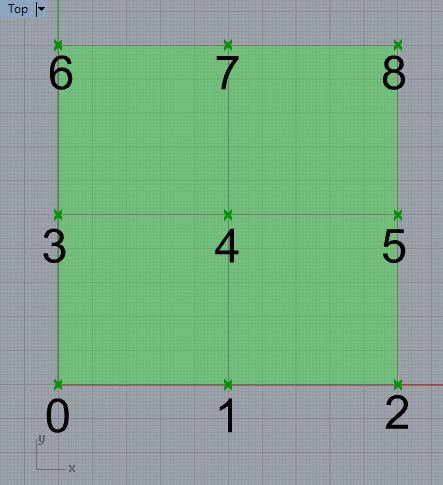
sub-lists for each face.For example, in the figure below there are nine
vertices, labelled 0 through
8. The first list is vertices for the points 0
through 8.
The second list is a set of sublists. The sublists describe which
vertices correspond to each face in counter clockwise order . For
example the sublist (0, 1, 4, 3) described indexe
to the
points 0, 1, 4, 3 below. The total list of faces is (0, 1,
4, 3), (1, 2, 5, 4), (3, 4, 7, 6) and (4, 5, 8, 7).
In
practic, a Python script to generate the polygon mesh surface would be
as follows. Note that the "faceVertices"
array
contains a list of index locations in the "vertices" array
for
each face of the polygon mesh.
import
rhinoscriptsyntax as rs
import Rhino as rh
#vertices of polygon mesh
pt0 = rh.Geometry.Point3d(0, 0, 0)
pt1 = rh.Geometry.Point3d(5, 0, 0)
pt2 = rh.Geometry.Point3d(10, 0, 0)
pt3 = rh.Geometry.Point3d(0, 5, 0)
pt4 = rh.Geometry.Point3d(5, 5, 0)
pt5 = rh.Geometry.Point3d(10, 5, 0)
pt6 = rh.Geometry.Point3d(0, 10, 0)
pt7 = rh.Geometry.Point3d(5, 10, 0)
pt8 = rh.Geometry.Point3d(10, 10, 0)
#create array of vertices
vertices = [pt0, pt1, pt2, pt3, pt4, pt5, pt6, pt7, pt8]
#create list of sublists to
determine each face
faceVertices = []
faceVertices.append((0,1,4,3))
faceVertices.append((1,2,5,4))
faceVertices.append((3,4,7,6))
faceVertices.append((4,5,8,7))
a = rs.AddMesh( vertices, faceVertices )
b = vertices #output variable b |
PART
2: A Pyramid
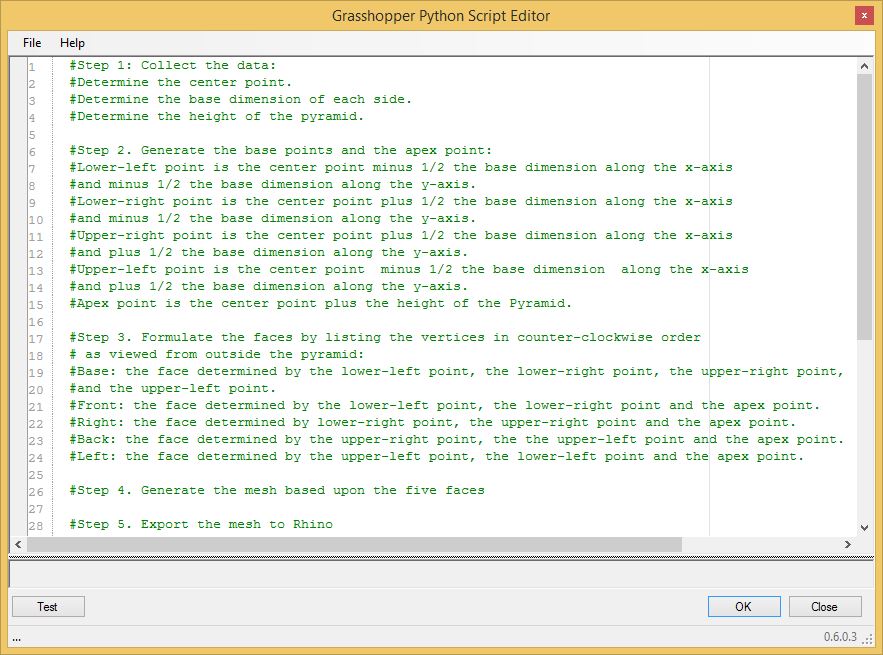
To create a Python
script to generate a
a four sided pyramid, the sequence of steps needed could first be
described in everyday english or so-called "pseudocode":
The next phase
of developing the script is to translate this sequence into a series of
comment lines in the python script itself, plus some other familiar
Python steps typically needed (loading the function library and
returning the result of the process.
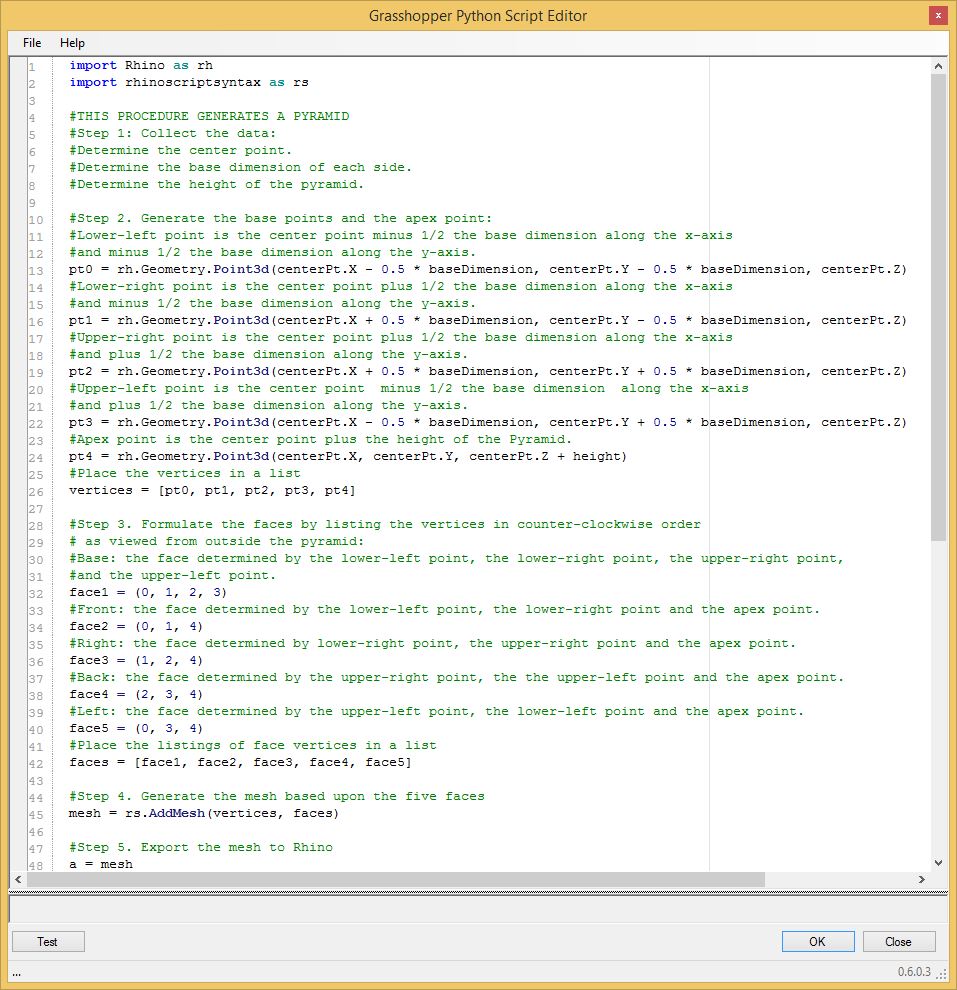
Next,
set into place the specific Rhino expressions and libraries needed
(mostly seen in previous tutorials). Note that an output variable
"a" is assigned the mesh in the Python script embedded in the
Grasshopper file createPyramid.gh.
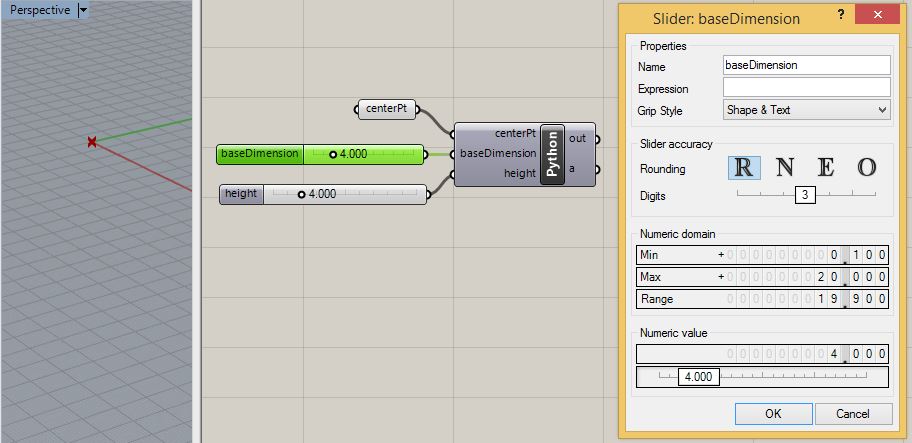
To
complete the Grasshopper Python script create a point parameter for the
center point of the pyramid, and sliders for base dimension and height
of the pyramid. Here, the center point is at the origin of
the
world XY plane, the the base dmensions and height are floating point
values that range from 0.1 to 20 feet.
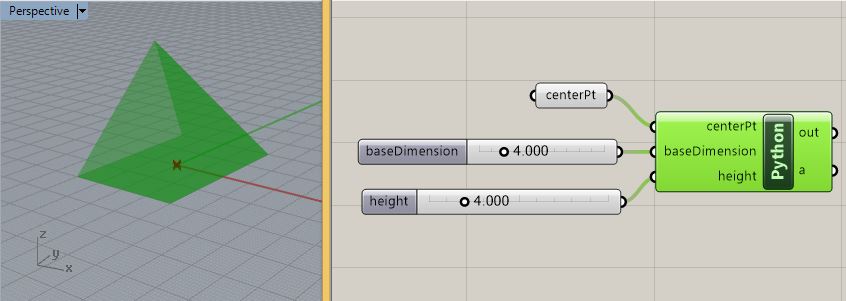
The resulting Pyramid appears in
the Python preview as follows:
Note
that if the centerPt input parameter is set to multiple points, then
Pyramids are in turn generated at the mulitple point locations. That is
, create a number of arbitrary points on the XYPlane of the world
coordinate system inside Rhino. Right -click on the
"centerPt"
parameter and choose the option to "clear values". Next right-click on
the "centerPt" parameter again, set it to "multiple points, and then
select the points inside Rhino.
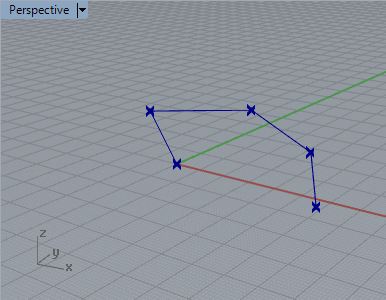
The result is the creation of a
pyramid at each point.

PART 3: Create
Interior Functions to the Script
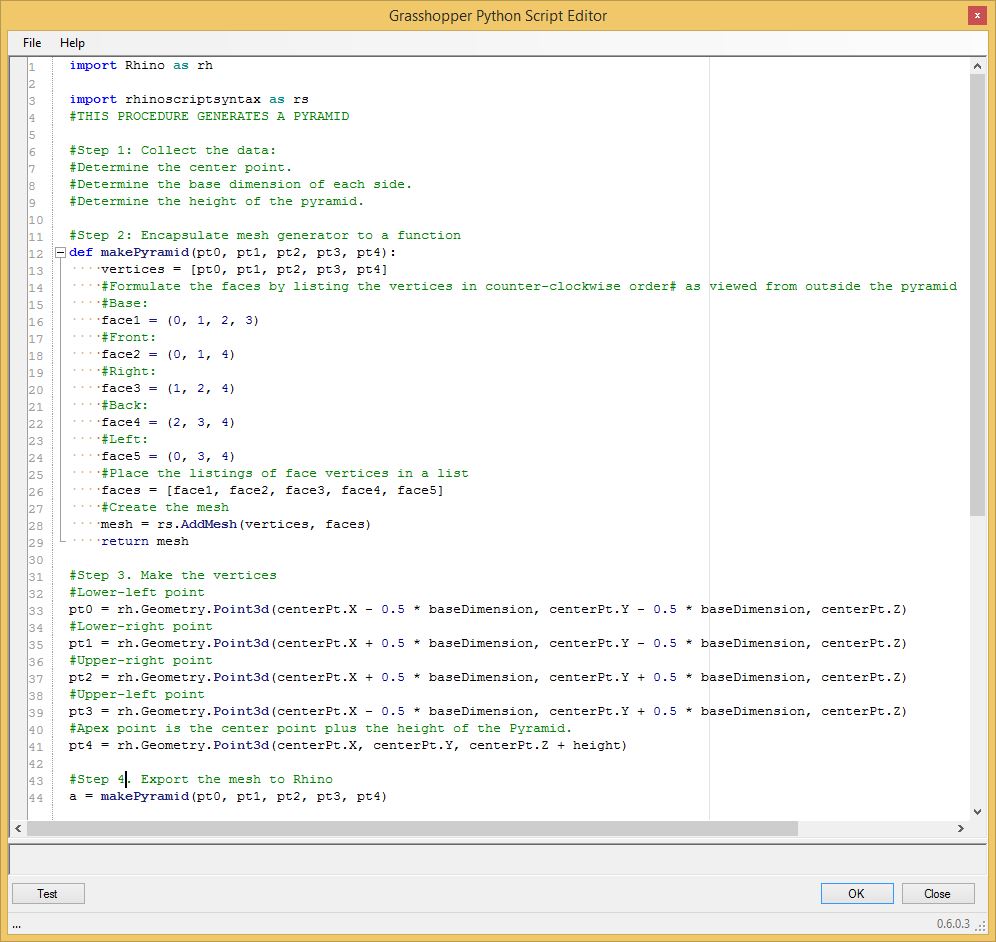
To
begin to modularize the script, the next step is to simplify comments,
and create a
function "makePyramid" as shown below that takes the five vertices as
input and
generates the polygonal mesh that forms the pyramid. This function is
embedded in the revised grasshopper file modifyPyramidWithInternalFunction.gh.
The function "makePyramid"
incorporates lines 26 through 45 of the original script of part 2 :
Next,
convert Step 3, lines 32 to 42 to a second function
"makePyramidFromCenterPt" that is embbed in the Grasshopper
script modifyPyramidWithInternalFunctions.gh.
This new function "makePyramidFromCenterPt"
calcuates the five PyramidPoints from the input parameters "centerPt,
baseDimension and height"in a revised step 3 below. It in turn
calls the program "makePyramid" to generate the pyramid mesh:
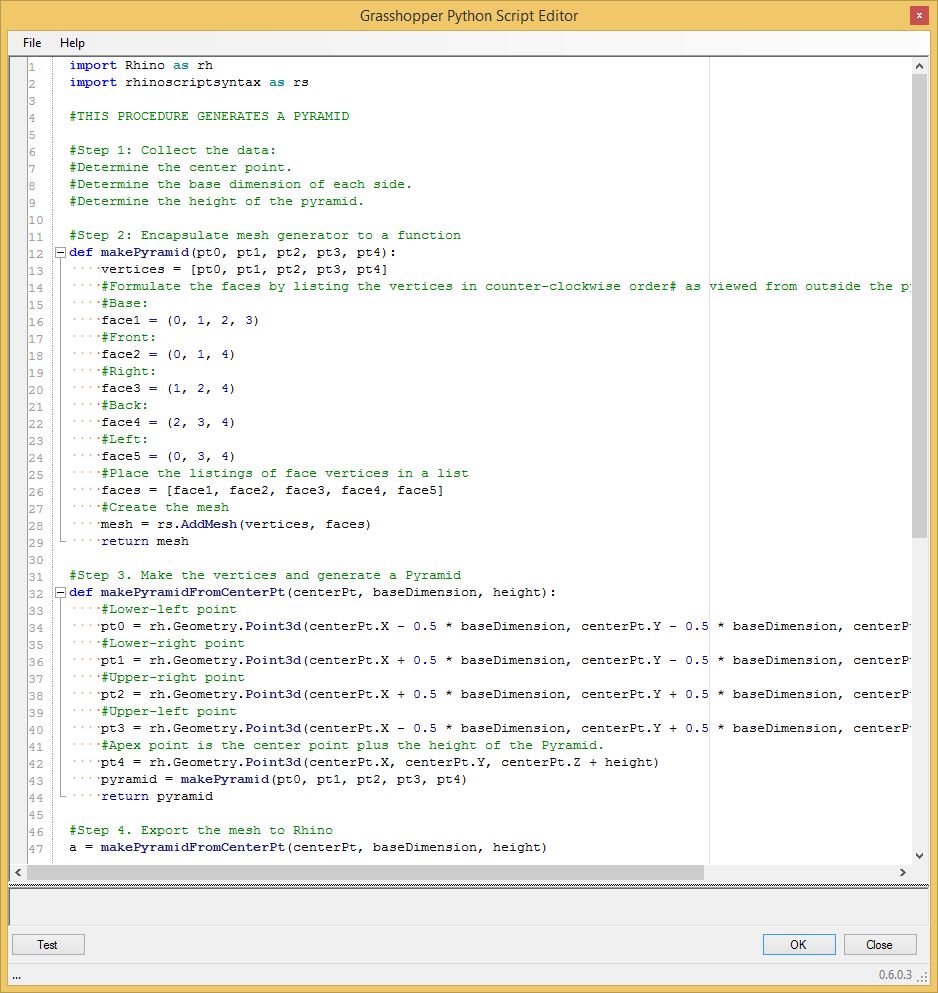
Note
that the script is now organized in a way that isolates the input
parameters "centerPt, baseDimension, and height" from the
internal functions "makePyramid" and "makePyramidFromPoints". If you
toggle the minus symbol on lines 12 and 32 the internal lines of each
function are hidden.
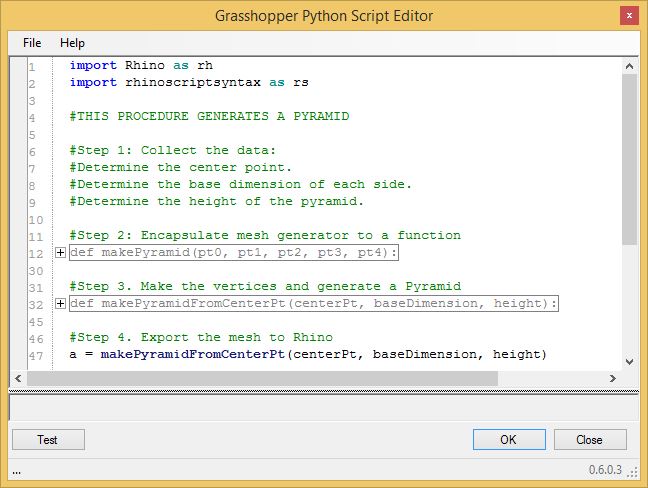
This
last view of the Python script makes its general organization a bit
simpler to understand from a kind of top down view. From this
perspective we can see that there are functions "makePyramid" in step 2
and "makePyramidFromCenterPt" in step 3 that take the
"centerPt", "baseDimension", and "height" and that
generate a
pyramid. The inner workings of steps 2 and 3 have been hidden away. All
we need to know about is are the parameters "centerPt, baseDimensinon,
and height", needed for the function call to
"makePyramamidFromPoints" on line 47.
Optional Reading Parts 4 and 5 _
Subdividing the pyramid into five pyramids and recursion.
PART 4: Add a new function that replaces the one pyramid
with five pyramids.
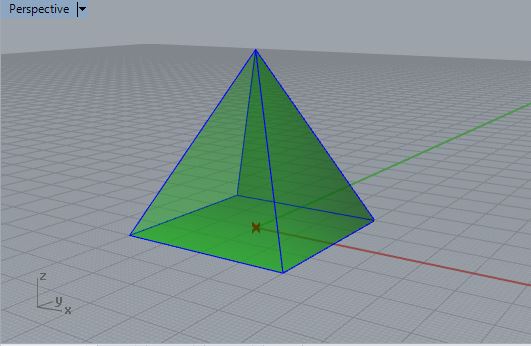
If you "bake" the output variable "a" of the Python script you get a
pyramid such as depticed below.
A
simple revision to the figure demonstrates how it can be sub-divided
into five
equal Pramids with four at its base and one formed by the upper half of
the original Pyramid.
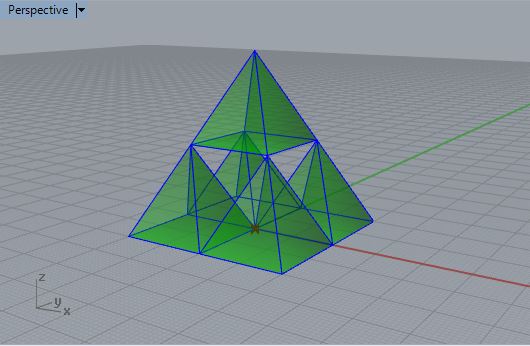
Note
that the dimensions of each of the smaller Pyramids is half the
baseDimension and half the height of the original Pyramid.
The center points of the base of the smaller pyramids are at the
following locations:
centerPtLowerLeft = the orginal centerPt minus 1/2 of the
new base dimension in the x axis and minus 1/2 of the new base
dimension in the y
axis.
centerPtLowerRight
= the orginal centerPt plus 1/2 of the new base dimension
in the x
axis and minus 1/2 of the new base
dimension in
the y axis.
centerPtUpperRight
= the orginal centerPt plus 1/2 of the new base dimension
in the
x axis and plus 1/2 of the new base
dimension in
the y axis.
centerPtLowerLeft
= the orginal centerPt minus 1/2 of the new base dimension
in the x
axis and plus 1/2 of the new base
dimension in
the y axis.
centerPtAppex
= the orginal centerPt plust the new height dimension in the z axis.
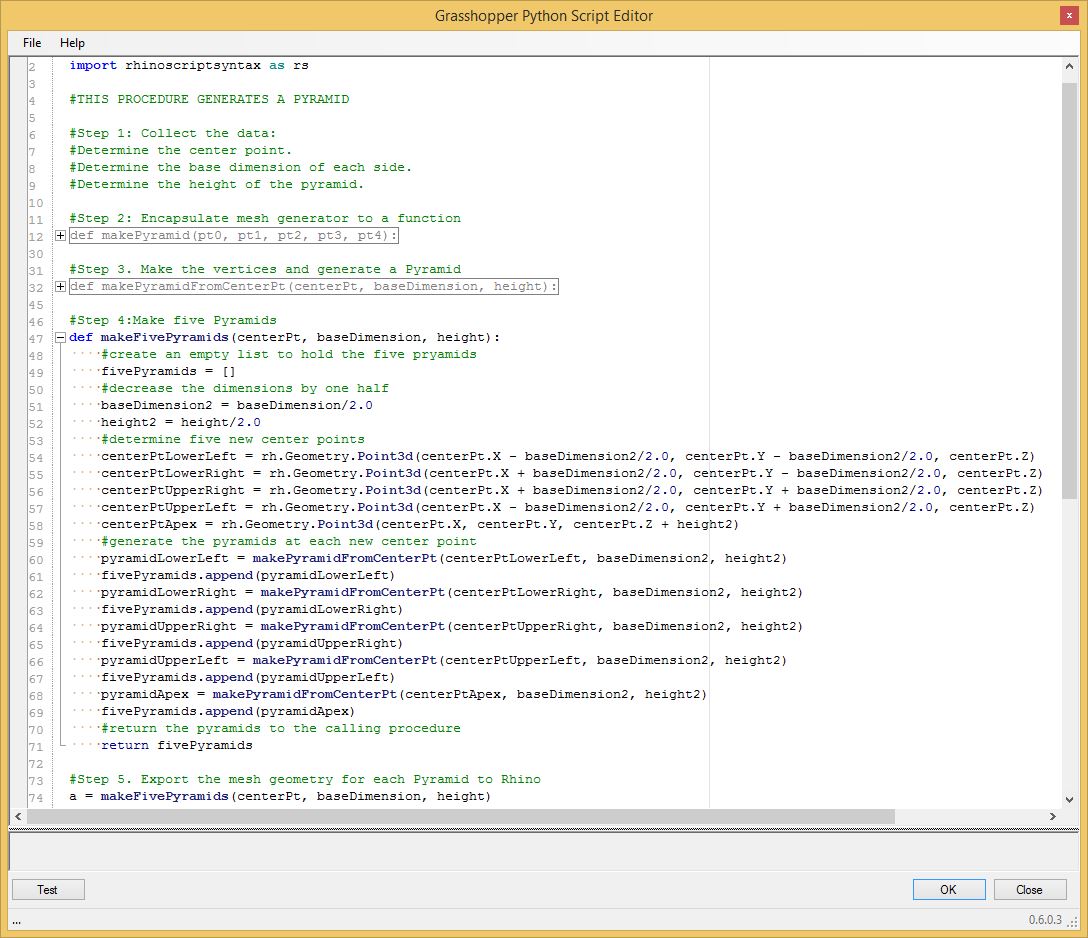
Accordingly, it's possible to modify the original Python
script
to add a new function "makeFivePyramids" with five new centerPoints.
This is incorporated into the file makeFivePyramids.gh
as
follows.
PART
5: Recursive Pyramids.
The
subdivision relationship between the original pyramid and the five new
pyramids can
be in turn used to generate even more pyramids. That is, it is possible
to create five new pyramids for each of the new
five pyramids for a total of 52 = 25 new
pyramids. In turn each of the 25 pyramids can be replaced
with five pyamids for a total of 53
= 125 pyramids. Moreover,
each of the `25 pyramids can be replaced with five pyamids for a total
of 54
= 625 pyramids/ These
observations begin to recognize a self-similar
recursive relationships beween the larger pyramid and the five smaller
pyramids at half of its size.

50
= 1 pyramid in blue wireframe and also in
green preview display at recursion level 0

51
= 5 pyramidsin blue wireframe and also
in green preview at recursion level 1
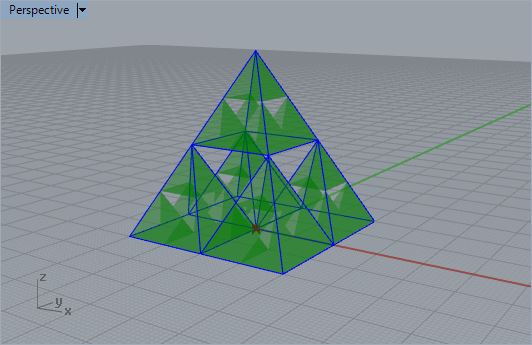
51
= 5 pyramids blue wireframe with 52 =
25 pyramids
in green preview at recursion level 2
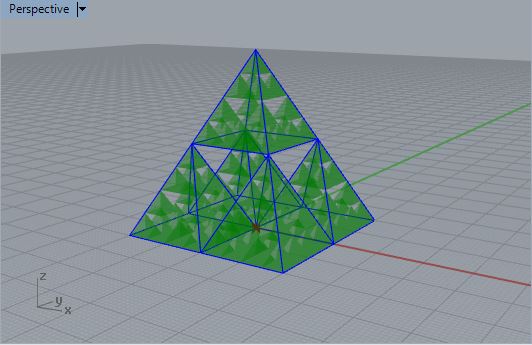
51
= 5 pyramids blue wireframe with 53 =
125 pyramids in
green preview at
recursion level 3
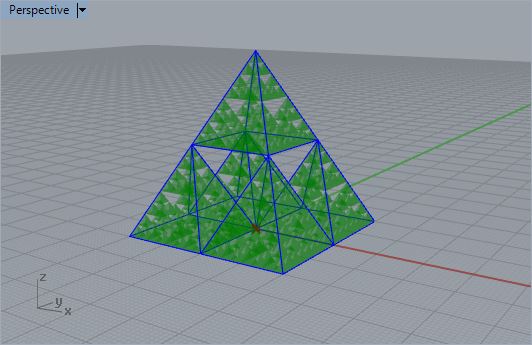
51
= 5 pyramids blue wireframe with 54 =
625 pyramidsin
green preview
at recursion level 4
To achieve a recursive process, first add a "recursion"
integer slider that ranges value from 0 to 7.
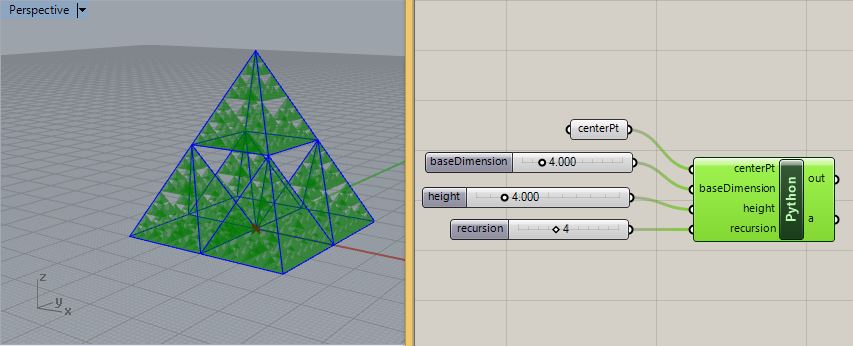
The increasing numbers of pyramids are generated by revising parameters
for centerPt,
baseDimension and height in each step of the recursion process. When
the final step in the recursive process is completed, then the final
set of center points with reduced basedimensions and heights can be
used to create 5, 25, 125 or more pyramids. That is, for a given number
of recursive steps N,
the recursive process can be used to generate 5N
pyramids.
(Note that individual computer memory and performance vary and so the
maximum recursion level is between 5 and
9).
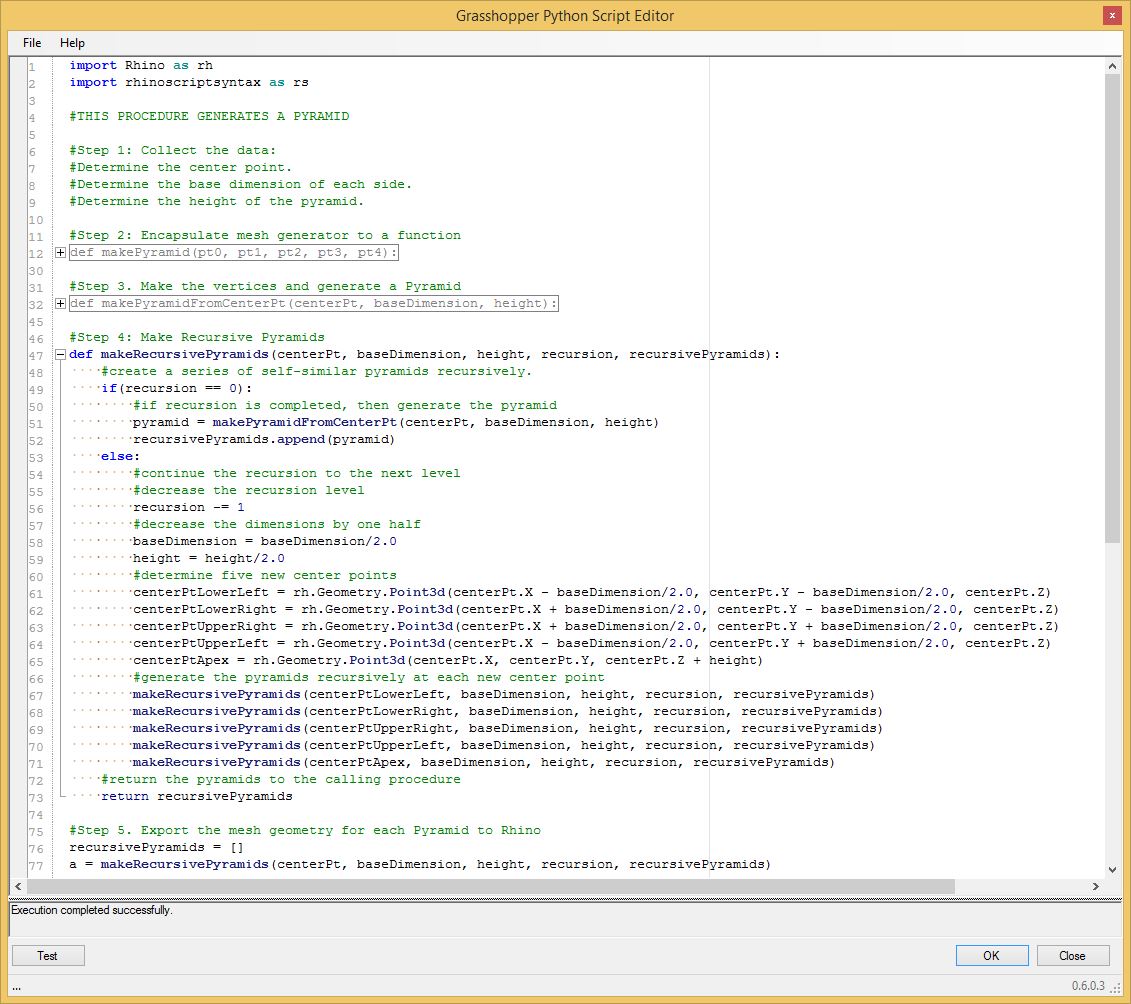
In the script incorporated into the Grasshopper file makeRecursivePyramid.gh shown below, steps 1, 2, and 3 are unchanged from the one
created for the case of generating the five pyramids in part 4 above.
Now, however, steps #4 and #5 have been changed.
5.1. In step #4, the recursive function "makeRecursive Pyramids has been
created for #step 4.
5.2 The "if" statement in line 49 tests the
recursion level with the statement "if (recursion == 0)".
5.3 If the "if" statement is true (i.e., the recursion level is equal to 0), then lines 50 and 51 are executed, and
5.3.1
the function creates a pyramid
5.3.2 the
pyrramid is append to the list of
"recursivePyramids".
5.4 If
the "if" statement
is not true (i.e., the recursion level is greater than 0)
then, then the "else" clause of line 53 is executed where
5.4.1 the recursion level is decremented by 1
5.4.2 the function prepares the next set of
parameters for five smaller pyramids
5.4.3 the function calls itself for each of the five smaller
pyramids.
5.5 In step #5, the call to the function
"makeRecursivePyramids containts two new parameters.
5.5.1 the parameter "recursion" determines how many recursion
levels to do
5.5.2 the
list "recursivePyramids" is used to store the set of pyramids that are
recursively created
