
The options are excerpted from the Rhino McNeel web sites above.
COMPUTER
AIDED
ARCHITECTURAL DESIGN
Workshop 14 Notes Supplement, Week of November 17 , 2025
BASIC ANIMATION IN RHINO WITH RHINO RENDER
These notes supplements the introduction to basic animation technique with V-Ray Animation may be rendered in either Rhino Render or V-Ray. During the adjpc workshop we followed the techniques described in Rhino's documentation for animation commands. We also used OpenShot previously to compile individual animation frame into a movie sequence . Alternative options to editing video sequences, such as Chaos Player, Adobe Premiere and Quicktime Pro have been noted previously.
Summary
Rhino Method method we used in discussion session workshop is summarized here. The details are described in three parts beginning with Part I below.
1. Create one or more animations rendered in either Rhino Render or V-Ray (the techniques are the same, except for Sunlight animation - see part I below).
2. Store the frames in separate folders on the desktop for each animation (e.g., folders "desktop\sunStudy", "desktop\walkThrough", etc.)
3. When rendering the files from Rhino, specify that the first frame number begins with the number 0000 (e.g., walk0000.jpg or sunStudy0000.jpg within each folder).
4. Launch the Photoshop software to load multple frame squences and combine them into a single mp4 video.
The
documentation here is in 2parts. Part I: Create The Animations, Part
II: Import the Animation Sequences into Photoshop and Compile the Video
1. Choose the rendering option of either "Rhino Render" or "V-Ray".
2. The animation techniques here are limited to camera movement and sunlight movement. Sunlight animation is more easily realized with Rhino Render than with V-Ray. V-Ray sunlight animation requires the use of additional less well documented rendering techniques. A method using the V-Ray plugin to Grasshopper is posted as workshop notes 15. However, with the this recent implementation of a V-Ray plugin to Grasshopper, it seems an reasonable to assume that it may be just a question of time before it should be able to handle multiple frame output. In the meantime, it's recommended that sunlight animation be limited to Rhino Render or that workshop notes 15 be used to generate sunlight animation by creating it one frame at a time. Note , if you wish to use both Rhino Render and V-Ray, it may be helpful to do them separately on two separate copies of the Rhino file. That is, one copy should be used to setup animations in Rhino Render. A second copy should be used to setup animations V-Ray. Note also that VRay rendering times can be signficantly longer.
3. Go to the Rhino Render Tab just above the view window and select the animation palette/celluloid strip.
The options are excerpted from the
Rhino McNeel web sites above.
Options and Documentation Links
Animate sun movement through a specified calendar day.
Animate sun movement through a specified week, month, or year.
Animate the camera and target movement along a path curve.
Animate the camera and target movement along separate path curves.
Rotate a view 360 degrees around the target.
4. To preview an animation, open the Animation Preview viewbar (also excerpted from the Rhino McNeel documentation above).
In
the toolbar, click the preview
animation button  .
.
The viewport will change showing a preview of the animation. You cannot adjust the speed of the preview playback.
Press "Esc" to stop.
PlayAnimation
Play
the animation preview.
 ViewFirstFrame
Go
to the first animation frame.
 ViewFrameNumber
Go
to the specified animation frame number.
 ViewLastFrame
Go
to the last animation frame.
 ViewNextFrame
Go
to the next animation frame.
 ViewPreviousFrame
Go to the previous animation frame.
5. For example, create a camera motion path and a target path. This method works equally well with selecting Rhino Render or VRay. With VRay do some still renderings first and adjust the lighting levels to adjust to the exposure needed.
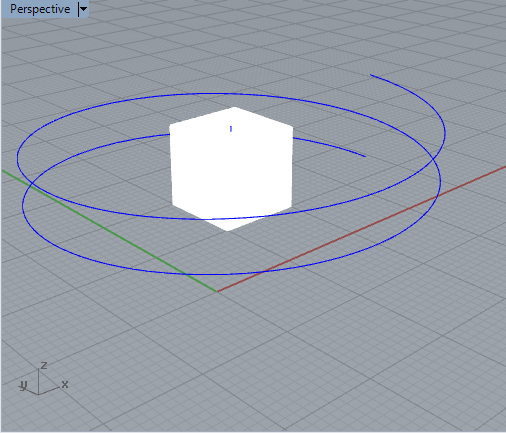
Draw two curves to represent the camera path and the motion path respectively. Here the curves are a helix for the camera path and a straight vertical line for the target path.
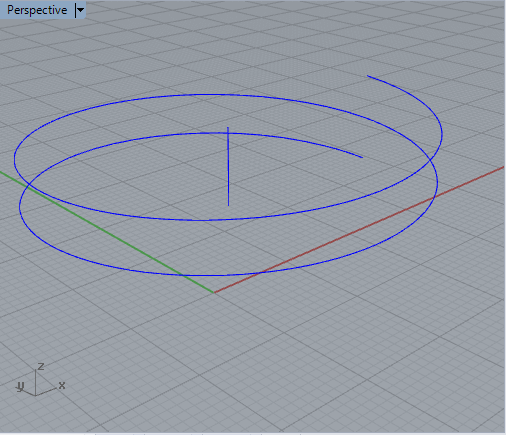
These paths were developed in relationship to a fractal cube subject of the animation and juxaposed as shown in the following image.
Select the Set
Path Animation tool  and pick
the beginning of the camera path animation on the lower end of the helix curve and then the beginning of
the target path on the lower end of the vertical line.
and pick
the beginning of the camera path animation on the lower end of the helix curve and then the beginning of
the target path on the lower end of the vertical line.
Set
the number of frames, image file format, render mode, and
image
name prefix (e.g, the prefiix "animation" for the series for animation
frames "animation0000.jpg", "animation0001.jpg", etc.) and
select
"OK".
Preview the animation using the PlayAnimation button.'


early part and later part of of camera path and target path sequence in VRay
6. Or, for example, to setup a one day sun animation with Rhino Render (VRay is a bit more complex *):
Select the Sun tool  and
specify the following information:
and
specify the following information:
Latitude (-90 to 90) _Specifies the model's latitude location.
Longitude (-180 to 180) _Specifies the model's longitude location.
North angle (clockwise from y-axis) _Specifies the model's north direction.
Date _Specifies the date.
Calendar _Click to select a date from calendar
Start time _Specifies the start time.
End time _Specifies the end time.
Minutes between frames _Specifies time interval.
File type _Select supported file type.
Capture method _Select from RenderFull using the current renderer or any viewport display style.
Viewport _Select viewport name.
Animation
name _The name for the animation file set (e.g., "sun0000.jpg")


beginnng of sun study sequence later part of sun study sequence
7. To record the animation , in the Animation toolbar, click
the Record
animation red button with a black dot. ![]()
At the Rhino Command Line Prompt Press
But first fill in the values for these options that are requested at the command prompt:
TargetFolder _Specifies the folder for saving the
animation frames
RunAnimation _Runs the animation and creates the rendered frames.
Press Enter to start recording. Press Esc to stop.
See workshop notes 12.


